TRENDnet TV-IP851WIC User's Guide - Page 7
Installation Option Description*, Wired Connection, DC 12V 1.25A - cloud
 |
View all TRENDnet TV-IP851WIC manuals
Add to My Manuals
Save this manual to your list of manuals |
Page 7 highlights
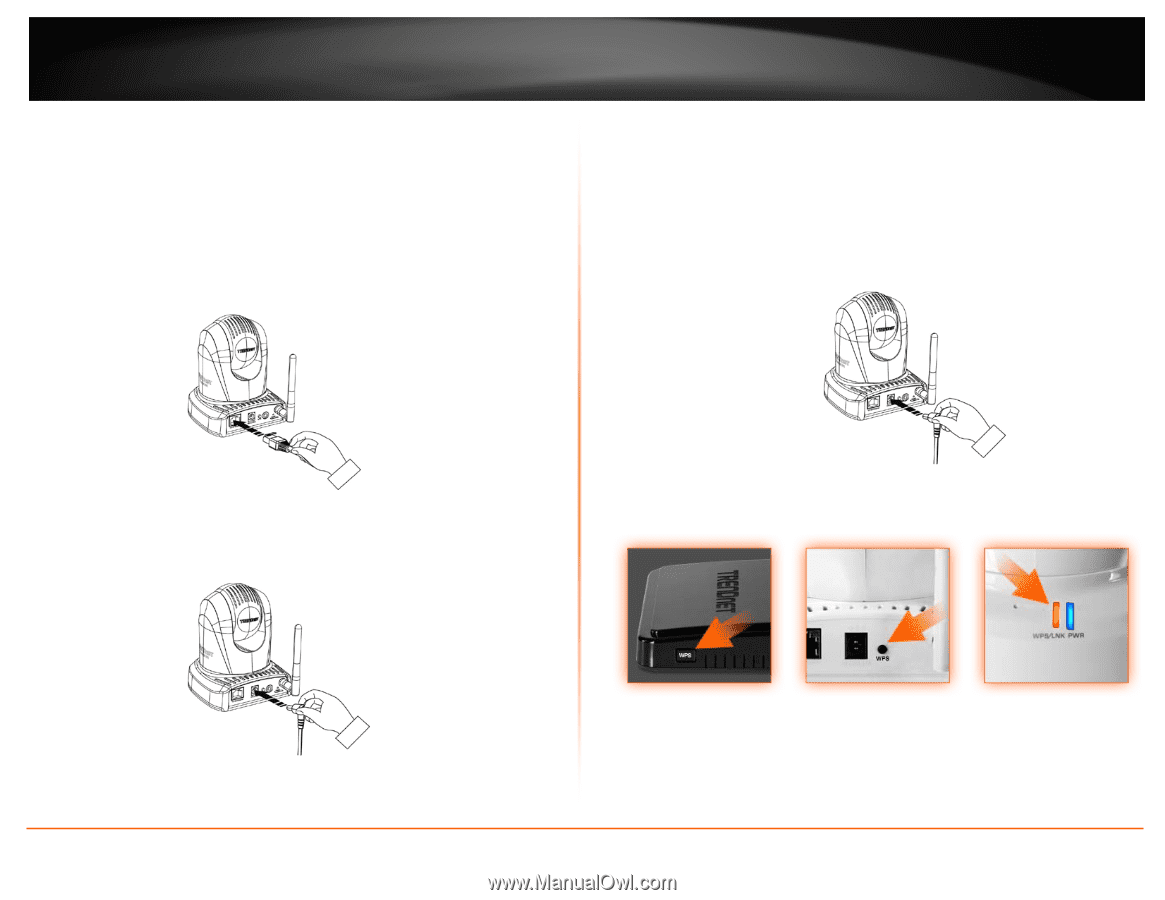
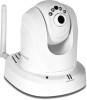
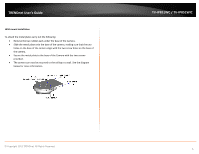
TRENDnet User's Guide Installation Option Description* Wired Connection 1. Connect the Ethernet Cable If you intend to use the network camera as a wired device, connect one end of the included Ethernet cable into the Ethernet port on the rear panel of the camera and connect the other end to an available port on your network. If you prefer to use the camera on a wireless network, see below for instructions on connecting the power adapter. TV-IP851WC / TV-IP851WIC WPS Connection An alternative method of connecting your camera to your network is by using WPS. WPS is a quick, simple and secure method of adding devices to a network. If you have a router which supports WPS follow the steps below, otherwise, please use the wired mode of setting up the camera. 1. Attach the Power Supply 2. Attach the Power Supply Attach the included power supply to the DC 12V 1.25A receptor on the rear panel of the camera and then connect it to a wall outlet or power strip. A blue LED will light up under the lens indicating that the camera has power. 2. Press the WPS button on your wireless device then press the WPS button on the camera. © Copyright 2013 TRENDnet. All Rights Reserved. *The Install wizard CD inside the package box will guide you step-by-step of wired or wireless options with the TRENDnet Cloud Service of installation; please refer to the page 8. 4
-
 1
1 -
 2
2 -
 3
3 -
 4
4 -
 5
5 -
 6
6 -
 7
7 -
 8
8 -
 9
9 -
 10
10 -
 11
11 -
 12
12 -
13
-
14
-
15
-
16
-
17
-
18
-
19
-
20
-
21
-
22
-
23
-
24
-
25
-
26
-
27
-
28
-
29
-
30
-
31
-
32
-
33
-
34
-
35
-
36
-
37
-
38
-
39
-
40
-
41
-
42
-
43
-
44
-
45
-
46
-
47
-
48
-
49
-
50
-
51
 |
 |