Thermador ME301YP Installation Instructions
Thermador ME301YP Manual
 |
View all Thermador ME301YP manuals
Add to My Manuals
Save this manual to your list of manuals |
Thermador ME301YP manual content summary:
- Thermador ME301YP | Installation Instructions - Page 1
Installation GUIDE Built-in oven ME301YP ME302YP THERMADOR.COM - Thermador ME301YP | Installation Instructions - Page 2
en-us 2 - Thermador ME301YP | Installation Instructions - Page 3
of the power outlet 14 Routing the electrical conduit cable 14 Installing a four-wire connection 14 Installing a three-wire connection 15 Testing the operation 15 Customer support 15 Contacting customer support 15 Product number (E-Nr.), production number (FD) and consecutive numbering (Z-Nr - Thermador ME301YP | Installation Instructions - Page 4
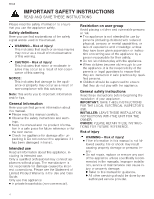
Care Guide. INSTALLER: LEAVE THESE INSTALLATION INSTRUCTIONS WITH THE UNIT FOR THE OWNER. OWNER: PLEASE RETAIN THESE INSTRUCTIONS FOR FUTURE REFERENCE. Risk of injury WARNING ‒ Risk of injury! ¡ If the information in this manual manuals. Improper installation, service or maintenance can cause injury or - Thermador ME301YP | Installation Instructions - Page 5
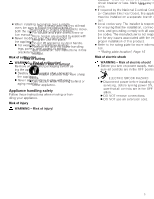
handle. ▶ Remove the door for easier handling and installation. See instructions in this manual. Risk of cutting WARNING ‒ Risk of cutting! the OFF position. ¡ ELECTRIC SHOCK HAZARD ▶ Disconnect power before installing or servicing. Before turning power ON, be sure that all controls are in - Thermador ME301YP | Installation Instructions - Page 6
electrical cord, be sure all controls are in the OFF position. ¡ Before installing, turn power OFF at the service panel. ▶ Lock service panel to prevent power from being turned ON accidentally. ¡ GROUNDING INSTRUCTIONS This appliance must be grounded. ▶ Grounding reduces the risk of electric shock - Thermador ME301YP | Installation Instructions - Page 7
begin Read Beforeyoubegin these instructions before you begin to install your appliance. Combination installations For combination installations with other Thermador products (i.e. cooktop over oven, side-by-side ovens, etc.), refer to the Approved Combination Guide located in the manual set or on - Thermador ME301YP | Installation Instructions - Page 8
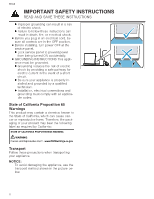
dimensions ¡ The cabinet base must be flat and capable of supporting the weight of your unit. Refer to the "appliance weight max. 2" (51mm). 5/8 30" Single oven flush mount installa- tion Flush installation requires two side cleats to be attached inside the cabinet frame, recessed from the - Thermador ME301YP | Installation Instructions - Page 9
Read here for appliance and cabinet dimensions for 30"Doubleovendimensions 30" double ovens. 30" Double oven appliance dimensions 30" Single oven under-counter installation *Includes ¾" (19 mm) base plate. **The junction box may be located to the left or right of the unit within reach of the - Thermador ME301YP | Installation Instructions - Page 10
of the unit within reach of the flexible conduit. Control panel overlap: min. 3/8" (10mm) to max. 2" (51mm). 30" Double oven flush mount installation Flush installation requires two side cleats to be attached inside the cabinet frame, recessed from the front. Top view bottom hinged door Prior to - Thermador ME301YP | Installation Instructions - Page 11
ovens to reduce the weight of the appliance and to facilitate its handling and installation. For double ovens with bottom hinge doors you can remove both oven doors. WARNING Risk of injury! Failure to follow these instructions when removing the oven door may lead to personal injury or product damage - Thermador ME301YP | Installation Instructions - Page 12
or scratches. Installing the ovens into the cabinet Installing the ovens into the cabinet Follow these instructions to install your appliance in is not crimped between the oven and the cabinet back wall. If necessary, guide the electric conduit cable into the wall of the cabinet access hole so it - Thermador ME301YP | Installation Instructions - Page 13
3. Slide the hinges into the slots as far as they will go and lower the door straight down . Installing the ovens into the cabinet en-us The angle of the door may need to be adjusted slightly to allow the hinges to engage properly - Thermador ME301YP | Installation Instructions - Page 14
connection Electrical connection Electrical connection Read Electricalconnection these instructions to safely connect your appliance to the electrical supply. Electrical requirements Make sure your electrical installation supports the following requirements. This appliance must be supplied - Thermador ME301YP | Installation Instructions - Page 15
firm that the door locks when the lock icon appears in the display. Customer support Customer support We're Customersupport happy to assist you with cleaning and care instructions, accessories, troubleshooting, scheduling service visits and more. Browse our online resources, such as FAQs and How-to - Thermador ME301YP | Installation Instructions - Page 16
en-us Customer support Filters, cleaners, accessories and parts Filters, descalers, cleaners, griddles, parts, and more can be purchased at Thermador online. ¡ USA: www.store.thermador.com/us ¡ us at the phone number above, or view instructions here: www.homeconnect.com/us/en/help-support/set-up. 16 - Thermador ME301YP | Installation Instructions - Page 17
de la prise de courant 28 Acheminement du câble de conduit électrique 28 Installation d'une connexion à quatre fils 29 Installation d'une connexion à trois fils 29 Opération d'essai 29 Support à la clientèle 30 Contacter le support à la clientèle 30 Numéro de série (E-Nr.), numéro de - Thermador ME301YP | Installation Instructions - Page 18
. Consignes générales de sécurité Lisez ces instructions avant de commencer l'installation de votre appareil. IMPORTANT : CONSERVEZ CES INSTRUCTIONS POUR L'UTILISATION DE L'INSPECTEUR ÉLECTRIQUE LOCAL. INSTALLATEUR : LAISSER CES INSTRUCTIONS D'INSTALLATION AVEC L'UNITÉ POUR LE PROPRIÉTAIRE. PROPRI - Thermador ME301YP | Installation Instructions - Page 19
d'utilisation. ▶ Toutes les autres réparations doivent être effectuées par un prestataire de services agréé. ¡ Lorsque vous installez une table de cuisson sur un seul four, veillez à suivre les instructions des manuels d'installation du four et de la table de cuisson. ¡ Ne jamais modifier ni altérer - Thermador ME301YP | Installation Instructions - Page 20
que toutes les commandes sont à la position OFF (Arrêt). ¡ Avant l'installation, couper l'alimentation au panneau de service. ▶ Verrouiller le panneau de service pour empêcher que l'alimentation ne soit rétablie par accident. ¡ INSTRUCTIONS DE MISE À LA TERRE Cet appareil électroménager doit - Thermador ME301YP | Installation Instructions - Page 21
Lisez Avantdecommencer ces instructions avant de commencer l'installation de votre appareil. Installations combinées Pour les installations combinées avec d'autres produits Thermador (c.-à-d. table de cuisson au-dessus du four, fours côte à côte, etc.), reportez-vous au Guide de combinaison approuv - Thermador ME301YP | Installation Instructions - Page 22
four. ¡ La base de support doit être bien fixée au sol ou à l'armoire et doit être de niveau. ¡ L'ouverture de l'armoire doit être d'aplomb et la base doit être plate et de niveau. ¡ Lors de l'installation d'un four à charnière latérale, laisser un dégagement d'au moins 10 po (254 mm) pour - Thermador ME301YP | Installation Instructions - Page 23
Lisez ici les dimensions de l'appareil et de l'armoire Dimensionsdufourdoublede30po pour les fours doubles de 30 po. Dimensions de l'appareil à four double de 30 po Installation sous le comptoir d'un four simple de 30 po * Comprend un socle de ¾ po (19 mm). ** La boîte de jonction peut être situ - Thermador ME301YP | Installation Instructions - Page 24
à la portée du conduit flexible. Chevauchement du panneau de commande : min 3/8 po (10 mm) à max 2 po (51 mm). Installation affleurante d'un four double de 30 po Une installation affleurée nécessite la fixation de deux taquets latéraux à l'intérieur du cadre de l'armoire, en retrait par l'avant. Vue - Thermador ME301YP | Installation Instructions - Page 25
l'appareil et faciliter sa manipulation et son installation. Pour les fours doubles avec portes Risque de blessure ! Le non-respect de ces instructions lors du retrait de la porte du four éviter toute blessure causée par l'enclenchement soudain du support de charnière, s'assurer que les deux leviers - Thermador ME301YP | Installation Instructions - Page 26
pas la porte sur sa poignée. Cela pourrait provoquer des bosses ou des rayures. Installation des fours dans l'armoire Installation des fours dans l'armoire Suivez ces instructions pour installer votre appareil dans Installationdesfoursdansl'armoire l'armoire. MISE EN GARDE Risque de blessure ! Il - Thermador ME301YP | Installation Instructions - Page 27
s'ouvre d'environ 7 po (18 cm). 3. Faites glisser les charnières dans les fentes aussi loin que possible et abaissez la porte vers le bas . Installation des fours dans l'armoire fr-ca 5. Poussez les loquets à levier sur les deux charnières vers le haut et l'avant, jusqu'à ce qu'ils s'enclenchent - Thermador ME301YP | Installation Instructions - Page 28
Raccordement électrique Raccordement électrique Lisez Raccordementélectrique ces instructions pour connecter votre appareil en toute sécurité à l'alimentation électrique. Exigences électriques Assurez-vous que votre installation électrique prend en charge les exigences suivantes. Cet appareil - Thermador ME301YP | Installation Instructions - Page 29
permettent pas la mise à la terre par le biais d'installations de circuit neutres et neuves (NEC 1996), de maisons 5 2 6 Opération d'essai fr-ca Installation d'une connexion à trois fils 1. IMPORTANT: Use après avoir terminé les étapes d'installation. 1. Mettez sous tension au disjoncteur. - Thermador ME301YP | Installation Instructions - Page 30
les Supportàlaclientèle instructions de nettoyage et d'entretien, les accessoires, le dépannage, la planification des visites de service et tique", Page 30 ¡ États-Unis : 800-735-4328 www.thermador.com/support ¡ Canada : 1-800-735-4328 www.thermador.ca Numéro de série (E-Nr.), numéro de fabrication - Thermador ME301YP | Installation Instructions - Page 31
Tabla de contenidos INSTRUCCIONES DE SEGURIDAD IMPORTANTES 32 Definiciones de seguridad 32 Información general 32 Uso previsto 32 Restricciones relativas a grupos de usuarios 32 Instrucciones generales de seguridad 32 Seguridad de manejo del aparato 33 Códigos y normas de seguridad 33 - Thermador ME301YP | Installation Instructions - Page 32
es responsable de los daños que pueda causar una conexión incorrecta. Véase la declaración de garantía limitada del producto en manual. Utilizar este aparato únicamente: ¡ en instalaciones domésticas (no comerciales). Restricciones relativas a grupos de usuarios Es preciso evitar todo riesgo para - Thermador ME301YP | Installation Instructions - Page 33
servicios de mantenimiento autorizado. ¡ Al instalar una placa de cocción sobre un horno individual, es preciso asegurarse de seguir las instrucciones de los manuales de instalación tanto del horno como de la placa de cocción. ¡ No modificar ni alterar la construcción del aparato. ▶ Por ejemplo, no - Thermador ME301YP | Installation Instructions - Page 34
es-mx INSTRUCCIONES DE SEGURIDAD IMPORTANTES LEA Y CONSERVE ESTAS INSTRUCCIONES Seguridad eléctrica Seguir estas instrucciones de seguridad para evitar riesgos de descarga eléctrica. ¡ Instalador: es preciso mostrar al propietario la ubicación del breaker del circuito o del fusible. Marcarla para - Thermador ME301YP | Installation Instructions - Page 35
es-mx INSTRUCCIONES DE SEGURIDAD IMPORTANTES LEA Y CONSERVE ESTAS INSTRUCCIONES 35 - Thermador ME301YP | Installation Instructions - Page 36
. Instalaciones combinadas Para instalar el aparato junto a otros productos de Thermador (por ejemplo, instalar placas de cocción sobre el horno, instalar pueden encontrar en la guía sobre combinaciones aprobadas incluida en el manual o en nuestro sitio web. Partes incluidas Después de desembalar el - Thermador ME301YP | Installation Instructions - Page 37
Requisitos de ubicación Antes de comenzar con el proceso de montaje, es preciso asegurarse de que la ubicación de montaje cumpla con los siguientes requisitos. ¡ Cuando se instala un horno al final de un gabinete en batería, junto a una pared perpendicular o a una puerta del gabinete, se aconseja - Thermador ME301YP | Installation Instructions - Page 38
es-mx Medidas para hornos individuales de 30" Horno individual de 30": instalación tradicional Vista lateral Horno individual de 30": instalación bajo cubierta *La caja de conexiones debe situarse encima o debajo, a la izquierda o a la derecha, de la unidad, al alcance del tubo flexible. ** - Thermador ME301YP | Installation Instructions - Page 39
Medidas para el horno doble de 30" Medidas para el horno doble de 30" Consultar esta sección para conocer las dimensiones Medidasparaelhornodoblede30" de aparato y gabinete para hornos dobles de 30". Dimensiones de aparato: horno doble de 30" Medidas para el horno doble de 30" es-mx Horno doble de - Thermador ME301YP | Installation Instructions - Page 40
es-mx Antes de la instalación Vista lateral Antes de la instalación Antes de la instalación Llevar Antesdelainstalación a cabo los siguientes pasos para preparar el aparato para su instalación. Elevación del aparato Seguir las recomendaciones para evitar lesiones y daños en el aparato al elevarlo. - Thermador ME301YP | Installation Instructions - Page 41
Hornos individuales con puerta con bisagra inferior Antes de la instalación es-mx 2. Voltear las palancas de las bisagras hacia sí mismo. Extracción de la puerta del horno (en modelos convencionales con bisagra inferior) Se recomienda extraer la puerta del horno con bisagra inferior en los hornos - Thermador ME301YP | Installation Instructions - Page 42
es-mx Instalación de los hornos en el gabinete 5. PRECAUCIÓN - Riesgo de lesiones! La puerta pesa mucho. ▶No sujetar la puerta por el asa. ▶Usar ambas manos para sujetarla con firmeza por ambos lados. Mantener el ángulo de la puerta, elevar la puerta recta aprox. 3/4 pulgadas (2 cm) para - Thermador ME301YP | Installation Instructions - Page 43
3. Deslizar las bisagras en las ranuras hasta el fondo y después bajar la puerta hacia abajo, en dirección recta . Instalación de los hornos en el gabinete es-mx Puede ser necesario ajustar el ángulo de la puerta ligeramente para permitir que las bisagras encajen adecuadamente y la puerta baje - Thermador ME301YP | Installation Instructions - Page 44
modelos de hornos que figuran en la cubierta frontal del presente manual de instalación cuentan con una clasificación doble, y están ásica de 4 hilos (4 cables) de 208 V o 240 V CA, 60 Hz. Modelo ME301YP ME302YP Circuito requerido 30 A 40 A Vatios @ 240 V 6400 8500 Circuito requerido 30 A 40 - Thermador ME301YP | Installation Instructions - Page 45
la unidad funciona correctamente. 1. Encender la energía eléctrica en el breaker. 2. Para comprobar el funcionamiento del horno, seleccionar el modo de horneado. Véase el manual de usuario para consultar las instrucciones de funcionamiento detalladas. 45 - Thermador ME301YP | Installation Instructions - Page 46
ísticas del aparato. → "Ubicación de la placa de características del aparato", Página 46 ¡ EE. UU.: 800-735-4328 www.thermador.com/support ¡ Canadá: 1-800-735-4328 www.thermador.ca Número de producto (E-Nr.), número de fabricación (FD) y número de conteo (Z-Nr.) El número de producto (E-Nr.), el - Thermador ME301YP | Installation Instructions - Page 47
- Thermador ME301YP | Installation Instructions - Page 48
*8001189463* 1901 MAIN STREET, SUITE 600 IRVINE, CA 92614 // 1-800-735-4328 // WWW.THERMADOR.COM © 2020 BSH HOME APPLIANCES CORPORATION 8001189463 // en-us, fr-ca, es-mx // 001112
-
 1
1 -
 2
2 -
 3
3 -
 4
4 -
 5
5 -
 6
6 -
 7
7 -
8
-
9
-
10
-
11
-
12
-
13
-
14
-
15
-
16
-
17
-
18
-
19
-
20
-
21
-
22
-
23
-
24
-
25
-
26
-
27
-
28
-
29
-
30
-
31
-
32
-
33
-
34
-
35
-
36
-
37
-
38
-
39
-
40
-
41
-
42
-
43
-
44
-
45
-
46
-
47
-
48
 |
 |

Installation
GUIDE
Built-in oven
ME301YP ME302YP
THERMADOR.COM