Thermador ME301YP Installation Instructions - Page 13
door until it is fully open.
 |
View all Thermador ME301YP manuals
Add to My Manuals
Save this manual to your list of manuals |
Page 13 highlights
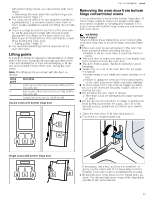
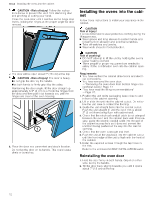
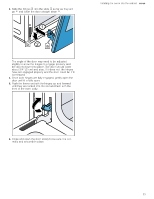
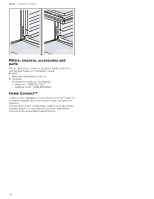
3. Slide the hinges into the slots as far as they will go and lower the door straight down . Installing the ovens into the cabinet en-us The angle of the door may need to be adjusted slightly to allow the hinges to engage properly and the door to lower into place. The door should lower about 3/4" (2 cm) and stop. If it does not, the hinges have not engaged properly and the door could fall if it is released. 4. Once both hinges are fully engaged, gently open the door until it is fully open. 5. Push the levers on both the hinges up and forward until they are locked into the slot and flush with the front of the oven body. 6. Close and open the door slowly to be sure it is correctly and securely in place. 13
-
 1
1 -
2
-
3
-
4
-
5
-
6
-
7
-
 8
8 -
 9
9 -
 10
10 -
 11
11 -
 12
12 -
 13
13 -
 14
14 -
 15
15 -
 16
16 -
 17
17 -
 18
18 -
19
-
20
-
21
-
22
-
23
-
24
-
25
-
26
-
27
-
28
-
29
-
30
-
31
-
32
-
33
-
34
-
35
-
36
-
37
-
38
-
39
-
40
-
41
-
42
-
43
-
44
-
45
-
46
-
47
-
48
 |
 |

Installing the ovens into the cabinet
en-us
13
3.
Slide the hinges
into the slots
as far as they will
go
and lower the door straight down
.
The angle of the door may need to be adjusted
slightly to allow the hinges to engage properly and
the door to lower into place. The door should lower
about 3/4" (2 cm) and stop. If it does not, the hinges
have not engaged properly and the door could fall if it
is released.
4.
Once both hinges are fully engaged, gently open the
door until it is fully open.
5.
Push the levers on both the hinges up and forward
until they are locked into the slot and flush with the
front of the oven body.
6.
Close and open the door slowly to be sure it is cor-
rectly and securely in place.