Thermador PCG366W Instructions for Use - Page 15
ExtraLow, burners
 |
View all Thermador PCG366W manuals
Add to My Manuals
Save this manual to your list of manuals |
Page 15 highlights
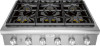
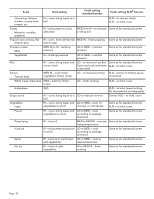
Control knobs The control knobs for two sealed gas burners, one in front and one in the rear, are located directly in front of and below the pair of burners on the control panel. Operation of the burners To turn on the burners 1. Press in on the knob and turn it counter-clockwise HI. - The igniter for the selected burner clicks and sparks. - After burner ignition, the igniter stops clicking. 2. Rotate the knob to any flame setting between HI and LO. LED panel light (select models) Positioned below the bullnose, the LED panel light provides task lighting with a theatrical ambiance. The panel light toggle switch on the control panel turns the light on and off. ExtraLow® burners The drawing shows that the control knob has an additional range after the XLO setting. When the knob is set within this range, the flame cycles off and on. By varying the length of time the flame is off and on, the heat is reduced even further to cook delicate foods. For example, these very low settings are suitable for simmering and poaching, melting chocolate and butter, holding cooked foods at temperatures without scorching or burning, etc. Operation of the ExtraLow® burners • XLO, the very lowest setting, is achieved by cycling the flame on for approximately 10 seconds and off for 50 seconds of each minute. • When the knob is set just below the XLO setting, the flame will cycle on for approximately 50 seconds and off for 10 seconds of each minute. • To vary the amount of low heat to suit the food and quantity, the control can be set anywhere within the XLO range marked on the knob. ExtraLow® techniques • To maintain a low or simmer heat, bring food to a rolling boil. Stir well, then cover the pan and lower the heat to a setting just below XLO. • If a large pan is used, the simmer action may occur mainly in the center of the pan. To equalize the temperature throughout the food, stir the food around the outer edges of the pan into the food in the center. • It is normal to stir food occasionally while simmering. This is especially important when simmering for several hours, such as for a homemade spaghetti sauce or beans. • If the setting is too low to hold a simmer, bring the food back to a boil before re-setting to a higher heat. Automatic re-ignition 9 CAUTION DO NOT touch the burners when the igniters are sparking. Each burner has its own electronic igniter that sparks when the burner is turned on. Each burner should light in four seconds or less. If a burner does not light, check to see that the cap is positioned correctly on the base. If any one or more burners blow out, the electronic igniter automatically activates to re-light the flame. Do not touch the burners when the igniters are active. IMPORTANT • For proper combustion do not use the rangetop without the burner grates in place. • There is a slight sound associated with gas combustion and ignition. This is a normal condition. • On rangetops using propane gas (LP), a slight "pop" sound may be heard at the burner ports a few seconds after the burner has been turned off. Page. 15
-
 1
1 -
2
-
3
-
4
-
5
-
6
-
7
-
8
-
9
-
 10
10 -
 11
11 -
 12
12 -
 13
13 -
 14
14 -
 15
15 -
 16
16 -
 17
17 -
 18
18 -
 19
19 -
 20
20 -
21
-
22
-
23
-
24
-
25
-
26
-
27
-
28
-
29
-
30
-
31
-
32
-
33
-
34
-
35
-
36
-
37
-
38
-
39
-
40
-
41
-
42
-
43
-
44
-
45
-
46
-
47
-
48
-
49
-
50
-
51
-
52
-
53
-
54
-
55
-
56
-
57
-
58
-
59
-
60
-
61
-
62
-
63
-
64
-
65
-
66
-
67
-
68
-
69
-
70
-
71
-
72
-
73
-
74
-
75
-
76
-
77
-
78
-
79
-
80
-
81
-
82
-
83
-
84
-
85
-
86
-
87
-
88
-
89
-
90
-
91
-
92
-
93
-
94
-
95
-
96
 |
 |