Thermador SGSX365TS Instructions for Use - Page 14
Operation
 |
View all Thermador SGSX365TS manuals
Add to My Manuals
Save this manual to your list of manuals |
Page 14 highlights
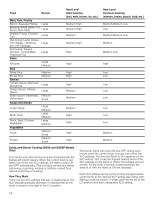
Control Knob Removal To remove knob and/or grommet: With control knob in the OFF position, gently lift knob up and off. Gently pull the grommet from the sides and lift out. 9 WARNING To avoid possible electric shock, do not reach through control opening into rough-in box. 9 WARNING Do not use the appliance without the knobs and grommets in place. To replace knob and/or grommet: Carefully insert the grommet into the opening, ensuring that the maintop is seated in the track around the entire perimeter of the grommet. Replace control knob by placing indicator line at the OFF position. Press down firmly. Operation About the Appliance Use the cooktop for surface cooking applications such as boiling, frying, simmering, steaming and sautéing. 9 WARNING The burning of gas cooking fuel can create small amounts of carbon monoxide, benzene, formaldehyde and soot. To minimize exposure to these substances, the burners should be adjusted by a certified installer or authorized servicer to ensure proper combustion. Ensure proper ventilation with an open window or use a ventilation fan or hood when cooking with Gas. Always operate the unit according to the instructions in this manual. 9 CAUTION To avoid possible injury or damage to the appliance, ensure grates are installed exactly per installation instructions and not backwards or upside down. Typical Flame Characteristics The burner flame should be blue in color and stable with no yellow tips, excessive noise or fluttering. It should burn completely around the burner cap. Checking Flame Characteristics: Yellow flames: Further adjustment is required. Normal Operation - Electronic Ignition/Reignition The cooktop uses electronic igniters to light the burners. There is no pilot light. Each burner has its own igniter. If a burner flame blows out during use, the burner will automatically reignite. 9 CAUTION To avoid possible injury or damage to the appliance, ensure grates are installed exactly per installation instructions and not backwards or upside down. The igniter should be clean and dry for proper operation. ▯ Avoid getting water or food on the igniter. ▯ If the igniter is wet or soiled, it may spark without igniting the burner, or even spark continuously when a flame is present. Note: If the burner does not light within 4 seconds, turn the burner off. Check to see that the burner cap is positioned correctly on the burner base and the igniter is clean and dry. If a burner still fails to ignite, see "Before Calling for Service". When a flame is present and a Low setting is used, the igniter may occasionally spark. This is normal. Yellow tips on outer cones: Normal for LP Gas. Soft blue flames: Normal for Natural Gas. ▯ If the flame is completely or mostly yellow, verify that the regulator is set for the correct fuel. After adjustment, retest. ▯ Some yellow streaking is normal during the initial startup. Allow unit to operate 4 to 5 minutes and reevaluate before making adjustments. ▯ Foreign particles in the gas line may cause an orange flame during initial use. This should disappear with use. Check burner to make sure port holes are not obstructed. If the ports are clogged. ~ "Before Calling for Service" on page 25 Note: An audible "pop" may be heard when the burner is turned off manually. The "popping" may be louder with LP gas than with natural gas. This is normal. 14
-
 1
1 -
2
-
3
-
4
-
5
-
6
-
7
-
8
-
 9
9 -
 10
10 -
 11
11 -
 12
12 -
 13
13 -
 14
14 -
 15
15 -
 16
16 -
 17
17 -
 18
18 -
 19
19 -
20
-
21
-
22
-
23
-
24
-
25
-
26
-
27
-
28
-
29
-
30
-
31
-
32
-
33
-
34
-
35
-
36
-
37
-
38
-
39
-
40
-
41
-
42
-
43
-
44
-
45
-
46
-
47
-
48
-
49
-
50
-
51
-
52
-
53
-
54
-
55
-
56
-
57
-
58
-
59
-
60
 |
 |