Toshiba 26AV550E Owners Manual - Page 9
TV front and side panel controls
 |
UPC - 883180587178
View all Toshiba 26AV550E manuals
Add to My Manuals
Save this manual to your list of manuals |
Page 9 highlights
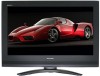
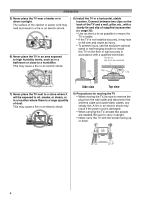
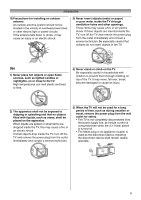
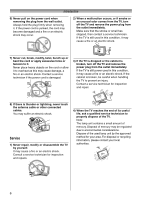
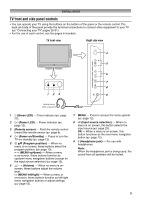
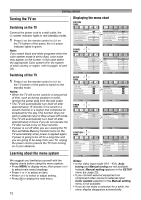
Getting started TV front and side panel controls • You can operate your TV using the buttons on the bottom of the panel or the remote control. The back and side of the panel provide the terminal connections to connect other equipment to your TV (- "Connecting your TV" pages 26-31). • For the use of each control, see the pages in brackets. TV front view Right side view 4 5 6 7 8 123 9 Headphones (Not supplied) 1 4 (Green LED) - Timer indicator (- page 22). 2 ! (Power LED) - Power indicator (page 12). 3 (Remote sensor) - Point the remote control toward this remote sensor (- page 8). 4 ! (Power on/Standby) - Press to turn the TV on/ standby (- page 12). 5 p Bb (Program position) - When no menu is on screen, these buttons select the program position. (- page 13). U u (MENU up/down) - When a menu is on-screen, these buttons function as up/down menu navigation buttons (except for the input source selection) (- page 12). 6 2 - + (Volume) - When no menu is onscreen, these buttons adjust the volume level. I i (MENU left/right) - When a menu is on-screen, these buttons function as left/right menu navigation buttons or adjust settings (- page 12). 7 MENU - Press to access the menu system (- page 12). 8 o (Input source selection) - When no menu is on screen, this button selects the input source (- page 23). OK - When a menu is on-screen, this button functions as the next menu navigation button (- page 12). 9 D (Headphone jack) - For use with headphones. Note: When the Headphone jack is being used, the sound from all speakers will be muted. 9
-
 1
1 -
2
-
3
-
 4
4 -
 5
5 -
 6
6 -
 7
7 -
 8
8 -
 9
9 -
 10
10 -
 11
11 -
 12
12 -
 13
13 -
 14
14 -
15
-
16
-
17
-
18
-
19
-
20
-
21
-
22
-
23
-
24
-
25
-
26
-
27
-
28
-
29
-
30
-
31
-
32
-
33
-
34
-
35
-
36
 |
 |
