Toshiba 46SL417U User Manual - Page 11
Introduction, Features, Overview of installation, setup, and use - hd tv
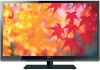 |
View all Toshiba 46SL417U manuals
Add to My Manuals
Save this manual to your list of manuals |
Page 11 highlights
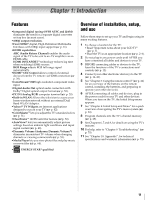
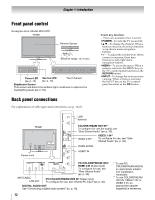
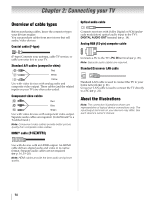
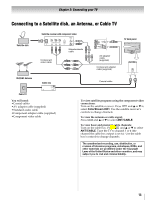
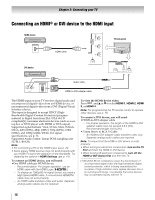
Chapter 1: Introduction Features •Integrated digital tuning (8VSB ATSC and QAM) eliminates the need for a separate digital converter set-top box (in most cases). •1080p output resolution. •Four HDMI® digital, High-Definition Multimedia Interfaces with 1080p input support (- p. 16). •HDMI capabilities ARC (Audio Return Channel) enables the audio signal of the TV to be sent to an AV amplifier via an HDMI cable. HDMI INSTAPORT™ technology reduces lag time when switching HDMI sources. RGB Range adjusts RGB full range signal automatically. •HDMI® CEC Control allows control of external devices from the TV remote via HDMI connection (p. 39). •ColorStream® HD high-resolution component video input. •Digital Audio Out optical audio connection with Dolby® Digital optical output format (- p. 53). •PC IN (Analog RGB) computer terminal (- p. 20). •Built-in WLAN Allows the television to access your home wireless network without an external Dual Band WLAN Adapter. •Yahoo!® TV Widgets are Internet applications designed to run on your TV (- p. 62). •ColorMaster™ lets you adjust the TV's standard colors (- p. 51). •ClearFrame™ 120 Hz anti-blur feature (-p. 50). •AutoView® lets you automatically adjust picture settings based on ambient light conditions and input signal content (- p. 48). •Dynamic Volume (Audyssey Dynamic Volume®) eliminates inconsistent TV volume when changing channels or viewing commercials (- p. 53). •Media Player lets you view photo files and play music or movie files (- p. 64). • ENERGY STAR® qualified Overview of installation, setup, and use Follow these steps to set up your TV and begin using its many exciting features. 1 To choose a location for the TV: • Read "Important notes about your LCD TV" (- p. 7). • Place the TV in an appropriate location (- p. 2-6). 2 Do not plug in any power cords until AFTER you have connected all cables and devices to your TV. 3 BEFORE connecting cables or devices to the TV, learn the functions of the TV's connections and controls (- p. 12). 4 Connect your other electronic device(s) to the TV (- p. 14-21). 5 See "Chapter 3: Using the remote control" (- p. 22) for an overview of the buttons on the remote control, installing the batteries, and preparing to operate your other device(s). 6 AFTER connecting all cables and devices, plug in the power cords for your TV and other devices. When you turn on the TV, the Initial Setup menu appears. 7 See "Chapter 4: Initial Setup and Menu" for a quick overview of navigating the TV's menu system (p. 24). 8 Program channels into the TV's channel memory (- p. 28). 9 See Chapters 6, 7 and 8, for details on using the TV's features. 10 For help, refer to "Chapter 9: Troubleshooting" (- p. 70). 11 See "Chapter 10: Appendix", for technical specifications and warranty information (- p. 73). 11
-
 1
1 -
2
-
3
-
4
-
5
-
 6
6 -
 7
7 -
 8
8 -
 9
9 -
 10
10 -
 11
11 -
 12
12 -
 13
13 -
 14
14 -
 15
15 -
 16
16 -
17
-
18
-
19
-
20
-
21
-
22
-
23
-
24
-
25
-
26
-
27
-
28
-
29
-
30
-
31
-
32
-
33
-
34
-
35
-
36
-
37
-
38
-
39
-
40
-
41
-
42
-
43
-
44
-
45
-
46
-
47
-
48
-
49
-
50
-
51
-
52
-
53
-
54
-
55
-
56
-
57
-
58
-
59
-
60
-
61
-
62
-
63
-
64
-
65
-
66
-
67
-
68
-
69
-
70
-
71
-
72
-
73
-
74
-
75
-
76
-
77
-
78
-
79
-
80
-
81
-
82
-
83
-
84
-
85
-
86
-
87
-
88
-
89
-
90
-
91
-
92
-
93
 |
 |
