Toshiba M7 PTM71C-GH10TE Users Manual Canada; English - Page 114
Using optical disc drives, Loading discs
 |
View all Toshiba M7 PTM71C-GH10TE manuals
Add to My Manuals
Save this manual to your list of manuals |
Page 114 highlights
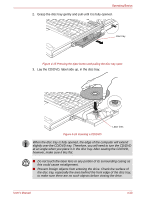
Operating Basics (*). It is recommended that the keyboard cursor keys (movement) and enter key (selection) or the directional pad be used when selecting an Item from the Menu in laptop or landscape modes. 3. The Fingerprint Software Management screen is displayed. Click Settings and click System Settings. 4. The Protector Suite Settings screen is displayed. Place a checkmark in Allow power-on security single sign-on within Enable logon support and click OK. Fingerprint utility limitations TOSHIBA does not guarantee that the Fingerprint utility technology will be completely secure or error-free. TOSHIBA does not guarantee that the Fingerprint utility will accurately screen out unauthorized users at all times. TOSHIBA is not liable for any failure or damage that might arise out of the use of the fingerprint software or utility. Using optical disc drives The full-size drive provides high-performance execution of CD/DVD-ROMbased programs. You can run either 12 cm (4.72") or 8 cm (3.15") CD/DVDs without an adaptor. An ATAPI interface controller is used for CD/DVD-ROM operation. When the computer is accessing a CD/DVDROM, an indicator on the drive glows. Use the WinDVD application to view DVD-Video discs. If you have a DVD-ROM&CD-R/RW drive, refer also to the Writing CDs on DVD-ROM&CD-R/RW drive section for precautions on writing to CDs. If you have a DVD Super Multi drive, refer also to the Writing CD/DVDs on DVD Super Multi drive section for precautions on writing to CDs/DVDs. When the power of the optical disc drive is off, pressing the Fn + Tab keys will turn the power of the optical disc drive on. Furthermore, it is possible to set it to turn the power of the optical disc drive on and eject the tray at the same time. Loading discs To load CD/DVDs, follow the steps below. 1. When the computer's power is on, press the eject button to open the disc tray slightly. User's Manual 4-19
-
 1
1 -
2
-
3
-
4
-
5
-
6
-
7
-
8
-
9
-
10
-
11
-
12
-
13
-
14
-
15
-
16
-
17
-
18
-
19
-
20
-
21
-
22
-
23
-
24
-
25
-
26
-
27
-
28
-
29
-
30
-
31
-
32
-
33
-
34
-
35
-
36
-
37
-
38
-
39
-
40
-
41
-
42
-
43
-
44
-
45
-
46
-
47
-
48
-
49
-
50
-
51
-
52
-
53
-
54
-
55
-
56
-
57
-
58
-
59
-
60
-
61
-
62
-
63
-
64
-
65
-
66
-
67
-
68
-
69
-
70
-
71
-
72
-
73
-
74
-
75
-
76
-
77
-
78
-
79
-
80
-
81
-
82
-
83
-
84
-
85
-
86
-
87
-
88
-
89
-
90
-
91
-
92
-
93
-
94
-
95
-
96
-
97
-
98
-
99
-
100
-
101
-
102
-
103
-
104
-
105
-
106
-
107
-
108
-
 109
109 -
 110
110 -
 111
111 -
 112
112 -
 113
113 -
 114
114 -
 115
115 -
 116
116 -
 117
117 -
 118
118 -
 119
119 -
120
-
121
-
122
-
123
-
124
-
125
-
126
-
127
-
128
-
129
-
130
-
131
-
132
-
133
-
134
-
135
-
136
-
137
-
138
-
139
-
140
-
141
-
142
-
143
-
144
-
145
-
146
-
147
-
148
-
149
-
150
-
151
-
152
-
153
-
154
-
155
-
156
-
157
-
158
-
159
-
160
-
161
-
162
-
163
-
164
-
165
-
166
-
167
-
168
-
169
-
170
-
171
-
172
-
173
-
174
-
175
-
176
-
177
-
178
-
179
-
180
-
181
-
182
-
183
-
184
-
185
-
186
-
187
-
188
-
189
-
190
-
191
-
192
-
193
-
194
-
195
-
196
-
197
-
198
-
199
-
200
-
201
-
202
-
203
-
204
-
205
-
206
-
207
-
208
-
209
-
210
-
211
-
212
-
213
-
214
-
215
-
216
-
217
-
218
-
219
-
220
-
221
-
222
-
223
-
224
-
225
-
226
-
227
-
228
-
229
-
230
-
231
-
232
-
233
-
234
-
235
-
236
-
237
-
238
-
239
-
240
-
241
-
242
-
243
-
244
-
245
-
246
-
247
-
248
-
249
-
250
-
251
-
252
-
253
-
254
-
255
-
256
-
257
-
258
-
259
-
260
-
261
 |
 |
