Toshiba Satellite Pro 6000 User Guide - Page 46
Connecting the power cable to the AC adapter, If the main battery is present, the battery light - power supply
 |
View all Toshiba Satellite Pro 6000 manuals
Add to My Manuals
Save this manual to your list of manuals |
Page 46 highlights
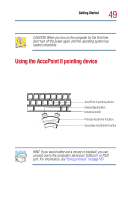
46 Getting Started Setting up your computer Connecting the power cable to the AC adapter _ + 2 Connect the DC OUT end of the AC adapter cable to the DC IN jack at the back of the computer. Connecting the AC adapter cable to the computer 3 Insert the plug end of the power cable into a live wall outlet. The AC power light on the system indicator panel glows green. If the main battery is present, the battery light glows: ❖ Amber while the battery is charging ❖ Green when the battery is fully charged If the battery light flashes amber during charging, either the battery pack is malfunctioning, or it is not receiving input from the AC power supply. Disconnect the AC cable and
-
 1
1 -
2
-
3
-
4
-
5
-
6
-
7
-
8
-
9
-
10
-
11
-
12
-
13
-
14
-
15
-
16
-
17
-
18
-
19
-
20
-
21
-
22
-
23
-
24
-
25
-
26
-
27
-
28
-
29
-
30
-
31
-
32
-
33
-
34
-
35
-
36
-
37
-
38
-
39
-
40
-
 41
41 -
 42
42 -
 43
43 -
 44
44 -
 45
45 -
 46
46 -
 47
47 -
 48
48 -
 49
49 -
 50
50 -
 51
51 -
52
-
53
-
54
-
55
-
56
-
57
-
58
-
59
-
60
-
61
-
62
-
63
-
64
-
65
-
66
-
67
-
68
-
69
-
70
-
71
-
72
-
73
-
74
-
75
-
76
-
77
-
78
-
79
-
80
-
81
-
82
-
83
-
84
-
85
-
86
-
87
-
88
-
89
-
90
-
91
-
92
-
93
-
94
-
95
-
96
-
97
-
98
-
99
-
100
-
101
-
102
-
103
-
104
-
105
-
106
-
107
-
108
-
109
-
110
-
111
-
112
-
113
-
114
-
115
-
116
-
117
-
118
-
119
-
120
-
121
-
122
-
123
-
124
-
125
-
126
-
127
-
128
-
129
-
130
-
131
-
132
-
133
-
134
-
135
-
136
-
137
-
138
-
139
-
140
-
141
-
142
-
143
-
144
-
145
-
146
-
147
-
148
-
149
-
150
-
151
-
152
-
153
-
154
-
155
-
156
-
157
-
158
-
159
-
160
-
161
-
162
-
163
-
164
-
165
-
166
-
167
-
168
-
169
-
170
-
171
-
172
-
173
-
174
-
175
-
176
-
177
-
178
-
179
-
180
-
181
-
182
-
183
-
184
-
185
-
186
-
187
-
188
-
189
-
190
-
191
-
192
-
193
-
194
-
195
-
196
-
197
-
198
-
199
-
200
-
201
-
202
-
203
-
204
-
205
-
206
-
207
-
208
-
209
-
210
-
211
-
212
-
213
-
214
-
215
-
216
-
217
-
218
-
219
-
220
-
221
-
222
-
223
-
224
-
225
-
226
-
227
-
228
-
229
-
230
-
231
-
232
-
233
-
234
-
235
-
236
-
237
-
238
-
239
-
240
-
241
-
242
-
243
-
244
-
245
-
246
-
247
-
248
-
249
-
250
-
251
-
252
-
253
-
254
-
255
-
256
-
257
-
258
-
259
-
260
-
261
-
262
-
263
-
264
-
265
-
266
-
267
-
268
-
269
-
270
-
271
-
272
-
273
-
274
-
275
-
276
-
277
-
278
-
279
-
280
-
281
 |
 |

46
Getting Started
Setting up your computer
Connecting the power cable to the AC adapter
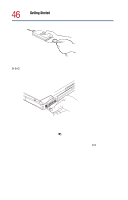
2
Connect the DC OUT end of the AC adapter cable to the
DC IN jack at the back of the computer.
Connecting the AC adapter cable to the computer
3
Insert the plug end of the power cable into a live wall outlet.
The AC power light
on the system indicator panel glows
green.
If the main battery is present, the battery light
glows:
Amber while the battery is charging
Green when the battery is fully charged
If the battery light flashes amber during charging, either the
battery pack is malfunctioning, or it is not receiving input
from the AC power supply. Disconnect the AC cable and
_
+