Toshiba Tecra A8 PTA83C-KF801E Users Manual Canada; English - Page 86
Set Up Procedure, Window Logon via Fingerprint Authentication, Fingerprint Registration
 |
View all Toshiba Tecra A8 PTA83C-KF801E manuals
Add to My Manuals
Save this manual to your list of manuals |
Page 86 highlights
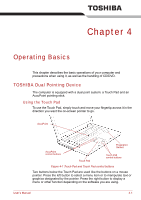
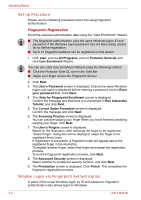
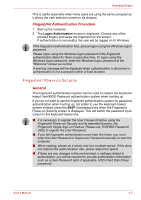
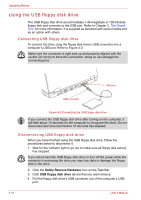
Operating Basics Set Up Procedure Please use the following procedure when first using fingerprint authentication. Fingerprint Registration Enroll the required authentication data using the "User Enrollment" Wizard. ■ The fingerprint authentication uses the same Windows logon ID and password. If the Windows logon password has not been setup, please do so before registration. ■ Up to 21 fingerprint patterns can be registered on this sensor. 1. Click start, point to All Programs, point to Protector Suite QL and click User Enrollment Wizard. You can also start User Enrollment Wizard using the following method. ■ Click the Protector Suite QL icon in the Task Bar. ■ Swipe your finger across the Fingerprint Sensor. 2. Click Next. 3. The User's Password screen is displayed. Ensure the same Windows logon user name is displayed before entering a password into the Enter your password field. Click Next. 4. The Hints for Fingerprint Enrollment screen is displayed. Confirm the message and that there is a checkmark in Run Interactive Tutorial, and click Next. 5. The Correct Swipe Procedure screen is displayed. Confirm the message and click Next. 6. The Scanning Practice screen is displayed. You can practice swiping your finger When you have finished practicing swiping your finger, click Next. 7. The User's Fingers screen is displayed. Based on the illustration, after selecting the finger to be registered, "Swipe Finger" dialog box will be displayed; swipe the finger to be registered three times. If registration is successful, a fingerprint mark will appear above the registered finger in the illustration. To register another finger, select that finger and repeat the registration process. To end the fingerprint registration process, click Next. 8. The Advanced Security screen is displayed. Select whether to enable the security function, and click Next. 9. The Finalization screen is displayed. Click Finish. This completes the fingerprint registration process. Window Logon via Fingerprint Authentication In place of the usual Windows logon by ID and password, fingerprint authentication also allows logon to Windows. 4-6 User's Manual
-
 1
1 -
2
-
3
-
4
-
5
-
6
-
7
-
8
-
9
-
10
-
11
-
12
-
13
-
14
-
15
-
16
-
17
-
18
-
19
-
20
-
21
-
22
-
23
-
24
-
25
-
26
-
27
-
28
-
29
-
30
-
31
-
32
-
33
-
34
-
35
-
36
-
37
-
38
-
39
-
40
-
41
-
42
-
43
-
44
-
45
-
46
-
47
-
48
-
49
-
50
-
51
-
52
-
53
-
54
-
55
-
56
-
57
-
58
-
59
-
60
-
61
-
62
-
63
-
64
-
65
-
66
-
67
-
68
-
69
-
70
-
71
-
72
-
73
-
74
-
75
-
76
-
77
-
78
-
79
-
80
-
 81
81 -
 82
82 -
 83
83 -
 84
84 -
 85
85 -
 86
86 -
 87
87 -
 88
88 -
 89
89 -
 90
90 -
 91
91 -
92
-
93
-
94
-
95
-
96
-
97
-
98
-
99
-
100
-
101
-
102
-
103
-
104
-
105
-
106
-
107
-
108
-
109
-
110
-
111
-
112
-
113
-
114
-
115
-
116
-
117
-
118
-
119
-
120
-
121
-
122
-
123
-
124
-
125
-
126
-
127
-
128
-
129
-
130
-
131
-
132
-
133
-
134
-
135
-
136
-
137
-
138
-
139
-
140
-
141
-
142
-
143
-
144
-
145
-
146
-
147
-
148
-
149
-
150
-
151
-
152
-
153
-
154
-
155
-
156
-
157
-
158
-
159
-
160
-
161
-
162
-
163
-
164
-
165
-
166
-
167
-
168
-
169
-
170
-
171
-
172
-
173
-
174
-
175
-
176
-
177
-
178
-
179
-
180
-
181
-
182
-
183
-
184
-
185
-
186
-
187
-
188
-
189
-
190
-
191
-
192
-
193
-
194
-
195
-
196
-
197
-
198
-
199
-
200
-
201
-
202
-
203
-
204
-
205
-
206
-
207
-
208
-
209
-
210
-
211
-
212
-
213
-
214
-
215
-
216
-
217
-
218
-
219
-
220
-
221
-
222
-
223
-
224
-
225
-
226
-
227
-
228
-
229
-
230
-
231
-
232
-
233
-
234
-
235
-
236
-
237
-
238
-
239
-
240
-
241
-
242
-
243
-
244
-
245
-
246
-
247
-
248
-
249
-
250
-
251
-
252
-
253
-
254
-
255
-
256
-
257
-
258
-
259
-
260
-
261
-
262
-
263
-
264
-
265
-
266
-
267
-
268
-
269
-
270
-
271
-
272
-
273
-
274
-
275
-
276
 |
 |
