Tripp Lite SMART1000RT1U Owners Manual for SmartPro Line-Interactive Single-Ph - Page 10
LCD Display
 |
View all Tripp Lite SMART1000RT1U manuals
Add to My Manuals
Save this manual to your list of manuals |
Page 10 highlights
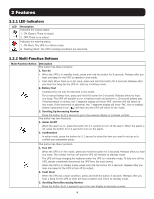
2 Features Multi-Function Button Description 1. Entering Setup Mode Simultaneously press these two buttons for 3 seconds to enter setup mode. 2. Exiting Setup Mode In setup mode, press these two buttons simultaneously for 3 seconds to exit setup mode. Note: When the LCD backlight is off, press any button mentioned above to illuminate the display and enable each button function. 2.2.3 LCD Display Icon Icon Name Input AC Icon Description Indicates the input source status. 1. On: The AC input is within the acceptable input range. 2. Flashing: The AC input is out of the acceptable input range, but is still sufficient to charge the battery. Load Bank Icon 3. Off: The AC input is out of the acceptable input range and is not sufficient to charge the battery. Indicates the output status. 1. On: There is output to the load bank 1/load bank 2. 2. Off: There is no output to the load bank 1/load bank 2. Battery Power Indicates the battery power status. Icon 1. ON: Battery power is on. 2. OFF: Output is not supplied by the battery power. Standby Illuminates when the UPS is operating in stand- by mode. Mode Graph Line Mode Graph AVR Mode Graph Illuminates when the UPS is operating in line mode. Illuminates when the UPS is operating in AVR mode. Battery Mode Illuminates when the UPS is operating in battery mode. Graph 10
-
 1
1 -
2
-
3
-
4
-
 5
5 -
 6
6 -
 7
7 -
 8
8 -
 9
9 -
 10
10 -
 11
11 -
 12
12 -
 13
13 -
 14
14 -
 15
15 -
16
-
17
-
18
-
19
-
20
-
21
-
22
-
23
-
24
-
25
-
26
-
27
-
28
-
29
-
30
-
31
-
32
-
33
-
34
-
35
-
36
-
37
-
38
-
39
-
40
-
41
-
42
-
43
-
44
-
45
-
46
-
47
-
48
-
49
-
50
-
51
-
52
-
53
-
54
-
55
-
56
-
57
-
58
-
59
-
60
-
61
-
62
-
63
-
64
-
65
-
66
-
67
-
68
-
69
-
70
-
71
-
72
-
73
-
74
-
75
-
76
-
77
-
78
-
79
-
80
-
81
-
82
-
83
-
84
-
85
-
86
-
87
-
88
-
89
-
90
-
91
-
92
 |
 |
