Tripp Lite SMART1000RT1U Owners Manual for SmartPro Line-Interactive Single-Ph - Page 18
Installation
 |
View all Tripp Lite SMART1000RT1U manuals
Add to My Manuals
Save this manual to your list of manuals |
Page 18 highlights
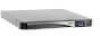
3 Installation Notes: • Before installation, read section 1.1 Important Safety Instructions thoroughly. • Each model contains internal batteries. • Only qualified personnel should perform iinstallation. 3.1 Installation Data Item Installation Environment UPS Dimensions [H x W x D] Operating Temperature Relative Humidity (non-condensing) Max. Altitude (without de-rating) Input Power Connection Output Power Connection Battery Power Connection Air Inlet Air Outlet Specification Indoor only 1.5kVA: 1.7 x 17.3 x 21.8 in. (44 x 440 x 554 mm) 700VA-1200VA: 1.7 x 17.3 x 20 in. (44 x 440 x 509 mm) 32°F~104°F (0°C~40°C) 0%~95% 3,280 ft. (1,000 m) above sea level Rear Rear Rear Front Rear 3.2 Rack-Mount Installation You can rack mount the UPS in a 4-post frame or rack enclosure. Notes: • The UPS draws cooling air from its front. If your rack has a door on the front, make sure there is sufficient clearance between the UPS vents and the rack door. • It is strongly recommended that at least two people lift the unit when rack mounting. If there is only one person available, we suggest that the UPS internal batteries be removed for less weight before rack mounting. After rack mounting, re-install the internal batteries. • Use only the provided bracket ears and rail kits for rack-mount installation. Never depend on lower devices to support the UPS. 1 Attach the included bracket ears to the lateral mounting holes of the UPS. 1 18
-
 1
1 -
2
-
3
-
4
-
5
-
6
-
7
-
8
-
9
-
10
-
11
-
12
-
 13
13 -
 14
14 -
 15
15 -
 16
16 -
 17
17 -
 18
18 -
 19
19 -
 20
20 -
 21
21 -
 22
22 -
 23
23 -
24
-
25
-
26
-
27
-
28
-
29
-
30
-
31
-
32
-
33
-
34
-
35
-
36
-
37
-
38
-
39
-
40
-
41
-
42
-
43
-
44
-
45
-
46
-
47
-
48
-
49
-
50
-
51
-
52
-
53
-
54
-
55
-
56
-
57
-
58
-
59
-
60
-
61
-
62
-
63
-
64
-
65
-
66
-
67
-
68
-
69
-
70
-
71
-
72
-
73
-
74
-
75
-
76
-
77
-
78
-
79
-
80
-
81
-
82
-
83
-
84
-
85
-
86
-
87
-
88
-
89
-
90
-
91
-
92
 |
 |
