Vaddio RoboSHOT 12 HDMI User Guide - Page 30
Pan, Tilt and Home Controls, Zoom Control, Pan/Tilt and Zoom Speed Controls, Camera Presets, Store
 |
View all Vaddio RoboSHOT 12 HDMI manuals
Add to My Manuals
Save this manual to your list of manuals |
Page 30 highlights
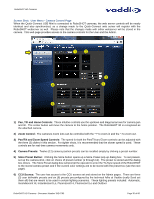
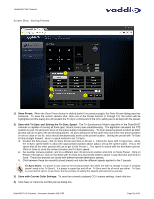
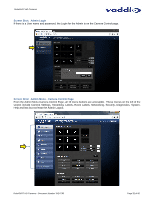
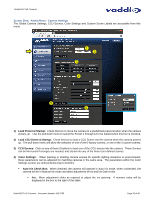
RoboSHOT HD Cameras Screen Shot: User Menu - Camera Control Page When the Quick-Connect USB Mini is connected to RoboSHOT cameras, the web server controls will be nearly identical and also synchronized, so a change made to the Quick-Connect web server will register with the RoboSHOT webserver as well. Please note that the changes made with either webserver will be stored in the camera. This web page provides access to the camera controls for the User and the Admin. ➊➋ ➌ ➍ ➎ ➏ 1) Pan, Tilt and Home Controls: These intuitive controls use the up/down and diagonal arrows for camera pan and tilt. The center button will move the camera to the home position. The RoboSHOT 30 is recognized as the attached camera. 2) Zoom Control: The camera's zoom lens can be controlled with the "+" to zoom-in and the "-"to zoom out. 3) Pan/Tilt and Zoom Speed Controls: The speed for both the Pan/Tilt and Zoom controls can be adjusted with the three (3) sliders in this section. For tighter shots, it is recommended that the slower speed is used. These controls are for real-time camera movements only. 4) Camera Presets: Twelve (12) camera position presets can be recalled simply by clicking a preset number. 5) Store Preset Button: Clicking the Store button opens up a Store Preset pop-up dialog box. To set presets, set up the camera shot, click on choice of preset number (1 through 12). The preset is stored and the dialog box closes. The Store Preset dialog bow will prompt the operator to enter the Tri-Sync speed of the RoboSHOT to the stored camera preset and if the current color settings are to be stored with the preset too (see the next page). 6) CCU Scenes: The user has access to the CCU scenes set and stored on the Admin pages. There are three (3) user definable presets and six (6) presets preconfigured by the technical folks at Vaddio (really Scott set them all) that are meant to be used in certain lighting scenarios. These lighting presets included: Automatic, Incandescent Hi, Incandescent Lo, Fluorescent Hi, Fluorescent Lo and Outdoor RoboSHOT HD Cameras - Document Number 342-0793 Page 30 of 60
-
 1
1 -
2
-
3
-
4
-
5
-
6
-
7
-
8
-
9
-
10
-
11
-
12
-
13
-
14
-
15
-
16
-
17
-
18
-
19
-
20
-
21
-
22
-
23
-
24
-
 25
25 -
 26
26 -
 27
27 -
 28
28 -
 29
29 -
 30
30 -
 31
31 -
 32
32 -
 33
33 -
 34
34 -
 35
35 -
36
-
37
-
38
-
39
-
40
-
41
-
42
-
43
-
44
-
45
-
46
-
47
-
48
-
49
-
50
-
51
-
52
-
53
-
54
-
55
-
56
-
57
-
58
-
59
-
60
 |
 |
