ViewSonic PJ1172 PJ1172 User Guide, English - Page 18
Power On/Off - projector lamp for
 |
UPC - 766907095111
View all ViewSonic PJ1172 manuals
Add to My Manuals
Save this manual to your list of manuals |
Page 18 highlights
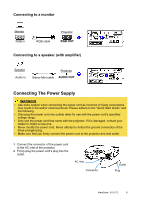
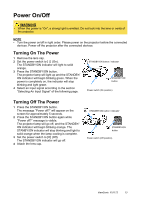
Power On/Off WARNING • When the power is "On", a strong light is emitted. Do not look into the lens or vents of the projector. NOTE • Turn the power on/off in right order. Please power on the projector before the connected devices. Power off the projector after the connected devices. Turning On The Power 1 Remove the lens cap. 2 Set the power switch to [ | ] (On). The STANDBY/ON indicator will light to solid orange. 3 Press the STANDBY/ON button. The projector lamp will light up and the STANDBY/ ON indicator will begin blinking green. When the power is completely on, the indicator will stop blinking and light green. 4 Select an input signal according to the section "Selecting An Input Signal" of the following page. STANDBY/ON button / indicator STANDBY/ON button Power switch (On position) Turning Off The Power 1 Press the STANDBY/ON button. The message "Power off?" will appear on the screen for approximately 5 seconds. 2 Press the STANDBY/ON button again while "Power off?" message is visible. The projector lamp will go off, and the STANDBY/ ON indicator will begin blinking orange. The STANBY/ON indicator will stop blinking and light to solid orange when the lamp cooling is complete. 3 Set the power switch to [O] (Off). The STANDBY/ON indicator will go off. 4 Attach the lens cap. STANDBY/ON button / indicator STANDBY/ON button Power switch (Off position) ViewSonic PJ1172 13
-
 1
1 -
2
-
3
-
4
-
5
-
6
-
7
-
8
-
9
-
10
-
11
-
12
-
 13
13 -
 14
14 -
 15
15 -
 16
16 -
 17
17 -
 18
18 -
 19
19 -
 20
20 -
 21
21 -
 22
22 -
 23
23 -
24
-
25
-
26
-
27
-
28
-
29
-
30
-
31
-
32
-
33
-
34
-
35
-
36
-
37
-
38
-
39
-
40
-
41
-
42
-
43
-
44
-
45
-
46
-
47
-
48
-
49
-
50
-
51
-
52
-
53
-
54
 |
 |