ViewSonic PJ1172 PJ1172 User Guide, English - Page 41
Replacing The Lamp - ceiling mount
 |
UPC - 766907095111
View all ViewSonic PJ1172 manuals
Add to My Manuals
Save this manual to your list of manuals |
Page 41 highlights
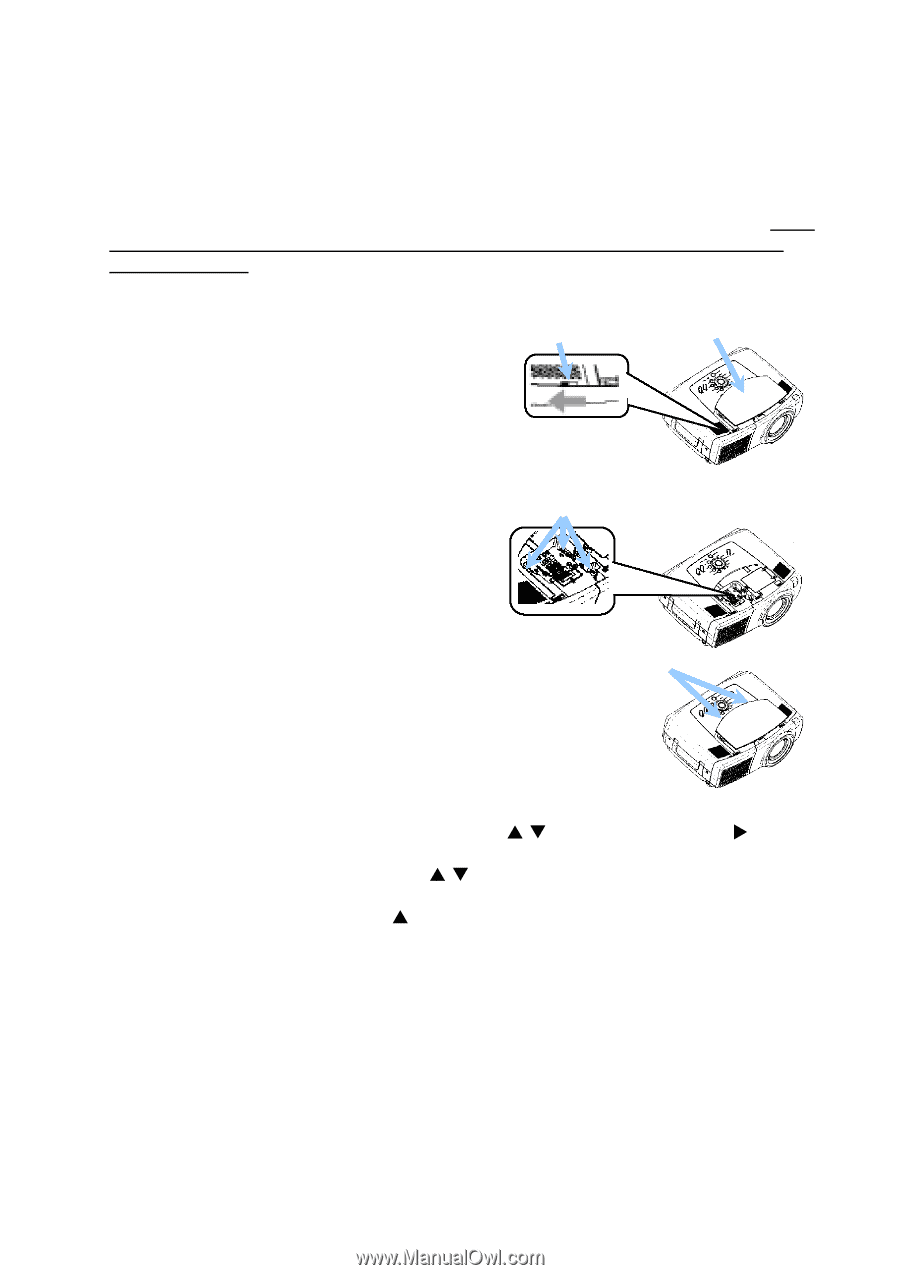
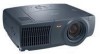
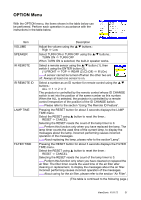
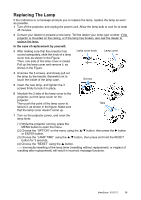
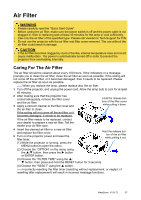
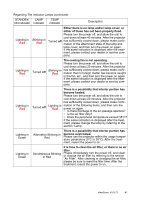
Replacing The Lamp If the indicators or a message prompts you to replace the lamp, replace the lamp as soon as possible. 1 Turn off the projector, and unplug the power cord. Allow the lamp bulb to cool for at least 45 minutes. 2 Contact your dealer to prepare a new lamp. Tell the dealer your lamp type number. If the projector is mounted on the ceiling, or if the lamp has broken, also ask the dealer to replace the lamp. In the case of replacement by yourself, 3 After making sure that the projector has cooled adequately, slide the knob of a lamp cover lock as shown in the Figure. Then, one side of the lamp cover is raised. Pull up the lamp cover and remove it, as shown in the Figure. Lamp cover knob Lamp cover 4 Unscrew the 3 screws, and slowly pull out the lamp by the handle. Becareful not to touch the inside of the lamp case. Screws 5 Insert the new lamp, and tighten the 3 screws firmly to lock it in place. 6 Interlock the 2 tabs of the lamp cover to the projector, put the lamp cover on the projector. Then push the point of the lamp cover to Tabs secure it, as shown in the figure. Make sure that the lamp cover doesn't come up. 7 Turn on the projector power, and reset the lamp timer. (1) While the projector running, press the MENU button to open the menu. (2) Choose the "OPTION" on the menu using the S/T button, then press the X button or ENTER button. (3) Choose the "LAMP TIME" using the S/T button, then press and hold the RESET button for 3 seconds. (4) Choose the "RESET" using the S button. memo Incorrectly resetting of the lamp timer (resetting without replacement, or neglect of resetting after replacement) will result in incorrect message functions. ViewSonic PJ1172 36
-
 1
1 -
2
-
3
-
4
-
5
-
6
-
7
-
8
-
9
-
10
-
11
-
12
-
13
-
14
-
15
-
16
-
17
-
18
-
19
-
20
-
21
-
22
-
23
-
24
-
25
-
26
-
27
-
28
-
29
-
30
-
31
-
32
-
33
-
34
-
35
-
 36
36 -
 37
37 -
 38
38 -
 39
39 -
 40
40 -
 41
41 -
 42
42 -
 43
43 -
 44
44 -
 45
45 -
 46
46 -
47
-
48
-
49
-
50
-
51
-
52
-
53
-
54
 |
 |