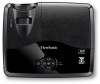
ViewSonic PJD5123 PJD5123 User Guide (English) - Page 16
Remote Control, Power, Left mouse, Mouse, Right mouse, Keystone/Arrow keys, Timer, My Button, Pattern - user manual
 |
UPC - 766907526516
View all ViewSonic PJD5123 manuals
Add to My Manuals
Save this manual to your list of manuals |
Page 16 highlights
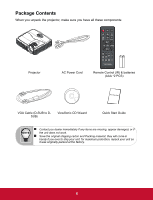
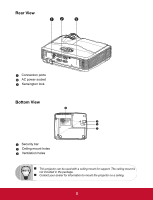
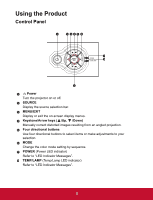
Remote Control 1 Power Turn the projector on or off. 13 2 VGA1 Display COMPUTER IN 1 signal. 14 3 Menu/ Left mouse Display on-screen display menus. Perform the left button of the 3 mouse when mouse mode is 4 15 16 17 activated. 5 4 Mouse/ Right mouse Switch between the normal and 6 mouse modes. Perform the right button of the 5 18 19 mouse when mouse mode is activated. 5 Keystone/Arrow keys ( /Up, /Down) 7 8 9 20 21 Manually correct distorted images 10 resulting from an angled projection. 11 12 22 23 6 Left When the On-Screen Display (OSD) menu is activated, the #5, #6, and #19 keys are used as directional arrows to select the desired menu items and to make adjustments. 7 Timer Activate P-Timer OSD menu. 11 Color Mode Select the picture setup mode. 12 Blank Hide the screen picture. 8 My Button User definable key for customized 13 function. Source Display the source selection bar. 9 Pattern Display embedded test pattern. 10 Freeze Freeze the projected image. 14 Auto Automatically determines the best picture timings for the displayed image. EN-11 11
-
 1
1 -
2
-
3
-
4
-
5
-
6
-
7
-
8
-
9
-
10
-
 11
11 -
 12
12 -
 13
13 -
 14
14 -
 15
15 -
 16
16 -
 17
17 -
 18
18 -
 19
19 -
 20
20 -
 21
21 -
22
-
23
-
24
-
25
-
26
-
27
-
28
-
29
-
30
-
31
-
32
-
33
-
34
-
35
-
36
-
37
-
38
-
39
-
40
-
41
-
42
-
43
-
44
-
45
-
46
-
47
-
48
-
49
-
50
-
51
-
52
-
53
-
54
-
55
 |
 |
