Vizio E55-C2 User Manual (English) - Page 36
Locking and Unlocking the Custom Picture Modes, Deleting a Custom Picture Mode
 |
View all Vizio E55-C2 manuals
Add to My Manuals
Save this manual to your list of manuals |
Page 36 highlights
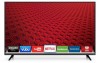
4 Locking and Unlocking the Custom Picture Modes Custom picture modes can be locked with a unique PIN to prevent accidental changes to their settings. To lock all custom picture modes: 1. From the PICTURE menu, use the Arrow buttons to highlight Picture Mode Edit and press OK. Select Lock Picture Mode, then press OK. The LOCK PICTURE MODE menu is displayed. VIZIO LOCK PICTURE MODE Create a picture control PIN to prevent change to all custom picture modes. 2. Use the Number Pad on your remote to enter a unique 4-digit PIN. Save 3. Highlight Save and then press the OK button. 4. Press the EXIT button to exit the menu screens. Create a 4 digit passcode using the number keys on the remote. To unlock all custom picture modes: 5. From the PICTURE menu, use the Arrow buttons to highlight Picture Mode Edit and press OK. Select Unlock Picture Mode, then press OK. The UNLOCK PICTURE MODE menu is displayed. 6. Use the Number Pad on your remote to enter your 4-digit PIN. 7. Make any desired changes to the picture modes. 8. To re-lock picture modes, you must create a new 4-digit PIN. Deleting a Custom Picture Mode Custom picture modes that are no longer needed can be deleted. Inputs assigned to a deleted custom picture mode become assigned to the Calibrated picture mode. ToWdidee leteZoaomcustNoomrmapl icPtaunroerammicode: 1. From the PICTURE menu, use the Arrow buttons to highlight Picture Mode Edit and press ExOit K. If t2hD e cust3oDm picture mode is locked, select Unlock Picture Mode and preAsBsCOK. Enter your 4-digit PIN to unlock the custom Inppiuct tureWmideode. CC To delete the user created Custom 1 picture mode, select the Delete button. Delete Cancel 2. Use the Arrow buttons to highlight Delete Picture Mode and press OK. 3. STliUm eeespre thPeictLureeft/RAuigdiho t Arrow buttons to highlight Delete and press OK. 4. Press the BACK button to adjust additional settings or EXIT. Network Settings Help 36
-
 1
1 -
2
-
3
-
4
-
5
-
6
-
7
-
8
-
9
-
10
-
11
-
12
-
13
-
14
-
15
-
16
-
17
-
18
-
19
-
20
-
21
-
22
-
23
-
24
-
25
-
26
-
27
-
28
-
29
-
30
-
 31
31 -
 32
32 -
 33
33 -
 34
34 -
 35
35 -
 36
36 -
 37
37 -
 38
38 -
 39
39 -
 40
40 -
 41
41 -
42
-
43
-
44
-
45
-
46
-
47
-
48
-
49
-
50
-
51
-
52
-
53
-
54
-
55
-
56
-
57
-
58
-
59
-
60
-
61
-
62
-
63
-
64
-
65
-
66
-
67
-
68
-
69
-
70
-
71
-
72
-
73
-
74
-
75
-
76
-
77
-
78
-
79
 |
 |