Weider Pro 9600 English Manual - Page 29
Begin Each Assembly Stage To Open The Parts Bag Labeled
 |
View all Weider Pro 9600 manuals
Add to My Manuals
Save this manual to your list of manuals |
Page 29 highlights
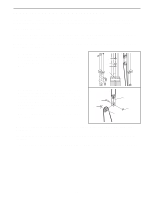
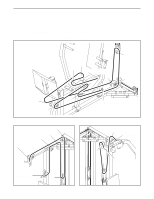
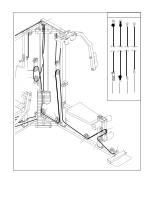
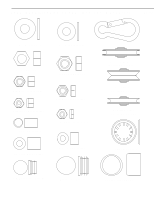
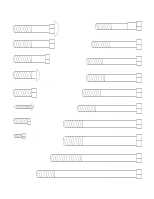
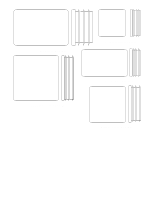
This chart is provided to help you identify the small parts used in assembly. The number in parenthesis following each part description refers to the key number of the part from the PART LIST in the center of this manual. Important: Some parts may have been pre-assembled for shipping purposes. If you cannot find a part in the parts bags, check to see if it has been pre-assembled. Note: The assembly procedure is divided into four stages: 1) frame assembly, 2) arm assembly, 3) cable assembly, and 4) seat assembly. The hardware for each stage is packaged separately. WAIT UNTIL YOU BEGIN EACH ASSEMBLY STAGE TO OPEN THE PARTS BAG LABELED FOR THAT ASSEMBLY STAGE.
-
 1
1 -
2
-
3
-
4
-
5
-
6
-
7
-
8
-
9
-
10
-
11
-
12
-
13
-
14
-
15
-
16
-
17
-
18
-
19
-
20
-
21
-
22
-
23
-
 24
24 -
 25
25 -
 26
26 -
 27
27 -
 28
28 -
 29
29 -
 30
30 -
 31
31 -
 32
32 -
 33
33 -
 34
34 -
35
 |
 |

Note: The assembly procedure is divided into four stages: 1) frame
assembly, 2) arm assembly, 3) cable assembly, and 4) seat assembly.
The hardware for each stage is packaged separately. WAIT UNTIL YOU
BEGIN EACH ASSEMBLY STAGE TO OPEN THE PARTS BAG LABELED
FOR THAT ASSEMBLY STAGE.
This chart is provided to help you identify the small parts used in assembly. The number in parenthesis following
each part description refers to the key number of the part from the PART LIST in the center of this manual.
Important: Some parts may have been pre-assembled for shipping purposes. If you cannot find a part in
the parts bags, check to see if it has been pre-assembled.