Weider Pro 9600 English Manual - Page 8
Secure the Weight Guides to the Press Base
 |
View all Weider Pro 9600 manuals
Add to My Manuals
Save this manual to your list of manuals |
Page 8 highlights
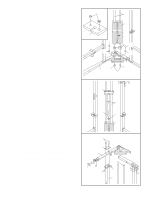
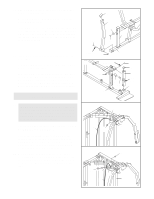
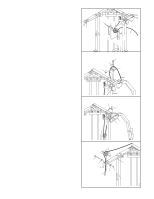
9. See the inset drawing. Insert two Weight Inserts (56) into each Weight (21). Set the two Weight Bumpers (51) over the holes in the corner bar of the Press Base (6). Slide the Weight Guides (15) through the Weight Bumpers (51) and the holes in the Press Base (6). Secure the Weight Guides to the Press Base with two 3/8" x 2 3/4" Bolts (89), four 3/8" Flat Washers (48), and two 3/8" Nylon Locknuts (50). Slide the Weights (21) onto the Weight Guides (15), stacking them on top of the Weight Bumpers (51). Note: Be sure the Weights are oriented so that the slots in the Weights are toward the front, as shown. 9 21 56 89 48 15 21 Slot 51 89 48 10. Press the Weight Tube Bumper (18) into the Weight 10 Tube (17). Slide the Top Weight (16) onto the Weight Guides (15), so that the Weight Tube (17) goes into the center hole in the Weights (21). 6 48 48 50 16 15 17 18 21 11. Press a 1 1/2" x 2 1/2" Inner Cap (83) into the end of the Press Top Frame (9). Attach the Press Top Frame (9) and a Support Plate (94) to the Press Upright (2) with two 3/8" x 2 1/2" Bolts (87) and two 3/8" Nylon Locknuts (50). Do not tighten the Nylon Locknuts yet. Note: Be sure that the Weight Guides (15) are properly positioned in relation to the Press Top Frame (9), as shown in drawing 12 on the next page. 11 83 87 94 9 50 15 50 2 8
-
 1
1 -
2
-
 3
3 -
 4
4 -
 5
5 -
 6
6 -
 7
7 -
 8
8 -
 9
9 -
 10
10 -
 11
11 -
 12
12 -
 13
13 -
14
-
15
-
16
-
17
-
18
-
19
-
20
-
21
-
22
-
23
-
24
-
25
-
26
-
27
-
28
-
29
-
30
-
31
-
32
-
33
-
34
-
35
 |
 |
