Weider Wedier Pro 9635 Canadian English Manual - Page 15
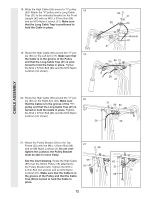
Locate the Military Press Cable 72.
 |
View all Weider Wedier Pro 9635 manuals
Add to My Manuals
Save this manual to your list of manuals |
Page 15 highlights
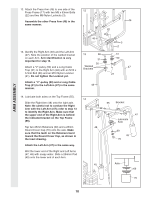
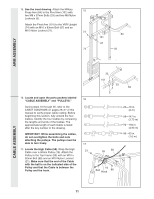
28. Attach the end of the Low Cable (23) to the 28 Long "U"-bracket (57) with an M8 Nylon Locknut (3) and an M8 Washer (8). Do not completely tighten the Locknut. It should be threaded onto the end of the Cable so that only two threads are showing past the Locknut, as shown in the inset drawing. 3 3 8 23 29. Attach the High Cable (58) to a Small "U"bracket (71) with an M8 Nylon Locknut (3) 29 and an M8 Washer (8). Do not completely tighten the Locknut. It should be threaded onto the end of the Cable so that only two threads are showing past the Locknut, as shown in the inset drawing. Attach the Small "U"-bracket (71) to the indicated Weight Tube (63) with an M8 x 45mm Bolt (24) and an M8 Nylon Locknut (3). 57 58 3 71 63 57 23 24 CABLE ASSEMBLY 58 71 8 3 30. Locate the Military Press Cable (72). Attach 30 the Military Press Cable to the other Small "U"-bracket (71) with an M8 Nylon Locknut (3) 3 and an M8 Washer (8). Do not completely tighten the Locknut. It should be threaded onto the end of the Cable so that only two threads are showing past the Locknut, as 63 shown in the inset drawing. Attach the Small "U"-bracket (71) to the indicated Weight Tube (63) with an M8 x 45mm Bolt (24) and an M8 Nylon Locknut (3). 72 71 8 3 15 8 3 72 71 24 8 3
-
 1
1 -
2
-
3
-
4
-
5
-
6
-
7
-
8
-
9
-
 10
10 -
 11
11 -
 12
12 -
 13
13 -
 14
14 -
 15
15 -
 16
16 -
 17
17 -
 18
18 -
 19
19 -
 20
20 -
21
-
22
-
23
-
24
-
25
-
26
-
27
-
28
-
29
-
30
-
31
-
32
-
33
-
34
 |
 |
