Weider Wedier Pro 9635 Canadian English Manual - Page 6
Frame Assembly
 |
View all Weider Wedier Pro 9635 manuals
Add to My Manuals
Save this manual to your list of manuals |
Page 6 highlights
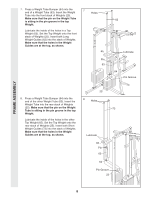
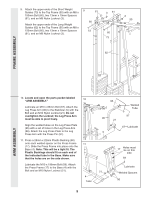
2. Slide the VKR Upright (74) and the Leg Press Upright (56) onto the indicated M8 x 62mm Carriage Bolts (1) in the Stabilizer (5). The high side of the brackets on the VKR Upright and Leg Press Upright should be on the side shown. Hand-tighten four M8 Nylon Locknuts (3) onto the Carriage Bolts. Do not tighten the Locknuts yet. Attach the Rubber Bumper (91) to the Leg Press Upright (56) with the M4 x 13mm Selftapping Screw (87) and an M4 Washer (76). 2 74 87 High Sides 76 of Brackets 91 56 3. Slide the Front Upright (42) onto the M8 x 62mm Carriage Bolts (1) in the Base (4). Handtighten an M8 Nylon Locknut (3) onto each Carriage Bolt. Do not tighten the Locknuts yet. 3 3 3 1 3 3 5 1 FRAME ASSEMBLY 42 3 4 1 6
-
 1
1 -
 2
2 -
 3
3 -
 4
4 -
 5
5 -
 6
6 -
 7
7 -
 8
8 -
 9
9 -
 10
10 -
 11
11 -
 12
12 -
13
-
14
-
15
-
16
-
17
-
18
-
19
-
20
-
21
-
22
-
23
-
24
-
25
-
26
-
27
-
28
-
29
-
30
-
31
-
32
-
33
-
34
 |
 |

6
2.
Slide the VKR Upright (74) and the Leg Press
Upright (56) onto the indicated M8 x 62mm
Carriage Bolts (1) in the Stabilizer (5).
The
high side of the brackets on the VKR
Upright and Leg Press Upright should be
on the side shown.
Hand-tighten four M8
Nylon Locknuts (3) onto the Carriage Bolts.
Do not tighten the Locknuts yet.
Attach the Rubber Bumper (91) to the Leg
Press Upright (56) with the M4 x 13mm Self-
tapping Screw (87) and an M4 Washer (76).
3.
Slide the Front Upright (42) onto the M8 x
62mm Carriage Bolts (1) in the Base (4).
Handtighten an M8 Nylon Locknut (3) onto
each Carriage Bolt.
Do not tighten the
Locknuts yet.
2
1
1
56
74
3
3
3
3
5
High Sides
of Brackets
3
FRAME ASSEMBLY
42
4
1
3
87
91
76