WestBend TEMPR100 Instruction Manual - Page 6
Egg & Toast Function for breakfast sandwich, Note: DO NOT, CAUTION
 |
View all WestBend TEMPR100 manuals
Add to My Manuals
Save this manual to your list of manuals |
Page 6 highlights
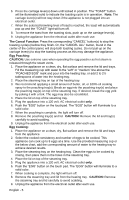
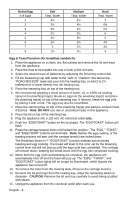
Boiled Egg # of Eggs 1 2 3 4 5 6 7 8 Soft Tbsp. Water 3½ 3¼ 2¾ 2½ 2½ 2¼ 2 1¾ Medium Tbsp. Water 4½ 4¼ 3¾ 3½ 3½ 3¼ 2¾ 2½ Hard Tbsp. Water 7 6¾ 6¼ 6 5 4¾ 4¼ 4 Egg & Toast Function (for breakfast sandwich): 1. Place the appliance on a clean, dry, flat surface and remove the lid and trays from the appliance. 2. Place the food to be toasted into one or both of the slot sets. 3. Select the desired level of darkness by adjusting the browning control dial. 4. Fill the measuring cup with water to the "soft" or "medium" line above the "POACHED EGG" mark and pour into the heating tray, or add 2 to 2½ tablespoons of water directly into the heating tray. 5. Place the steaming tray on top of the heating tray. 6. We recommend applying a small amount of butter, oil, or 100% oil cooking spray to the poaching tray(s). Break an egg into the poaching tray(s) and place the poaching tray(s) on top of the steaming tray. If desired, break the egg yolk by poking it with a fork. The egg may also be scrambled. 7. Place the warming tray on top of the poaching tray(s) and add pre-cooked meat, if desired. Note: DO NOT use raw or uncooked meats in this appliance. 8. Place the lid on top of the warming tray. 9. Plug the appliance into a 120 volt, AC electrical outlet only. 10. Push the "EGG/TOAST" button on the touchpad. The "EGG/TOAST" button will flash. 11. Press the carriage lever(s) down until locked into position. The "EGG," "TOAST," and "EGG/TOAST" buttons will illuminate. Note: Neither the egg cooking, or the toasting process will start until the carriage lever(s) are locked down. The Breakfast Station's™ "EGG/TOAST" function enables synchronized toasting and egg cooking. The bread will toast to the color set by the browning control lever but will not pop up until the egg cycle has completed. The carriage will remain down, keeping the bread warm until the egg has completed cooking. 12. When both the egg cycle and toasting are complete, the appliance will automatically shut off and the toast will pop up. The "EGG," "TOAST," and "EGG/TOAST" button lights will no longer be illuminated, which signals the appliance has turned off. 13. To remove the toast from the toasting slots, lift up on the carriage lever(s). 14. Remove the lid and trays from the heating tray. Allow the remaining steam to dissipate. CAUTION: Remove the lid and tray carefully to avoid being scalded with steam. 15. Unplug the appliance from the electrical outlet after each use. English - 6
-
 1
1 -
 2
2 -
 3
3 -
 4
4 -
 5
5 -
 6
6 -
 7
7 -
 8
8 -
 9
9 -
 10
10 -
 11
11 -
 12
12 -
13
-
14
-
15
-
16
-
17
-
18
-
19
-
20
-
21
-
22
-
23
-
24
-
25
-
26
-
27
-
28
 |
 |
