Western Digital My Book Pro User Manual - Page 24
Upgrading the Device Capacity, Registering the Device, Applications, WD Drive Utilities
 |
View all Western Digital My Book Pro manuals
Add to My Manuals
Save this manual to your list of manuals |
Page 24 highlights
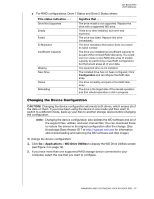
MY BOOK PRO USER MANUAL d. Read the explanation about permanently erasing all of the data on the drive when you change the configuration and select the I understand... check box to signify that you accept the risk and activate the Erase Drive button. Important: If you want to save any of the data that is on the device drives, back it up to another storage device before continuing with the drive erase. e. Click Erase Drive to begin the erase operation. 5. When prompted, type your computer logon password and click OK: 6. A completion message signifies that the drive erase has completed and the drive is ready to use: 7. Go to http://support.wd.com and see Knowledge Base Answer ID 7 for information about downloading and restoring the WD software and disk image. Upgrading the Device Capacity 1. Use steps Steps 1 through 5 of "Removing and Replacing the Drive" on page 24 to remove both drives. 2. Use Steps 6 through 10 to install the new drives. 3. Use the WD Drive Utilities software to confirm the New Drive status indication and reconfigure the device. (See "Changing the Device Configuration" on page 16.) Important: Only use WD Black™ hard drives to upgrade the capacity of your My Book Pro device. Also, both drives must be new, and have the same capacity for RAID configurations. Using any other hard drive or mixed drive capacities voids the warranty for your My Book Pro device. Registering the Device The WD Drive Utilities software uses your computer's Internet connection to register your drive. Registering the drive provides free technical support during the warranty period and keeps you up-to-date on the latest WD products. 1. Click Go > Applications > WD Drive Utilities to display the WD Drive Utilities screen (see Figure 4 on page 12). MANAGING AND CUSTOMIZING YOUR MY BOOK PRO - 20
-
 1
1 -
2
-
3
-
4
-
5
-
6
-
7
-
8
-
9
-
10
-
11
-
12
-
13
-
14
-
15
-
16
-
17
-
18
-
 19
19 -
 20
20 -
 21
21 -
 22
22 -
 23
23 -
 24
24 -
 25
25 -
 26
26 -
 27
27 -
 28
28 -
 29
29 -
30
-
31
-
32
-
33
-
34
-
35
-
36
-
37
-
38
-
39
-
40
-
41
 |
 |
