Xerox 6180MFP User Guide - Page 57
Manually Setting the Printer’s IP Address, Using the Control Panel
 |
UPC - 095205733839
View all Xerox 6180MFP manuals
Add to My Manuals
Save this manual to your list of manuals |
Page 57 highlights
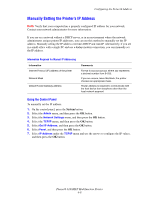
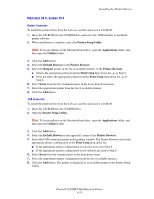
Configuring the Network Address Manually Setting the Printer's IP Address Note: Verify that your computer has a properly configured IP address for your network. Contact your network administrator for more information. If you are on a network without a DHCP server, or in an environment where the network administrator assigns printer IP addresses, you can use this method to manually set the IP address. Manually setting the IP address overrides DHCP and AutoIP. Alternatively, if you are in a small office with a single PC and use a dialup modem connection, you can manually set the IP address. Information Required for Manual IP Addressing Information Internet Protocol (IP) address of the printer Network Mask Default Router/Gateway address Comments Format is xxx.xxx.xxx.xxx, where xxx represents a decimal number from 0-255. If you are unsure, leave this blank; the printer chooses an appropriate mask. Router address is required to communicate with the host device from anywhere other than the local network segment. Using the Control Panel To manually set the IP address: 1. On the control panel, press the System button. 2. Select the Admin menu, and then press the OK button. 3. Select the Network Settings menu, and then press the OK button. 4. Select the TCP/IP menu, and then press the OK button. 5. Select Get IP Address, and then press the OK button. 6. Select Panel, and then press the OK button. 7. Select IP Address under the TCP/IP menu and use the arrows to configure the IP values, and then press the OK button. Phaser® 6180MFP Multifunction Printer 4-8
-
 1
1 -
2
-
3
-
4
-
5
-
6
-
7
-
8
-
9
-
10
-
11
-
12
-
13
-
14
-
15
-
16
-
17
-
18
-
19
-
20
-
21
-
22
-
23
-
24
-
25
-
26
-
27
-
28
-
29
-
30
-
31
-
32
-
33
-
34
-
35
-
36
-
37
-
38
-
39
-
40
-
41
-
42
-
43
-
44
-
45
-
46
-
47
-
48
-
49
-
50
-
51
-
 52
52 -
 53
53 -
 54
54 -
 55
55 -
 56
56 -
 57
57 -
 58
58 -
 59
59 -
 60
60 -
 61
61 -
 62
62 -
63
-
64
-
65
-
66
-
67
-
68
-
69
-
70
-
71
-
72
-
73
-
74
-
75
-
76
-
77
-
78
-
79
-
80
-
81
-
82
-
83
-
84
-
85
-
86
-
87
-
88
-
89
-
90
-
91
-
92
-
93
-
94
-
95
-
96
-
97
-
98
-
99
-
100
-
101
-
102
-
103
-
104
-
105
-
106
-
107
-
108
-
109
-
110
-
111
-
112
-
113
-
114
-
115
-
116
-
117
-
118
-
119
-
120
-
121
-
122
-
123
-
124
-
125
-
126
-
127
-
128
-
129
-
130
-
131
-
132
-
133
-
134
-
135
-
136
-
137
-
138
-
139
-
140
-
141
-
142
-
143
-
144
-
145
-
146
-
147
-
148
-
149
-
150
-
151
-
152
-
153
-
154
-
155
-
156
-
157
-
158
-
159
-
160
-
161
-
162
-
163
-
164
-
165
-
166
-
167
-
168
-
169
-
170
-
171
-
172
-
173
-
174
-
175
-
176
-
177
-
178
-
179
-
180
-
181
-
182
-
183
-
184
-
185
-
186
-
187
-
188
-
189
-
190
-
191
-
192
-
193
-
194
-
195
-
196
-
197
-
198
-
199
-
200
-
201
-
202
-
203
-
204
-
205
-
206
-
207
-
208
-
209
-
210
-
211
-
212
-
213
-
214
-
215
-
216
-
217
-
218
-
219
-
220
-
221
-
222
-
223
-
224
-
225
-
226
-
227
-
228
-
229
-
230
-
231
-
232
-
233
-
234
-
235
-
236
-
237
-
238
-
239
-
240
-
241
-
242
-
243
-
244
-
245
-
246
-
247
-
248
 |
 |