Xerox 850DX Xerox Wide Format 8825/8830/8850/8855/X2 Tech System Introduction - Page 28
Quick Start for Scanning to Net, Scanning to Net
 |
UPC - 042215454865
View all Xerox 850DX manuals
Add to My Manuals
Save this manual to your list of manuals |
Page 28 highlights
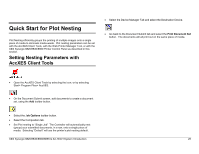
XES Synergix 8825/8830/8850/8855 & X2-TECH System Introduction Quick Start for Scanning to Net Note: Scan-to-Net is a standard feature of the 8830/8850/8855/X2-TECH Digital Solutions, and an optional feature of the 8825 Digital Solution. Effective with Firmware Release 7.5, a new Color Enablement feature key is available enabling Scanning-to-Net in color in TIFF and JPEG formats. The printing of JPEG files is also enabled in Firmware Release 7.5. Scanning to Net • 8825/8830/8850 Digital Solution: If necessary, power on the Scanner/Controller Circuit Breaker/Printer. (The Scanner MUST be powered on first to be recognized.) • 8855 Digital Solution: If necessary, power on the Scanner/Controller /Printer. (The Scanner MUST be powered on first to be recognized.) • X2-TECH Digital Solution: If necessary, power on the Scanner/Printer/Controller. • If job accounting is enabled, enter in your User ID and Account ID when prompted and press Enter. If job accounting is not enabled, you will not have to enter your IDs. • If you want to see a preview of the scanned images when they are retrieved from the Controller to your workstation, verify that the scanner's default "Preview" box is checked. (On the Synergix Scan System it is located by selecting the Menu button. On the MAIN MENU select CONFIGURATION > SCAN OPTIONS - LINE OR PHOTO (OR COLOR, if enabled) > PREVIEW .) Use the Previous, Next, and Enter keys to navigate to and through available selections. Use the Enter key to confirm your choice(s). • With Ready to Copy displayed on the Scanner Control Panel, press the Mode key. 20 • Use the keypad on the Scanner Control Panel to enter in your 16 alphanumeric character Scan Directory name. • When the Scanner Control Panel displays Ready to Scan, select your desired scanning resolution using the NEXT and PREVIOUS keys. NOTE: Your selected Scan-to-Network file format is displayed in the lower left corner of the Scanner Control Panel screen. To change formats (including color format, if enabled), press the Menu key. Select CONFIGURATION (using the Previous and Next keys, if necessary) and press Enter. Using the Next key, select Scan Options (Line or Photo or Color-if color is enabled) and press Enter. Use the Previous, Next, and Enter keys to navigate to and through the available selections. Press the Enter key to confirm your choice(s). Press the Menu key to put the scanner back on line. NOTE: When making a color scan, be sure to select "Mixed/Custom" with the arrow key under Image Quality on the Scanner Control Panel. • Insert your original document face down and centered on the feed tray of the Scanner. • Gently move your document forward until the Scanner's feed rolls engage the document's leading edge. • If prompted to do so, enter the desired scanning width and press Enter. • As your document is automatically fed into the Scanner, the resulting image is stored as a file in the Scan Directory on the system Controller's hard drive. The image can be retrieved at your workstation using the Retrieve Tool of the AccXES Client Tools. NOTE: You may have to press the Start button if the configuration (for Auto Scan) has been changed from the factory default. For full details on Scanner Configuration refer to the XES Synergix & X2-TECH Digital Solution User Guide.
-
 1
1 -
2
-
3
-
4
-
5
-
6
-
7
-
8
-
9
-
10
-
11
-
12
-
13
-
14
-
15
-
16
-
17
-
18
-
19
-
20
-
21
-
22
-
 23
23 -
 24
24 -
 25
25 -
 26
26 -
 27
27 -
 28
28 -
 29
29 -
 30
30 -
 31
31 -
 32
32 -
 33
33 -
34
-
35
-
36
-
37
-
38
-
39
-
40
-
41
-
42
-
43
-
44
-
45
-
46
-
47
-
48
-
49
-
50
-
51
-
52
-
53
-
54
-
55
-
56
-
57
-
58
-
59
-
60
-
61
-
62
-
63
-
64
-
65
-
66
-
67
-
68
-
69
-
70
-
71
-
72
-
73
-
74
-
75
-
76
-
77
-
78
-
79
-
80
-
81
-
82
-
83
-
84
-
85
-
86
-
87
-
88
-
89
-
90
-
91
-
92
-
93
-
94
-
95
-
96
-
97
-
98
 |
 |
