Yamaha AW4416 Reference Guide - Page 116
Import CD-DA to an audio track
 |
View all Yamaha AW4416 manuals
Add to My Manuals
Save this manual to your list of manuals |
Page 116 highlights
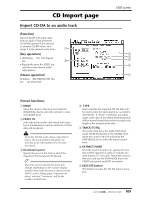
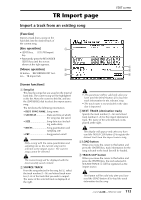
CD Import page Import CD-DA to an audio track [Function] Import CD-DA (CD audio) data from an audio CD/mixed-mode CD-ROM inserted in the internal or external CD-RW drive, and assign it to the desired audio track. 1 [Key operation] • [EDIT] key ¡ [F3] (CD Import) key 5 • Repeatedly press the [EDIT] key until the screen shown at the right appears. [Mouse operation] M button ¡ RECORDER EDIT button ¡ CD Import tab EDIT screen 2 3 4 6 7 [Screen functions] A DRIVE Move the cursor to this area and rotate the [DATA/JOG] dial to select the internal or external CD-RW drive. B PASTE TO Select the track number and virtual track number of the destination track in which the CD-DA data will be placed. Since the CD-DA audio data is imported in stereo, the track number will always be selected as an odd-numbered/even-numbered pair. C Destination point Specify the point in the track at which the imported CD-DA data will be placed. Tip! The units used to specify this point will change depending on the counter display method (time/units/measures) selected in the SONG screen Setting page. If measure display is selected, "measures" will be the smallest settable unit. D TYPE Select whether the imported CD-DA data will be inserted into the track (Insert) or overwritten (OverWrite). If "Insert" is selected, any subsequent audio data in the import destination track will be moved toward the end of the song by the length of the inserted audio data. E TRACK/TOTAL This is the track list of the audio CD/mixedmode CD-ROM inserted in the CD-RW drive. Move the cursor to this list and rotate the [DATA/JOG] dial to select the import source track. F EXTRACT POINT From the track selected in 5, specify the area that will be imported in units of "minutes:seconds:frames (1/75 second)." Move the cursor to this area, and use the [DATA/JOG] dial to set START (start point) and END (end point). G EXECUTE button This button executes the CD-DA import operation. 109 - Reference Guide
-
 1
1 -
2
-
3
-
4
-
5
-
6
-
7
-
8
-
9
-
10
-
11
-
12
-
13
-
14
-
15
-
16
-
17
-
18
-
19
-
20
-
21
-
22
-
23
-
24
-
25
-
26
-
27
-
28
-
29
-
30
-
31
-
32
-
33
-
34
-
35
-
36
-
37
-
38
-
39
-
40
-
41
-
42
-
43
-
44
-
45
-
46
-
47
-
48
-
49
-
50
-
51
-
52
-
53
-
54
-
55
-
56
-
57
-
58
-
59
-
60
-
61
-
62
-
63
-
64
-
65
-
66
-
67
-
68
-
69
-
70
-
71
-
72
-
73
-
74
-
75
-
76
-
77
-
78
-
79
-
80
-
81
-
82
-
83
-
84
-
85
-
86
-
87
-
88
-
89
-
90
-
91
-
92
-
93
-
94
-
95
-
96
-
97
-
98
-
99
-
100
-
101
-
102
-
103
-
104
-
105
-
106
-
107
-
108
-
109
-
110
-
 111
111 -
 112
112 -
 113
113 -
 114
114 -
 115
115 -
 116
116 -
 117
117 -
 118
118 -
 119
119 -
 120
120 -
 121
121 -
122
-
123
-
124
-
125
-
126
-
127
-
128
-
129
-
130
-
131
-
132
-
133
-
134
-
135
-
136
-
137
-
138
-
139
-
140
-
141
-
142
-
143
-
144
-
145
-
146
-
147
-
148
-
149
-
150
-
151
-
152
-
153
-
154
-
155
-
156
-
157
-
158
-
159
-
160
-
161
-
162
-
163
-
164
-
165
-
166
-
167
-
168
-
169
-
170
-
171
-
172
-
173
-
174
-
175
-
176
-
177
-
178
-
179
-
180
-
181
-
182
-
183
-
184
-
185
-
186
-
187
-
188
-
189
-
190
-
191
 |
 |
