Yamaha DTX500K Owner's Manual - Page 10
Connections, 1 Connecting the Pads, Setting up with Acoustic Drums, 2 Setting Up the Power Supply - electric drum kit
 |
View all Yamaha DTX500K manuals
Add to My Manuals
Save this manual to your list of manuals |
Page 10 highlights
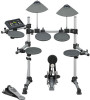
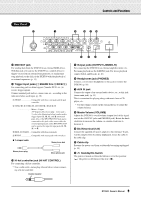
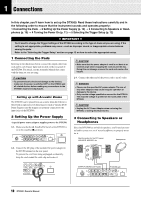
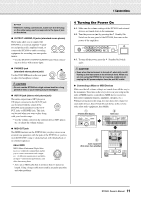
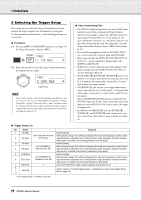
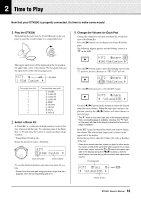
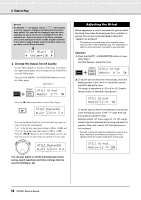
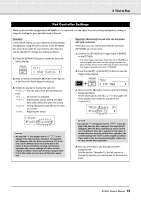
1 Connections In this chapter, you'll learn how to set up the DTX500. Read these instructions carefully and in the following order to ensure that the instrument sounds and operates properly: 1 Connecting the Pads → 2 Setting Up the Power Supply (p. 10) → 3 Connecting to Speakers or Headphones (p. 10) → 4 Turning the Power On (p. 11) → 5 Selecting the Trigger Setup (p. 12) !! IMPORTANT !! You'll need to change the Trigger Settings of the DTX500 according to the type of drum set you are using. If the setting is not appropriate, problems may occur-such as improper sound, or inappropriate volume balance among the pads. Refer to the "Selecting the Trigger Setup" section on page 12 on how to select the appropriate setup. 1 Connecting the Pads Referring to the illustration below, connect the output cable from each pad to each Trigger Input jack located on the rear panel of the DTX500. For details, see the Assembly Manual that comes with the drum set you are using. CAUTION • To prevent electric shock and damage to the devices, make sure the power is switched OFF on the DTX500 and all related devices before making any connections to the DTX500's input and output jacks. Setting up with Acoustic Drums The DTX500 can be played from an acoustic drum kit if the kit is fitted with an optional set of drum triggers (such as Yamaha DT20 Drum Triggers) and the triggers are properly connected to the input jacks of the DTX500. CAUTION • Make sure that the power adaptor's cord is not bent at an extreme angle when wrapping the cord around the clip. Doing this can damage or sever the cord and create a fire hazard. 2-3. Connect the other end of the power cord to an AC outlet. WARNING • Please use the specified AC power adaptor. The use of any other adaptors may cause irregular operation or damage to the device. • Only use the voltage specified as correct for the DTX500. The required voltage is printed on the name plate of the DTX500. CAUTION • Unplug the AC Power Adaptor when not using the DTX500, or during electrical storms. 2 Setting Up the Power Supply A special power source adaptor supplies power to the DTX500. 2-1. Make sure that the Standby/On Switch of the DTX500 is set to the standby (?) position. 3 Connecting to Speakers or Headphones Since the DTX500 has no built-in speakers, you'll need an external audio system or a set of stereo headphones to properly monitor it. Monitor system for the DTX series MS100DR, MS50DR, etc. Headphones 2-2. Connect the DC plug of the included AC power adaptor to the DC IN terminal on the rear panel. To prevent the cord from being unplugged accidentally, wrap the cord around the cable clip and secure it. OUTPUT L/MONO and R jacks PHONES jack 10 DTX500 Owner's Manual
-
 1
1 -
2
-
3
-
4
-
 5
5 -
 6
6 -
 7
7 -
 8
8 -
 9
9 -
 10
10 -
 11
11 -
 12
12 -
 13
13 -
 14
14 -
 15
15 -
16
-
17
-
18
-
19
-
20
-
21
-
22
-
23
-
24
-
25
-
26
-
27
-
28
-
29
-
30
-
31
-
32
-
33
-
34
-
35
-
36
-
37
-
38
-
39
-
40
-
41
-
42
-
43
-
44
-
45
-
46
-
47
-
48
 |
 |
