Yamaha DTX500K Owner's Manual - Page 9
Rear Panel, Output jacks OUTPUT L/MONO, R - used
 |
View all Yamaha DTX500K manuals
Add to My Manuals
Save this manual to your list of manuals |
Page 9 highlights
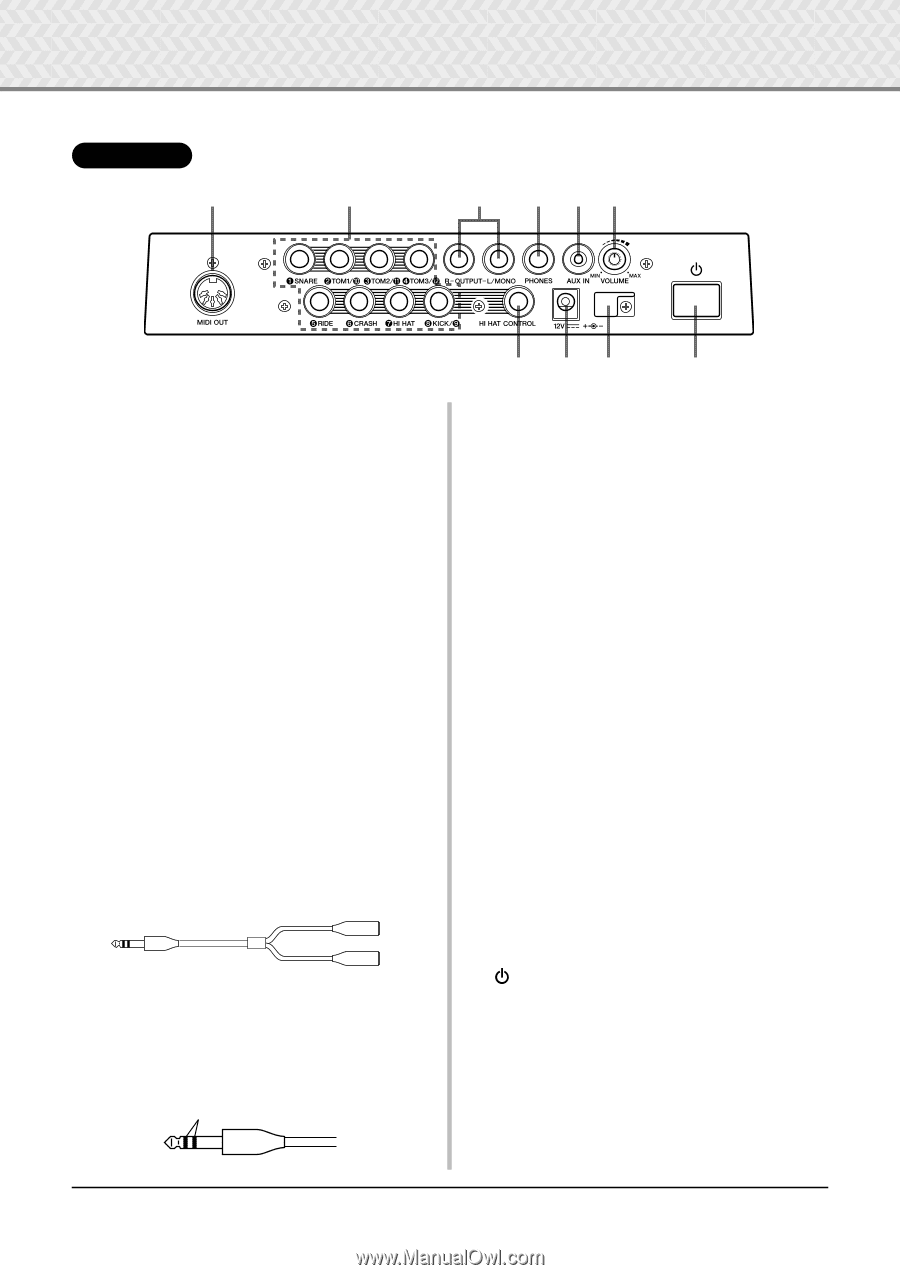
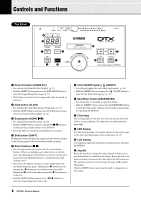
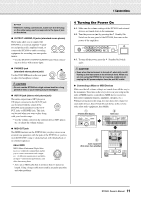
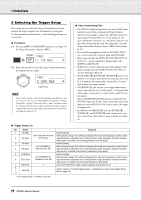
Rear Panel !2 Controls and Functions !3 !5 !6 !7 !8 !2 MIDI OUT jack For sending data from the DTX500 to an external MIDI device. With this jack, you can use the DTX500 as a control device to trigger voices from an external tone generator, or synchronize song playback or the click of the DTX500 with the playback of an external sequencer. (p. 11) !3 Trigger Input jacks (1SNARE thru 8KICK/9) For connecting pads or drum triggers (Yamaha DT20, etc.) to receive trigger signals. Connect external pads such as a snare, tom, etc., according to the indication below each input. (p. 10) 1SNARE Compatible with three-zone pads and the pad controller. 2TOM1/ 0, 3TOM2/ !, 4TOM3/ @, 8KICK/ 9 Mono x 2 inputs A Y-shaped cable (stereo plug-mono jack x 2; refer to the illustration below) can be used to trigger inputs 9, 0, !, and @ (monaural pad). Also, if the KP125W/125/65 kick pad is connected to this jack with a stereo cable, the external pad input jack on the KP125W/125/65 can be used as the input for input jacks 9, 0, !, or @. 5RIDE, 6CRASH ..... Compatible with three-zone pads. 7HI HAT Compatible with stereo pads (with switches) ● Y-shaped cable Mono phone jack Stereo phone plug Mono phone jack !4 Hi-hat controller jack (HI HAT CONTROL) For connecting a hi-hat controller. * Use a cable with a stereo plug (shown below) when connecting a hi-hat controller. Double insulator !4 !9 @0 @1 !5 Output jacks (OUTPUT L/MONO, R) For connecting the DTX500 to an external amplifier, mixer, etc. For mono playback use the L/MONO jack. For stereo playback connect both L and R jacks. (p. 10) !6 Headphones jack (PHONES) Connect a set of stereo headphones to this jack to monitor the DTX500. (p. 10) !7 AUX IN jack Connect the output of an external audio device, etc., to this jack (stereo mini jack). (p. 11) This is convenient for playing along with music from a CD player, etc. * Use the volume control on the external device to adjust the volume balance. !8 Master Volume (VOLUME) Adjusts the DTX500's overall volume (output level of the signal sent via the OUTPUT jacks and PHONES jack). Rotate the knob clockwise to increase the volume, or counter-clockwise to decrease it. !9 DC IN terminal (12V) Connect the supplied AC power adaptor to this terminal. To prevent the adaptor from becoming unplugged, secure the cable to the cable clip. @0 Cable clip Prevents the power cord from accidentally becoming unplugged. (p. 10) @1 Standby/On Switch The power is turned on when the button is set to this position: (>). The power is off when set this way: (?). 9 DTX500 Owner's Manual
-
 1
1 -
2
-
3
-
 4
4 -
 5
5 -
 6
6 -
 7
7 -
 8
8 -
 9
9 -
 10
10 -
 11
11 -
 12
12 -
 13
13 -
 14
14 -
15
-
16
-
17
-
18
-
19
-
20
-
21
-
22
-
23
-
24
-
25
-
26
-
27
-
28
-
29
-
30
-
31
-
32
-
33
-
34
-
35
-
36
-
37
-
38
-
39
-
40
-
41
-
42
-
43
-
44
-
45
-
46
-
47
-
48
 |
 |