Yamaha DTX500K Owner's Manual - Page 14
Adjusting the Hi-hat, ™tom1, Volume=110, UTIL1, Hi-hat, HHofs, MasterEQ, HHofs=-12 - drum set
 |
View all Yamaha DTX500K manuals
Add to My Manuals
Save this manual to your list of manuals |
Page 14 highlights
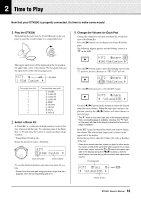
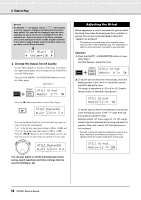
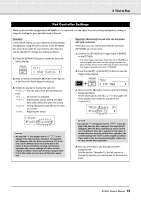
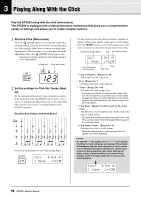
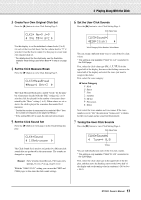
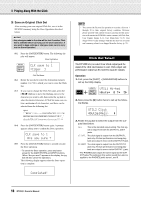
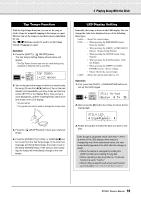
2 Time to Play NOTICE • An asterisk "*" will appear next to "KIT3" in the display once the volume is changed, indicating that the kit has been edited. This asterisk will disappear after the Store operation (p. 32) is carried out. If a different drum kit is selected, etc., before carrying out the Store operation, the current settings will return to their original condition. If you want to keep changes made to the data, make sure you carry out the Store operation. KIT3*~~™tom1~~~˙ "~~Volume=110~~, 4 Change the Output Sound Quality Use the Master Equalizer found on Utility Page 5 to change the output sound quality. Overall settings for the DTX500 are set in the Utility pages. First, press the [SHIFT] + [SAVE/ENTER] buttons to view the Utility pages. Utility (Page 1) UTIL1~Hi-hat HHofs=~~0~T=~~5, Press the [>] button five times to view Utility Page 5. UTIL5~MasterEQ "Lo=+~2~Hi=+~2~, Now use the Master Equalizer (two-band shelving type) setting to change the sound quality. "Lo=" is for the low-range gain setting (+0dB to +12dB) and "Hi=" for the high-range gain setting (+0dB to +12dB). Press the [] buttons to move the flashing cursor to the item you want to set, then rotate the jog dial to set its value. UTIL5~MasterEQ "Lo=+~8~Hi=+~0~, You can also adjust or set the individual pad voices, tuning, reverb type/level, and other settings that fine tune the DTX500 (p. 26). Adjusting the Hi-hat Hi-hat adjustment is used to determine the point at which the hi-hat closes when the hi-hat pedal (foot controller) is pressed. You can also set the threshold at which foot 'splashes' are produced. * This setting is only valid when a foot controller is connected to the HI HAT CONTROL jack. The setting has no effect on a foot controller connected to any other jack. Operation 1. Press the [SHIFT] + [SAVE/ENTER] buttons to view Utility Page 1. Use this display to adjust the hi-hat. UTIL1~Hi-hat HHofs=~~0~T=~~5, 2. To set the point at which the hi-hat closes, move the flashing cursor to the "HHofs=" value then use the jog dial to adjust the value. The range of adjustment is -32 to 0 to +32. Smaller values produce a shallower closing point. UTIL1~Hi-hat HHofs=-12~T=~~5, To set the ease at which foot splashes are produced, move the flashing cursor to the "T=" value then use the jog dial to adjust the value. Settings include "off" and a range of 1 to 127. Larger values make foot splashes that are long and easier to produce. When this is set to "off," foot splashes are not produced. * Too high a value will make foot splashes too easy to pro- duce, resulting in the continuous production of foot splashes when the pedal is held down continuously. UTIL1~Hi-hat HHofs=-12~T=~20, 14 DTX500 Owner's Manual
-
 1
1 -
2
-
3
-
4
-
5
-
6
-
7
-
8
-
 9
9 -
 10
10 -
 11
11 -
 12
12 -
 13
13 -
 14
14 -
 15
15 -
 16
16 -
 17
17 -
 18
18 -
 19
19 -
20
-
21
-
22
-
23
-
24
-
25
-
26
-
27
-
28
-
29
-
30
-
31
-
32
-
33
-
34
-
35
-
36
-
37
-
38
-
39
-
40
-
41
-
42
-
43
-
44
-
45
-
46
-
47
-
48
 |
 |
