Yamaha DVX-S302 Owner's Manual - Page 41
DVD SETUP MENU OPTIONS, General setup menu
 |
View all Yamaha DVX-S302 manuals
Add to My Manuals
Save this manual to your list of manuals |
Page 41 highlights
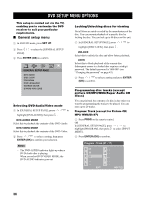
DVD SETUP MENU OPTIONS DVD SETUP MENU OPTIONS This setup is carried out via the TV, enabling you to customize the DVD receiver to suit your particular requirements. ■ General setup menu 1 In DVD/CD mode, press SET UP. 2 Press / to select the [GENERAL SETUP PAGE]. 3 Press ENTER (OK) to confirm. GENERAL SETUP PAGE DVD AUDIO DISC LOCK PROGRAM OSD LANGUAGE SCREEN SAVER DiVX(R) VOD CODE Selecting DVD-Audio/Video mode 1 In [GENERAL SETUP PAGE], presss / to highlight [DVD-AUDIO], then press . DVD-AUDIO MODE Select this to playback the contents of the DVD-Audio. DVD-VIDEO MODE Select this to playback the contents of the DVD-Video. 2 Press / to select a setting, then press ENTER (OK) to confirm your selection. Notes - The DVD-AUDIO indicator lights up when a DVD-Audio disc is playing. - When you select DVD-VIDEO MODE, the DVD-AUDIO indicator goes out. Locking/Unlocking discs for viewing Not all discs are rated or coded by the manufucturer of the disc. You can prevent playback of a specific disc by locking the disc. You can lock up to 40 discs on this unit. 1 In [GENERAL SETUP PAGE], press / to highlight [DISC LOCK], then press . UNLOCK Select this to unlock the disc and allow future playback. LOCK Select this to block playback of the current disc. Subsequent access to a locked disc requires a sixdigit password. The default password is '000 000' (see "Changing the password" on page 43). 2 Press / to select a setting and press ENTER (OK) to confirm. Programming disc tracks (except picture CD/MP3/WMA/Super Audio CD discs) You can playback the contents of a disc in the order you want by programming the tracks to be played. You can store up to 20 tracks. Program: Track (except for Picture CD/ MP3/ WMA/DivX®) 1 Press PROG on the remote control. OR In [GENERAL SETUP PAGE], press / to highlight [PROGRAM], then press to select [INPUT MENU]. 2 Press ENTER (OK) to confirm. 6 2 7 8 9 10 36
-
 1
1 -
2
-
3
-
4
-
5
-
6
-
7
-
8
-
9
-
10
-
11
-
12
-
13
-
14
-
15
-
16
-
17
-
18
-
19
-
20
-
21
-
22
-
23
-
24
-
25
-
26
-
27
-
28
-
29
-
30
-
31
-
32
-
33
-
34
-
35
-
 36
36 -
 37
37 -
 38
38 -
 39
39 -
 40
40 -
 41
41 -
 42
42 -
 43
43 -
 44
44 -
 45
45 -
 46
46 -
47
-
48
-
49
-
50
-
51
-
52
-
53
-
54
-
55
-
56
-
57
-
58
-
59
-
60
-
61
-
62
-
63
-
64
-
65
 |
 |
