Yamaha DVX-S302 Owner's Manual - Page 44
Video setup menu
 |
View all Yamaha DVX-S302 manuals
Add to My Manuals
Save this manual to your list of manuals |
Page 44 highlights
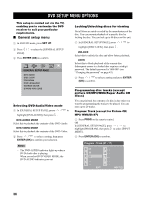
■ Video setup menu 1 In DVD/CD mode, press SET UP. 2 Press / to select [VIDEO SETUP PAGE] icon. 3 Press ENTER (OK) to confirm. VIDEO SETUP PAGE TV TYPE TV DISPLAY PROGRESSIVE PICTURE SETTING COMPONENT BLACK LEVEL CLOSED CAPTION DVD SETUP MENU OPTIONS 1 In [VIDEO SETUP PAGE], press / to highlight [PROGRESSIVE], then press . OFF Select this to disable progressive scan function. ON Select this to enable progressive scan function. 2 Press / to select a setting and press ENTER (OK) to confirm. → Follow the instructions shown on the TV to confirm the selection (if any). - If a blank/distorted TV screen appears, wait for 15 seconds for auto recovery to activate. 5 Note If you are changing the setting to OFF by using the remote control, follow the procedure below. 1 Open the disc tray. ON-SCREEN MENU TV type This menu contains the options for selecting the color system that matches the connected TV. For details, see "Selecting the TV type" on page 24. TV display This menu contains the options for matching the aspect ratio of the receiver to the connected TV. For details, see "Setting the TV display" on page 25. Progressive function The progressive scan display present 60 complete frames per seconds, rather than 30 frames per second of interlaced scanning (ordinary normal TV system). With nearly double the number of lines, progressive scan offers higher picture resolution and eliminates bothersome motion artifacts those jagged edge on moving objects. Note Before enabling the progressive scan function, you must ensure: 1 Turn on your TV progressive scan function (refer to your TV owner's manual). 2 You have connected the DVD receiver to your TV using Y PB PR (see "Connecting a TV" on page 19). 2 Press , then press ANGLE. Picture settings Note This receiver comes with three predefined sets of picture color settings and one personal setting that you can define yourself. 1 In [VIDEO SETUP PAGE], press / to highlight [PICTURE SETTING], then press . STANDARD Select this for the standard picture setting. BRIGHT Select this to make the TV picture brighter. SOFT Select this to make the TV picture softer. PERSONAL Select this to personalize your picture color by adjusting the brightness, contrast, tint and color (saturation). 2 Press / to select a setting and press ENTER (OK) to confirm. 3 If you selected [PERSONAL], proceed to step 4. → The [PERSONAL PICTURE SETUP] menu appears. English 39
-
 1
1 -
2
-
3
-
4
-
5
-
6
-
7
-
8
-
9
-
10
-
11
-
12
-
13
-
14
-
15
-
16
-
17
-
18
-
19
-
20
-
21
-
22
-
23
-
24
-
25
-
26
-
27
-
28
-
29
-
30
-
31
-
32
-
33
-
34
-
35
-
36
-
37
-
38
-
 39
39 -
 40
40 -
 41
41 -
 42
42 -
 43
43 -
 44
44 -
 45
45 -
 46
46 -
 47
47 -
 48
48 -
 49
49 -
50
-
51
-
52
-
53
-
54
-
55
-
56
-
57
-
58
-
59
-
60
-
61
-
62
-
63
-
64
-
65
 |
 |
