Yamaha DVX-S302 Owner's Manual - Page 54
Dimming the display screen, Setting the sleep timer, Recording on an external AV component
 |
View all Yamaha DVX-S302 manuals
Add to My Manuals
Save this manual to your list of manuals |
Page 54 highlights
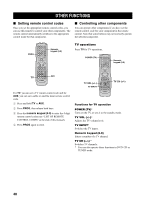
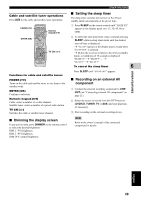
Cable and satellite tuner operations Press AUX for the cable and satellite tuner operations. POWER (TV) POWER DIMMER SLEEP POWER TV ENTER (OK) SCAN PAGE PROG REPEAT - A - B SHUFFLE TOP MENU/RETURN ON SCREEN ENTER MENU SET UP Numeric keypad (0-9) PRESET SUBTITLE AUDIO ANGLE NIGHT ZOOM TVVOL TV CH TV INPUT EFFECT TRE BASS SURR VOL MUTE TV AUX TUNER DVD/CD TV CH (+/-) Functions for cable and satellite tuners POWER (TV) Turns on the cable and satellite tuner, or sets them to the standby mode. ENTER (OK) Confirms a selection. Numeric keypad (0-9) Cable: enters a number of a cable channel. Satellite tuner: enters a number of a preset radio station. TV CH (+/-) Switches the cable or satellite tuner channel. ■ Dimming the display screen In any active mode, press DIMMER on the remote control to select the desired brightness: DIM 1: 70% brightness DIM 2: 40% brightness DIM OFF: normal brightness OTHER FUNCTIONS ■ Setting the sleep timer The sleep timer switches the receiver to Eco Power standby mode automatically at the preset time. 1 Press SLEEP on the remote control until "SLEEP XX" appears in the display panel (XX: 15, 30, 45, 60 or OFF). 2 To select the next sleep timer value, continue pressing SLEEP while in sleep timer mode until the desired turn-off time is displayed. → "SLEEP" appears in the display panel, except when "SLEEP OFF" is selected. → Before the receiver switches to Eco Power standby mode, a countdown of 10 seconds is displayed. "SLEEP 10" → "SLEEP 9".... → "SLEEP 2" → "SLEEP 1" To cancel the sleep timer 6 Press SLEEP until "SLEEP OFF" appears. OTHER FEATURES ■ Recording on an external AV component 1 Connect the external recording component to LINE OUT (see "Connecting external AV components" on page 21). 2 Select the source to record from this DVD receiver (DVD/CD, TUNER, TV or AUX) and start playback (if necessary). 3 Start recording on the external recording device. Note Refer to the owner's manual of the connected component for details. English 49
-
 1
1 -
2
-
3
-
4
-
5
-
6
-
7
-
8
-
9
-
10
-
11
-
12
-
13
-
14
-
15
-
16
-
17
-
18
-
19
-
20
-
21
-
22
-
23
-
24
-
25
-
26
-
27
-
28
-
29
-
30
-
31
-
32
-
33
-
34
-
35
-
36
-
37
-
38
-
39
-
40
-
41
-
42
-
43
-
44
-
45
-
46
-
47
-
48
-
 49
49 -
 50
50 -
 51
51 -
 52
52 -
 53
53 -
 54
54 -
 55
55 -
 56
56 -
 57
57 -
 58
58 -
 59
59 -
60
-
61
-
62
-
63
-
64
-
65
 |
 |
