Yamaha MT4X Owner's Manual - Page 42
Adjust the record levels on the master recorder.
 |
View all Yamaha MT4X manuals
Add to My Manuals
Save this manual to your list of manuals |
Page 42 highlights
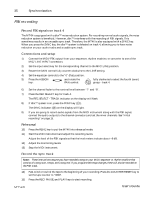
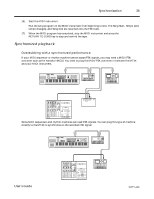
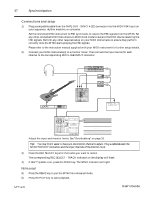
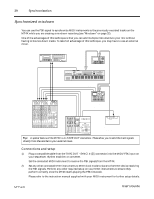
Synchronization 40 3) Plug compatible cables from the other TAPE OUT connectors (1, 2, and 3) into the inputs of your mixer. Tip: An alternative approach is to create a stereo mixdown with the built-in mixer and send that to the external mixer from the STEREO OUT connectors. 4) Connect the audio outputs from the MIDI instruments to the mixer inputs. 5) Connect the stereo inputs of the master recorder to the stereo outputs of the mixer. 6) Connect any external signal processors to the auxiliary connectors of the mixer. Rehearsal 7) If dbx™ system is on, press the SYNC key. The SYNC indicator will light. 8) Press the PLAY key to start playback. The MIDI instruments will start to playback in sync with the data recorded on track 4. 9) Adjust the levels, equalization, and pan of each channel on the mixer. Set the auxiliary send and return. Adjust the record levels on the master recorder. 10) When you are satisfied with the levels, press the RETURN TO ZERO key to stop the rehearsal and rewind the tape. Recording 11) Insert a tape into the master recorder. 12) Start recording on the master recorder. Press the PLAY key on the MT4X to start playback. The synchronized mixdown will be carried out automatically. Check the recording 13) When the recording is finished, rewind the master recorder and play back the tape. User's Guide
-
 1
1 -
2
-
3
-
4
-
5
-
6
-
7
-
8
-
9
-
10
-
11
-
12
-
13
-
14
-
15
-
16
-
17
-
18
-
19
-
20
-
21
-
22
-
23
-
24
-
25
-
26
-
27
-
28
-
29
-
30
-
31
-
32
-
33
-
34
-
35
-
36
-
 37
37 -
 38
38 -
 39
39 -
 40
40 -
 41
41 -
 42
42 -
 43
43 -
 44
44 -
 45
45 -
 46
46 -
 47
47 -
48
-
49
-
50
-
51
-
52
-
53
-
54
-
55
-
56
 |
 |