Yamaha RX-V4A RX-V4A User Guide - Page 58
Connecting the AM antenna, Assembling and connecting the AM antenna
 |
View all Yamaha RX-V4A manuals
Add to My Manuals
Save this manual to your list of manuals |
Page 58 highlights
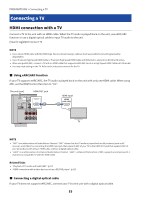
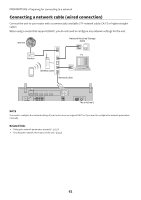
PREPARATIONS > Connecting the radio antennas Connecting the AM antenna Model For U.S.A., Canada, Asia, Korea, China, Taiwan, Brazil, General, and Central and South America Connect the supplied AM antenna to the unit. Place the AM antenna on a flat surface. AM antenna HDMI OUT 1 2 eARC/ARC (1 MOVIE) HDMI 3 4 AUDIO 2 (3 MUSIC) COAXIAL AUDIO 3 AUDIO 4 AUDIO 5 C CENTER SPEAKERS FR FL FRONT SR SL SURROUND /ZONE B/BI-AMP NETWORK (4 NET RADIO) PRE OUT SUBWOOFER 1 2 ANTENNA AM ( 2 RADIO ) FM 75 The unit (rear) Assembling and connecting the AM antenna Hold down Insert Release NOTE ( Unwind only the length of cable needed from the AM antenna unit. ( The wires of the AM antenna have no polarity. 58
-
 1
1 -
2
-
3
-
4
-
5
-
6
-
7
-
8
-
9
-
10
-
11
-
12
-
13
-
14
-
15
-
16
-
17
-
18
-
19
-
20
-
21
-
22
-
23
-
24
-
25
-
26
-
27
-
28
-
29
-
30
-
31
-
32
-
33
-
34
-
35
-
36
-
37
-
38
-
39
-
40
-
41
-
42
-
43
-
44
-
45
-
46
-
47
-
48
-
49
-
50
-
51
-
52
-
 53
53 -
 54
54 -
 55
55 -
 56
56 -
 57
57 -
 58
58 -
 59
59 -
 60
60 -
 61
61 -
 62
62 -
 63
63 -
64
-
65
-
66
-
67
-
68
-
69
-
70
-
71
-
72
-
73
-
74
-
75
-
76
-
77
-
78
-
79
-
80
-
81
-
82
-
83
-
84
-
85
-
86
-
87
-
88
-
89
-
90
-
91
-
92
-
93
-
94
-
95
-
96
-
97
-
98
-
99
-
100
-
101
-
102
-
103
-
104
-
105
-
106
-
107
-
108
-
109
-
110
-
111
-
112
-
113
-
114
-
115
-
116
-
117
-
118
-
119
-
120
-
121
-
122
-
123
-
124
-
125
-
126
-
127
-
128
-
129
-
130
-
131
-
132
-
133
-
134
-
135
-
136
-
137
-
138
-
139
-
140
-
141
-
142
-
143
-
144
-
145
-
146
-
147
-
148
-
149
-
150
-
151
-
152
-
153
-
154
-
155
-
156
-
157
-
158
-
159
-
160
-
161
-
162
-
163
-
164
-
165
-
166
-
167
-
168
-
169
-
170
-
171
-
172
-
173
-
174
-
175
-
176
-
177
-
178
-
179
-
180
-
181
-
182
-
183
-
184
-
185
-
186
-
187
-
188
-
189
-
190
-
191
-
192
-
193
-
194
-
195
-
196
-
197
-
198
-
199
-
200
-
201
-
202
-
203
-
204
-
205
-
206
-
207
-
208
-
209
-
210
-
211
-
212
-
213
-
214
-
215
-
216
-
217
-
218
-
219
-
220
-
221
-
222
-
223
-
224
-
225
-
226
-
227
-
228
-
229
-
230
-
231
-
232
-
233
-
234
-
235
-
236
-
237
-
238
-
239
-
240
-
241
-
242
-
243
-
244
-
245
-
246
-
247
-
248
-
249
-
250
-
251
-
252
-
253
-
254
-
255
-
256
-
257
-
258
-
259
-
260
-
261
-
262
-
263
-
264
-
265
-
266
-
267
-
268
-
269
-
270
-
271
-
272
-
273
-
274
-
275
-
276
-
277
-
278
-
279
-
280
-
281
-
282
-
283
-
284
-
285
-
286
-
287
-
288
-
289
-
290
-
291
-
292
-
293
-
294
-
295
-
296
-
297
-
298
-
299
-
300
-
301
-
302
-
303
-
304
-
305
-
306
-
307
-
308
-
309
-
310
-
311
-
312
-
313
-
314
-
315
-
316
-
317
-
318
-
319
-
320
-
321
-
322
-
323
-
324
 |
 |

Connecting the AM antenna
Model For
U.S.A., Canada, Asia, Korea, China, Taiwan, Brazil, General, and Central and South America
Connect the supplied AM antenna to the unit.
Place the AM antenna on a flat surface.
ANTENNA
FM
AM
AUDIO 5
AUDIO 4
COAXIAL
HDMI
CENTER
FRONT
SURROUND
/ZONE B/BI-AMP
SPEAKERS
PRE OUT
SUBWOOFER
AUDIO 2
(3 MUSIC)
AUDIO 3
NETWORK
HDMI OUT
eARC/ARC
( 2 RADIO )
(4 NET RADIO)
1
2
3
4
(1 MOVIE)
1
2
75
FR
C
FL
SR
SL
AM antenna
The unit (rear)
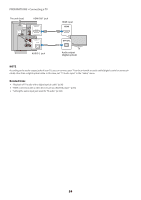
Assembling and connecting the AM antenna
Release
Hold down
Insert
NOTE
(
Unwind only the length of cable needed from the AM antenna unit.
(
The wires of the AM antenna have no polarity.
58
PREPARATIONS > Connecting the radio antennas