Yamaha RX Z9 MCXSP10 Manual - Page 12
GUI remote control, MULTI CH
 |
UPC - 027108918204
View all Yamaha RX Z9 manuals
Add to My Manuals
Save this manual to your list of manuals |
Page 12 highlights
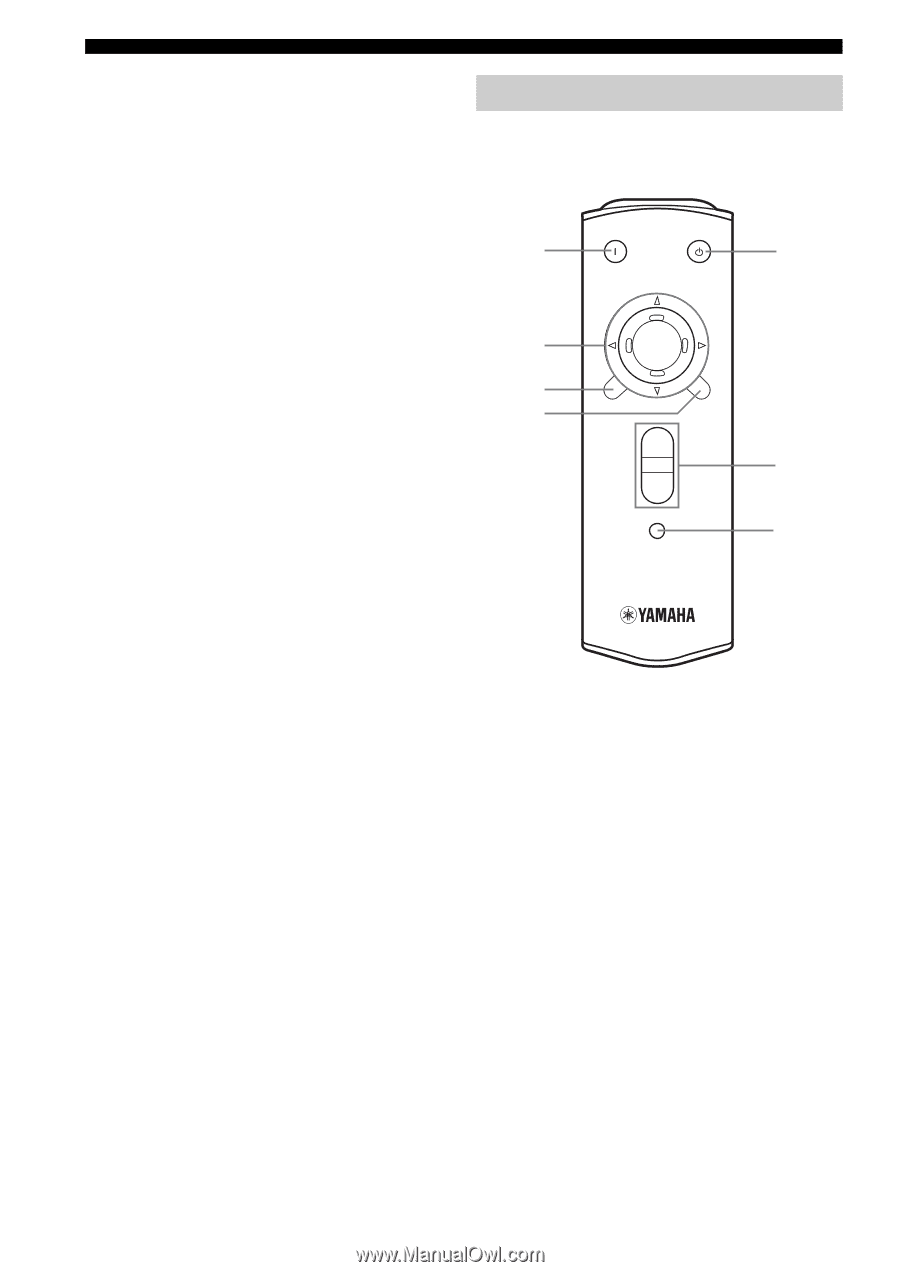
CONTROLS AND FUNCTIONS G LEARN Used for setting up the manufacturer code or for programming the functions of other remote controls (see pages 88 and 89). H MACRO Used to program a series of operations for control by a single button (see page 91). I MACRO ON/OFF Turns the macro function on and off. J Input selector buttons Selects the input source and changes the control area. K MULTI CH IN Selects the source connected to the MULTI CH INPUT jacks. This source takes priority over the source selected with INPUT SELECTOR (or the input selector buttons on the remote control). L Operation buttons Operate various parameters and commands shown in the on-screen display. M EXIT Press to exit the on-screen display menus. N TOP Press to display the top level of the on-screen display menus. O Sound field program Use to select sound field programs. P MUTE Mutes the sound. The MUTE indicator turns on when the MUTE function is on. Press again to restore the audio output to the previous volume level. Q VOLUME +/- Increases or decreases the volume level. R STRAIGHT/EFFECT Switches the sound fields off or on. When STRAIGHT is selected, input signals (2-channel or multi-channel) are output directly from their respective speakers without effect processing. S SPEAKERS A/B Turn on or off the set of front speakers connected to the A and/or B terminals on the rear panel each time the corresponding button is pressed. T Cover Slide down to use the concealed buttons for various setup and parameter operations. GUI remote control This section describes the controls and functions of the GUI remote control. See "USING THE GUI REMOTE CONTROL" on page 31 for details. 1 SYSTEM POWER STANDBY 5 2 ENTER 3 4 TOP EXIT + VOL 6 - MUTE 7 1 SYSTEM POWER Turns on this unit's power. 2 Multi-control/ENTER Tilt up/down or left/right to navigate through the various parameters and commands shown in the on-screen display. Press to choose the selected item in the on-screen display. 3 TOP Press to display the top level of the on-screen display menus. 4 EXIT Press to exit the on-screen display menus. 5 STANDBY Sets this unit in the standby mode. 6 VOLUME +/- Increases or decreases the volume level. 7 MUTE Mutes the sound. The MUTE indicator turns on when the MUTE function is on. Press again to restore the audio output to the previous volume level. 8
-
 1
1 -
2
-
3
-
4
-
5
-
6
-
 7
7 -
 8
8 -
 9
9 -
 10
10 -
 11
11 -
 12
12 -
 13
13 -
 14
14 -
 15
15 -
 16
16 -
 17
17 -
18
-
19
-
20
-
21
-
22
-
23
-
24
-
25
-
26
-
27
-
28
-
29
-
30
-
31
-
32
-
33
-
34
-
35
-
36
-
37
-
38
-
39
-
40
-
41
-
42
-
43
-
44
-
45
-
46
-
47
-
48
-
49
-
50
-
51
-
52
-
53
-
54
-
55
-
56
-
57
-
58
-
59
-
60
-
61
-
62
-
63
-
64
-
65
-
66
-
67
-
68
-
69
-
70
-
71
-
72
-
73
-
74
-
75
-
76
-
77
-
78
-
79
-
80
-
81
-
82
-
83
-
84
-
85
-
86
-
87
-
88
-
89
-
90
-
91
-
92
-
93
-
94
-
95
-
96
-
97
-
98
-
99
-
100
-
101
-
102
-
103
-
104
-
105
-
106
-
107
-
108
-
109
-
110
-
111
-
112
-
113
-
114
-
115
-
116
-
117
-
118
-
119
-
120
-
121
-
122
-
123
-
124
-
125
-
126
-
127
-
128
-
129
-
130
-
131
-
132
 |
 |