Zenith DVR413 Operating Guide - Page 40
Basic Recording, Basic Recording from TV channels, Instant Timer Recording
 |
View all Zenith DVR413 manuals
Add to My Manuals
Save this manual to your list of manuals |
Page 40 highlights
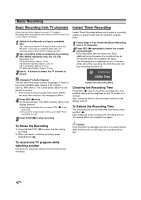
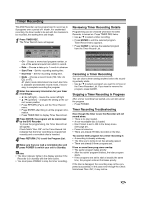
Basic Recording Basic Recording from TV channels Instant Timer Recording Follow the instructions below to record a TV program. Recording starts immediately and continues until the disc is full or you stop the recording. 1 Switch on the Recorder and load a recordable disc. Also make sure that the TV's input source is set to this Recorder. If you load a completely blank disc, the Recorder takes a short while to initialize the disc. 2 Set a recording mode as necessary by pressing REC MODE repeatedly. (HQ, SQ, LQ, EQ) Recordable time: HQ (High Quality); Approx. 1 hour SQ (Standard Quality); Approx. 2 hours LQ (Low Quality); Approx. 4 hours EQ (Extended Quality); Approx. 6 hours 3 Use v / V buttons to select the TV channel to record. Changing TV Audio Channel You can select the audio channel (language) to listen to by pressing AUDIO while viewing a TV program (Stereo, SAP, Mono). The current audio channel is displayed on-screen. • If the sound is of poor quality when set to Stereo, you may often improve it by changing to Mono. 4 Press REC (z) once. Recording will start. (The REC indicator lights in the display window.) Recording continues until you press STOP (x) or the disc is full. To record for a fixed length of time, see Instant Timer Recording on right. 5 Press STOP (x) to stop recording. Instant Timer Recording allows you to make a recording easily of a preset length without using the program timer. 1 Follow steps 1-4 as shown left (Basic Recording from a TV channels). 2 Press REC (z) repeatedly to select the recording time length. Recording starts after the first press. Each additional press increases the recording time by 10 minutes within the available free space. The recording time is displayed on the TV screen. At the end of the recording, the DVD Recorder will stop recording and shut off. Continue 65Min Free Instant Timer Recording Menu Checking the Recording Time Press REC (z) once to check the recording time. The recalled setting will be displayed on the TV screen for a moment. Also, remaining time for the recording is shown in the display window. To Extend the Recording Time The recording time can be extended anytime by pressing REC (z). Each additional press increases the recording time by 10 minutes within the available free space. To Pause the Recording 1. Press PAUSE/STEP (X) to pause the disc during recording. 2. When you want to continue recording, press PAUSE/STEP (X). Caution If the Recorder is unplugged (or there is a power failure) while the Recorder is recording, the recording will be lost. To record one TV program while watching another Using the TV, select the channel to be viewed during recording. 40
-
 1
1 -
2
-
3
-
4
-
5
-
6
-
7
-
8
-
9
-
10
-
11
-
12
-
13
-
14
-
15
-
16
-
17
-
18
-
19
-
20
-
21
-
22
-
23
-
24
-
25
-
26
-
27
-
28
-
29
-
30
-
31
-
32
-
33
-
34
-
 35
35 -
 36
36 -
 37
37 -
 38
38 -
 39
39 -
 40
40 -
 41
41 -
 42
42 -
 43
43 -
 44
44 -
 45
45 -
46
-
47
-
48
-
49
-
50
-
51
-
52
-
53
-
54
-
55
-
56
-
57
-
58
-
59
-
60
-
61
-
62
-
63
-
64
 |
 |
