ZyXEL G-210H User Guide - Page 49
WMM Advanced Setting, Enable WMM, Adapter - 802 11g wireless adapter
 |
View all ZyXEL G-210H manuals
Add to My Manuals
Save this manual to your list of manuals |
Page 49 highlights
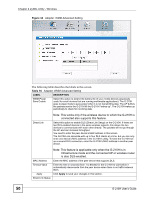
Chapter 4 ZyXEL Utility - Windows The following table describes the labels in this screen. Table 15 Windows: Adapter LABEL DESCRIPTION Adapter Setting Transfer Rate In most networking scenarios, the factory default Auto setting is the most efficient and allows your G-210H to operate at the highest possible transmission (data) rate. If you want to select a specific transmission rate, select one that the AP or peer wireless device supports. Wireless Mode Select 802.11 B/G mixed to have the G-210H connect to either an IEEE 802.11g or IEEE 802.11b wireless device. Select 802.11 B only to have the G-210H connect to an IEEE 802.11b wireless device only. 11B/G Protection Enabling this feature can help prevent collisions in mixed-mode networks (networks with both IEEE 802.11b and IEEE 802.11g traffic). Select Auto to have the G-210H send an RTS (Request to Send) message to the AP and wait for AP's CTS (Clear to Send) response before transmitting data when the G-210H is connecting to an AP with this feature enabled. Select On to have the G-210H always transmit data after a RTS/CTS handshake even when the G-210H is connecting to an AP with this feature disabled. Select Off to disable 11B/G protection. Enable Tx Burst Select the check box to increase the throughput and improve transmission speed. This only works when an AP or peer device supports this function. Fast Roaming at When the signal strength is too low, you may want to connect to a closer AP. Fast roaming allows you to connect to the closer AP without interrupting the wireless connection. Select the check box to enable fast roaming at the specified transmitting power. The G-210H will enter roaming mode when dBm reaches a certain level. Disable WMM/ Enable WMM WMM (Wi-Fi MultiMedia) QoS (Quality of Service) allows you to prioritize wireless traffic according to the delivery requirements of individual services. To do this, you must enable WMM QoS on all wireless devices in your network. Click Disable WMM to deactivate WMM QoS on the G-210H. Click Enable WMM to activate WMM QoS on the G-210H and display the WMM Advanced Setting screen. Save Click Save to save the changes to the G-210H. 4.6.1 WMM Advanced Setting Click Enable WMM in the Adapter screen to configure advanced WMM settings. " This screen is only available to Windows XP/2000 users. G-210H User's Guide 49
-
 1
1 -
2
-
3
-
4
-
5
-
6
-
7
-
8
-
9
-
10
-
11
-
12
-
13
-
14
-
15
-
16
-
17
-
18
-
19
-
20
-
21
-
22
-
23
-
24
-
25
-
26
-
27
-
28
-
29
-
30
-
31
-
32
-
33
-
34
-
35
-
36
-
37
-
38
-
39
-
40
-
41
-
42
-
43
-
 44
44 -
 45
45 -
 46
46 -
 47
47 -
 48
48 -
 49
49 -
 50
50 -
 51
51 -
 52
52 -
 53
53 -
 54
54 -
55
-
56
-
57
-
58
-
59
-
60
-
61
-
62
-
63
-
64
-
65
-
66
-
67
-
68
-
69
-
70
-
71
-
72
-
73
-
74
-
75
-
76
-
77
-
78
-
79
-
80
-
81
-
82
-
83
-
84
-
85
-
86
-
87
-
88
-
89
-
90
-
91
-
92
-
93
-
94
-
95
-
96
-
97
-
98
-
99
-
100
-
101
-
102
-
103
-
104
 |
 |