ZyXEL PLA-450 User Guide - Page 35
Introducing the Web Configurator, 4.1 Web Configurator Overview, 4.2 Accessing the Web Configurator
 |
View all ZyXEL PLA-450 manuals
Add to My Manuals
Save this manual to your list of manuals |
Page 35 highlights
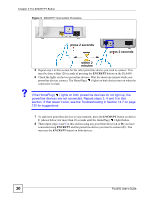
CHAPTER 4 Introducing the Web Configurator This chapter describes how to access the PLA450 web configurator and provides an overview of its screens. 4.1 Web Configurator Overview The web configurator is an HTML-based management interface that allows easy setup and management of the PLA450 via Internet browser. Use Internet Explorer 6.0 and later or Netscape Navigator 7.0 and later versions. The recommended screen resolution is 1024 by 768 pixels. In order to use the web configurator you need to allow: • Web browser pop-up windows from your device. Web pop-up blocking is enabled by default in Windows XP SP (Service Pack) 2. • JavaScripts (enabled by default). • Java permissions (enabled by default). Refer to the Troubleshooting chapter to see how to make sure these functions are allowed in Internet Explorer. 4.2 Accessing the Web Configurator 1 Make sure your PLA450 hardware is properly connected and prepare your computer or computer network to connect to the PLA450 (refer to the Quick Start Guide). 2 Launch your web browser. 3 Type "http://192.168.1.2" as the URL. 4 Type "1234" (default) as the password and click Login. In some versions, the default password appears automatically - if this is the case, click Login. 5 You should see a screen asking you to change your password (highly recommended) as shown next. Type a new password (and retype it to confirm) and click Apply or click Ignore. PLA450 User's Guide 35
-
 1
1 -
2
-
3
-
4
-
5
-
6
-
7
-
8
-
9
-
10
-
11
-
12
-
13
-
14
-
15
-
16
-
17
-
18
-
19
-
20
-
21
-
22
-
23
-
24
-
25
-
26
-
27
-
28
-
29
-
 30
30 -
 31
31 -
 32
32 -
 33
33 -
 34
34 -
 35
35 -
 36
36 -
 37
37 -
 38
38 -
 39
39 -
 40
40 -
41
-
42
-
43
-
44
-
45
-
46
-
47
-
48
-
49
-
50
-
51
-
52
-
53
-
54
-
55
-
56
-
57
-
58
-
59
-
60
-
61
-
62
-
63
-
64
-
65
-
66
-
67
-
68
-
69
-
70
-
71
-
72
-
73
-
74
-
75
-
76
-
77
-
78
-
79
-
80
-
81
-
82
-
83
-
84
-
85
-
86
-
87
-
88
-
89
-
90
-
91
-
92
-
93
-
94
-
95
-
96
-
97
-
98
-
99
-
100
-
101
-
102
-
103
-
104
-
105
-
106
-
107
-
108
-
109
-
110
-
111
-
112
-
113
-
114
-
115
-
116
-
117
-
118
-
119
-
120
-
121
-
122
-
123
-
124
-
125
-
126
-
127
-
128
-
129
-
130
-
131
-
132
-
133
-
134
-
135
-
136
-
137
-
138
-
139
-
140
-
141
-
142
-
143
-
144
-
145
-
146
-
147
-
148
-
149
-
150
-
151
-
152
-
153
-
154
-
155
-
156
-
157
-
158
-
159
-
160
-
161
-
162
-
163
-
164
-
165
-
166
-
167
-
168
-
169
-
170
-
171
-
172
-
173
-
174
-
175
-
176
-
177
-
178
-
179
-
180
-
181
-
182
-
183
-
184
-
185
-
186
-
187
-
188
-
189
-
190
 |
 |
