ZyXEL VES-1616PE-54 Support Guide
ZyXEL VES-1616PE-54 Manual
 |
View all ZyXEL VES-1616PE-54 manuals
Add to My Manuals
Save this manual to your list of manuals |
ZyXEL VES-1616PE-54 manual content summary:
- ZyXEL VES-1616PE-54 | Support Guide - Page 1
VES-1616PE-54 Support Notes Edition 1 - ZyXEL VES-1616PE-54 | Support Guide - Page 2
6 Using the Console Port 7 Using FTP:...7 Backing Up a Configuration File 7 Using the Web Configurator 7 Using the Console Port 8 Using FTP:...9 Load Factory Defaults ...9 Using the Web Configurator 9 DHCP Relay per VLAN...11 DHCP Relay per VLAN...11 Scenario ...11 Triple Play ...16 Triple Play - ZyXEL VES-1616PE-54 | Support Guide - Page 3
20 3. ISP Info Setting Configuration 21 4. Win RADIUS...22 VES-1616PE-54 configurations 24 1. VLAN configuration 24 P-870HW-51aV2 configurations 25 1. WAN configuration 25 2. Verification...26 3. Win RADIUS...27 Multicast Service ...28 1. IGMP Proxy Settings 28 2. MVR Settings...29 VoIP - ZyXEL VES-1616PE-54 | Support Guide - Page 4
Scenario ...42 1. VDSL Profile Configuration for Primary Template 43 2. VDSL Profile Configuration for Secondary Template 45 3. VDSL Line Setup Configuration 47 FAQ...48 Frequently Asked Questions 48 1. What is the default setting of the IP parameters 48 2. What is the default login Name and - ZyXEL VES-1616PE-54 | Support Guide - Page 5
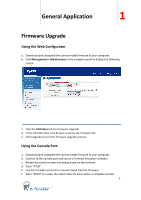
General Application 1 Firmware Upgrade Using the Web Configurator a. Download (and unzipped) the correct model firmware to your computer. b. Click Management > Maintenance in the navigator panel to display the following screen. c. Click the Click Here link for Firmware Upgrade d. In the File Path - ZyXEL VES-1616PE-54 | Support Guide - Page 6
firmware upgrade process is done. Using FTP: a. Download (and unzipped) the correct model firmware to your computer. b. Launch the FTP client on your computer to log into switch. (From the command prompt, type "ftp "). c. Press [ENTER] when prompted for a user name. d. Enter the - ZyXEL VES-1616PE-54 | Support Guide - Page 7
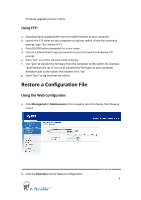
c. In the File Path field, click Browse to locate the firmware file. d. Click Restore to start restoring configuration. Using the Console Port: a. Connect to the console port and launch a Terminal Emulation software. b. Restart the switch to enter the debug mode via the terminal. c. Enter "ATLC" d. - ZyXEL VES-1616PE-54 | Support Guide - Page 8
b. Click the Click Here link for Backup Configuration to display the following screen. c. Click Backup to display the File Download dialog. Then, click Save to back up the configuration text file to a location you specify on your computer. Using the Console Port: a. Connect to the console port and - ZyXEL VES-1616PE-54 | Support Guide - Page 9
configuration file on the switch (rom-0) to your computer and renames it "config.rom". g. Enter "bye" to log out from the switch. Load Factory Defaults Using the Web Configurator: a. Click Management > Maintenance in the navigation panel to display the following screen. b. Click Click Here link for - ZyXEL VES-1616PE-54 | Support Guide - Page 10
prompt. d. Click OK. e. Click OK again to start the configuration reset process. After it is complete, the device automatically restarts. f. Please note that the IP address of the switch is now 192.168.1.1. 10 - ZyXEL VES-1616PE-54 | Support Guide - Page 11
VLAN 2 DHCP Relay per VLAN The feature of DHCP relay per VLAN basis comes handy for managing the DHCP IP assignment to the clients. VES-1616PE-54 has the ability to relay the DHCP request packets according to its VLAN tag to the DHCP server in the uplink Network. Scenario The purpose - ZyXEL VES-1616PE-54 | Support Guide - Page 12
1. Configure a Static VLAN a. In the navigation panel, click Advanced Application > VLAN > Static VLAN. The Static VLAN screen appears. b. Click to select the ACTIVE checkbox. c. Type "700" in the Name field. d. Type "700" in the VLAN Group ID field. e. In the Port 1 field, select Fixed and click to - ZyXEL VES-1616PE-54 | Support Guide - Page 13
2. VLAN Port Setting a. In the navigation panel, click Advanced Application > VLAN > VLAN Port Setting. The VLAN Port Setting screen appears. b. Type "700" in the PVID field of Port 1. c. Click the Apply button. 13 - ZyXEL VES-1616PE-54 | Support Guide - Page 14
3. Configure an In-band IP Address a. In the navigation panel, click Basic Setting > IP Setup. b. In the In-band IP Addresses section, type "192.168.1.100" in the IP Address field. c. Type "255.255.255.0" in the IP Subnet Mask field. d. Type "700" in the VID field. e. Type "192.168.1.101" in the - ZyXEL VES-1616PE-54 | Support Guide - Page 15
5. Save Configuration Click the Save link in the top right-hand corner of the screen to save your configuration into the Switch's nonvolatile memory. 15 - ZyXEL VES-1616PE-54 | Support Guide - Page 16
Triple Play 3 Triple Play concept The concept for the setting up a triple play service in VES-1616PE-54, is to manage the Internet, IPTV and VoIP traffic that are assigned into different VLANs. We will give an example of a service deployed in the fields, according to the following diagram. PPPoE - ZyXEL VES-1616PE-54 | Support Guide - Page 17
The goal of this case study is to demonstrate a proof of concept on a PPPoE service applied on ZyXEL own VDSL2 and BRAS devices. The scenario is focused on 3 devices: VES-1616PE-54, P-870HW-51aV2 and SMG-700. The client shall be able to enjoy INTERNET access, by simply plugging the Ethernet cable - ZyXEL VES-1616PE-54 | Support Guide - Page 18
-51aV2 shall be configured into PPPoE mode with the correct username and password, which the egress traffic will automatically be tagged with VLAN=100. VES-1616PE-54 untags the coming PPPoE traffic from the CPE, and relay it to the BRAS, SMG-700. The SMG-700 shall be able to establish the - ZyXEL VES-1616PE-54 | Support Guide - Page 19
IP domain topology The IP topology is described in details on the above diagram, keeping in mind that the NAT router at this demo has the ability to route the 172.168.23.0 domain to the INTERNET with NAT feature. Notice that the WinRADIUS is a (free) software that can be installed in Windows OS, in - ZyXEL VES-1616PE-54 | Support Guide - Page 20
Mask for the downlink interface, e.g. "255.255.255.0" i. Click Apply 2. PPPoE Setting Configuration a. Go to Service Setting > PPPoE Setting b. Type the AC name (access concentrator) of the PPPoE service, e.g. "test.com" c. Select the Increment IP address and start from and input the IP, e.g. "192 - ZyXEL VES-1616PE-54 | Support Guide - Page 21
3. ISP Info Setting Configuration a. Go to Service Setting > ISP Info Setting b. Input the ISP Domain Name, e.g. "test.com" c. Select the Authentication Method, e.g. "PAP" d. Select the Authentication Server, e.g. "Radius" e. Click Add f. Click the - ZyXEL VES-1616PE-54 | Support Guide - Page 22
4. Win RADIUS a. Make sure that Win Radius v4.00 is properly installed in a PC (OS: WinXP) with the IP of the NIC configured as IP: 172.168.23.101/24 b. Check if the NAS Secret and the Authorization and Accounting ports match the settings in the SMG-700 c. Create a PPPoE account, e.g. username/ - ZyXEL VES-1616PE-54 | Support Guide - Page 23
d. Check if the account is successfully created 23 - ZyXEL VES-1616PE-54 | Support Guide - Page 24
VES-1616PE-54 configurations 1. VLAN configuration a. Go to Advanced Application > VLAN > Static VLAN b. Check the Active box c. Input the Name, e.g. "Internet" d. Input the VLAN Group ID, e.g. "100" e. Set - ZyXEL VES-1616PE-54 | Support Guide - Page 25
P-870HW-51aV2 configurations 1. WAN configuration a. Go to Network > WAN > Internet Connection b. Input the Name, e.g. "INTERNET" c. Select the Mode as "PPPoE" d. Type the User Name, e.g. "[email protected]" e. Type the Password, e.g. "1234" f. Check the Retry when the authentication fails box g. Input - ZyXEL VES-1616PE-54 | Support Guide - Page 26
2. Verification P-870HW-51aV2 Check the status on the homepage: The PPPoE connection was successful! 26 - ZyXEL VES-1616PE-54 | Support Guide - Page 27
3. Win RADIUS Query the user info: We can see the record that the use successfully logged in! 27 - ZyXEL VES-1616PE-54 | Support Guide - Page 28
Multicast Service We shall set up an MVR=200 in VES-1616PE-54, to allow the multicast traffic to pass through without consuming too much resources. The multicast traffic is tagged with VID=200 before coming to the - ZyXEL VES-1616PE-54 | Support Guide - Page 29
h. Click the Apply button 2. MVR Settings a. Go to Advanced Application > Multicast > Multicast Setting > MVR b. Select "IGMP Proxy" in Behavior c. Click Apply d. Check the Active box 29 - ZyXEL VES-1616PE-54 | Support Guide - Page 30
e. Input the Name, e.g. "IPTV" f. Input the Multicast VLAN ID as "200" g. Select "5" to be the 802.1p Priority h. Select the Mode to be "Dynamic" i. Select "Receiver Port" for port 1 j. Check the Tagging box for port 1 k. Select "Source Port" for port 26 l. Check the Tagging box for port 26 m. Click - ZyXEL VES-1616PE-54 | Support Guide - Page 31
3. Save Configuration Click the Save link in the top right-hand corner of the screen to save your configuration into the nonvolatile memory of the VES 31 - ZyXEL VES-1616PE-54 | Support Guide - Page 32
32 - ZyXEL VES-1616PE-54 | Support Guide - Page 33
VoIP Service The VoIP traffic is tagged by the P-870HW-51aV2 with VID=300, so the objective of the VES is to make sure that the traffic - ZyXEL VES-1616PE-54 | Support Guide - Page 34
h. Go to Advanced Application > VLAN and click the index that VID="300" 34 - ZyXEL VES-1616PE-54 | Support Guide - Page 35
2. Classifier configuration a. Go to Advanced Application > Classifier b. Check the Active box c. Input the Name, e.g. "VoIP" d. Input the VLAN on Layer 2 as "300" e. Select the Source Port on Layer 2 as "1" f. Click Add 35 - ZyXEL VES-1616PE-54 | Support Guide - Page 36
3. Policy Rule configuration a. Go to Advanced Application > Policy Rule b. Check the Active box c. Input the Name, e.g. "SIP" d. Select "VoIP" as the Classifier e. Input "300" for the VLAN ID f. Select the Priority to be "7" g. Select "Set the packet's 802.1 priority" in the Action > Priority field - ZyXEL VES-1616PE-54 | Support Guide - Page 37
37 - ZyXEL VES-1616PE-54 | Support Guide - Page 38
WAN interface in P-870HW-51aV2 is configured so that its egress traffic is automatically tagged with VLAN=10, priority=0 under TPID=8100. According to the Service Provider this client subscribed to, the VES-1616PE-54 has to add an outer tag 38 - ZyXEL VES-1616PE-54 | Support Guide - Page 39
of VLAN=20, priority=5 under TPID=9100 before forwarding upwards to the Internet. For the traffic on the downlink direction, the VES-1616PE-54 shall only untag VLAN=20, priority=5 under TPID=9100, and let the P-870HW-51aV2 untag the rest, i.e. VLAN=10, priority=0 under TPID=8100. 1. VLAN Stacking - ZyXEL VES-1616PE-54 | Support Guide - Page 40
2. Static VLAN configuration a. Go to Advanced Application > VLAN b. Select the Active box c. Input the Name, e.g. "20" d. Input the VLAN Group ID to be "20" e. Select port 1 to be "fixed" f. Uncheck the Tx Tagging box of port 1 g. Select port 20 to be "fixed" h. Click Apply 40 - ZyXEL VES-1616PE-54 | Support Guide - Page 41
3. Verification If we capture the packets from the uplink ports of the VES, we can see the double tags on all traffic, such as the following picture 41 - ZyXEL VES-1616PE-54 | Support Guide - Page 42
VDSL Template 5 VDSL Template application notes On VES-1616PE-54, you can specify a primary and a fallback VDSL template for each subscriber port. A subscriber port uses the parameters defined in the primary VDSL template when the - ZyXEL VES-1616PE-54 | Support Guide - Page 43
The Fallback VDSL profile should consist of: 1. Band plan 12a 2. US/DS = 20/20 mbps 3. PhyR enabled 1. VDSL Profile Configuration for Primary Template a. Go to VDSL Setup > VDSL Profile > Line Profile b. Input the Name, e.g. "lineprofileA" c. Select the VDSL2 Profile to be "17a" d. Click Add e. Go - ZyXEL VES-1616PE-54 | Support Guide - Page 44
h. Click Add i. Go to VDSL Setup > VDSL Profile > VDSL Template Setup j. Input the Name, e.g. "TemplateA" k. Select "lineprofileA" to be the Line Profile l. Select "ChannelprofileA" to be the Channel Profile m. Click Add 44 - ZyXEL VES-1616PE-54 | Support Guide - Page 45
2. VDSL Profile Configuration for Secondary Template a. Go to VDSL Setup > VDSL Profile > Line Profile b. Input the Name, e.g. "lineprofileB" c. Select the VDSL2 Profile to be "12a" d. Click Add e. Go to VDSL Setup > VDSL Profile > Channel Profile f. Input the Name, e.g. "ChannelprofileB" g. Input - ZyXEL VES-1616PE-54 | Support Guide - Page 46
k. Go to VDSL Setup > VDSL Profile > VDSL Template Setup l. Input the Name, e.g. "TemplateB" m. Select "lineprofileB" to be the Line Profile n. Select "ChannelprofileB" to be the Channel Profile o. Click Add 46 - ZyXEL VES-1616PE-54 | Support Guide - Page 47
3. VDSL Line Setup Configuration a. Go to VDSL Setup > VDSL Line Setup b. Select "TemplateA" to be the Primary Template c. Select "TemplateB" to be the Fallback Template d. Click Add 47 - ZyXEL VES-1616PE-54 | Support Guide - Page 48
FAQ 6 Frequently Asked Questions 1. What is the default setting of the IP parameters? IP address: 192.168.1.1 Subnet: 255.255.255.0 2. What is the default login Name and Password of the Web Configurator? ID: admin Password: 1234 3. How to access my VES through the console port? Connect the male 9- - ZyXEL VES-1616PE-54 | Support Guide - Page 49
5. How to change the password? You can only change the administrator login password in the web configurator. After you log in for the first time, it is recommended you change the default administrator password. In the Web Configurator: Click Management > Access Control > Logins to display the - ZyXEL VES-1616PE-54 | Support Guide - Page 50
b. Restart the VES, and press any key to enter the debug mode at the "Press any key to enter Debug Mode within 3 seconds" prompt. c. Enter "atlc". d. When the "starting XMODEM upload" message displays, start XMODEM upload of the default configuration (rom) file to the VES. e. After the file upload - ZyXEL VES-1616PE-54 | Support Guide - Page 51
10.How to restart device from the Web Configurator? a. Click Management > Maintenance in the navigation panel to display the screen as shown. b. Click the Config1 or Config 2 button next to Reboot System. 11.How to check the current running firmware version? Access the console and enter the "show - ZyXEL VES-1616PE-54 | Support Guide - Page 52
14.Can I enable MVR and IGMP snooping at the same time? Yes. 52 - ZyXEL VES-1616PE-54 | Support Guide - Page 53
53
-
 1
1 -
 2
2 -
 3
3 -
 4
4 -
 5
5 -
 6
6 -
 7
7 -
8
-
9
-
10
-
11
-
12
-
13
-
14
-
15
-
16
-
17
-
18
-
19
-
20
-
21
-
22
-
23
-
24
-
25
-
26
-
27
-
28
-
29
-
30
-
31
-
32
-
33
-
34
-
35
-
36
-
37
-
38
-
39
-
40
-
41
-
42
-
43
-
44
-
45
-
46
-
47
-
48
-
49
-
50
-
51
-
52
-
53
 |
 |
VES-1616PE-54
Support Notes
Edition 1