ZyXEL VMG4825 User Guide - Page 119
Turning On UPnP in Windows 7 Example
 |
View all ZyXEL VMG4825 manuals
Add to My Manuals
Save this manual to your list of manuals |
Page 119 highlights
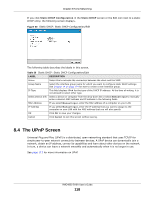
Chapter 8 Home Networking Use the following screen to configure the UPnP settings on your VMG. Click Network Setting > Home Networking > UPnP to display the screen shown next. Figure 51 Network Setting > Home Networking > UPnP The following table describes the labels in this screen. Table 31 Network Setting > Home Networking > UPnP LABEL UPnP UPnP NAT-T DESCRIPTION Select Enable to activate UPnP. Be aware that anyone could use a UPnP application to open the web configurator's login screen without entering the VMG's IP address (although you must still enter the password to access the web configurator). Select Enable to allow UPnP-enabled applications to automatically configure the VMG so that they can communicate through the VMG by using NAT traversal. UPnP applications automatically reserve a NAT forwarding port in order to communicate with another UPnP enabled device; this eliminates the need to manually configure port forwarding for the UPnP enabled application. # Description Destination IP Address External Port Internal Port Protocol Apply Cancel The table below displays the NAT port forwarding rules added automatically by UPnP NAT-T. This is the index number of the UPnP NAT-T connection. This is the description of the UPnP NAT-T connection. This is the IP address of the other connected UPnP-enabled device. This is the external port number that identifies the service. This is the internal port number that identifies the service. This is the transport layer protocol used for the service. Click Apply to save your changes. Click Cancel to exit this screen without saving. 8.4.1 Turning On UPnP in Windows 7 Example This section shows you how to use the UPnP feature in Windows 7. UPnP server is installed in Windows 7. Activate UPnP on the VMG. Make sure the computer is connected to a LAN port of the VMG. Turn on your computer and the VMG. 1 Click the start icon, Control Panel and then the Network and Sharing Center. VMG4825-B10A User's Guide 119
-
 1
1 -
2
-
3
-
4
-
5
-
6
-
7
-
8
-
9
-
10
-
11
-
12
-
13
-
14
-
15
-
16
-
17
-
18
-
19
-
20
-
21
-
22
-
23
-
24
-
25
-
26
-
27
-
28
-
29
-
30
-
31
-
32
-
33
-
34
-
35
-
36
-
37
-
38
-
39
-
40
-
41
-
42
-
43
-
44
-
45
-
46
-
47
-
48
-
49
-
50
-
51
-
52
-
53
-
54
-
55
-
56
-
57
-
58
-
59
-
60
-
61
-
62
-
63
-
64
-
65
-
66
-
67
-
68
-
69
-
70
-
71
-
72
-
73
-
74
-
75
-
76
-
77
-
78
-
79
-
80
-
81
-
82
-
83
-
84
-
85
-
86
-
87
-
88
-
89
-
90
-
91
-
92
-
93
-
94
-
95
-
96
-
97
-
98
-
99
-
100
-
101
-
102
-
103
-
104
-
105
-
106
-
107
-
108
-
109
-
110
-
111
-
112
-
113
-
 114
114 -
 115
115 -
 116
116 -
 117
117 -
 118
118 -
 119
119 -
 120
120 -
 121
121 -
 122
122 -
 123
123 -
 124
124 -
125
-
126
-
127
-
128
-
129
-
130
-
131
-
132
-
133
-
134
-
135
-
136
-
137
-
138
-
139
-
140
-
141
-
142
-
143
-
144
-
145
-
146
-
147
-
148
-
149
-
150
-
151
-
152
-
153
-
154
-
155
-
156
-
157
-
158
-
159
-
160
-
161
-
162
-
163
-
164
-
165
-
166
-
167
-
168
-
169
-
170
-
171
-
172
-
173
-
174
-
175
-
176
-
177
-
178
-
179
-
180
-
181
-
182
-
183
-
184
-
185
-
186
-
187
-
188
-
189
-
190
-
191
-
192
-
193
-
194
-
195
-
196
-
197
-
198
-
199
-
200
-
201
-
202
-
203
-
204
-
205
-
206
-
207
-
208
-
209
-
210
-
211
-
212
-
213
-
214
-
215
-
216
-
217
-
218
-
219
-
220
-
221
-
222
-
223
-
224
-
225
-
226
-
227
-
228
-
229
-
230
-
231
-
232
-
233
-
234
-
235
-
236
-
237
-
238
-
239
-
240
-
241
-
242
-
243
-
244
-
245
-
246
-
247
-
248
-
249
-
250
-
251
-
252
-
253
-
254
-
255
-
256
-
257
-
258
-
259
-
260
-
261
-
262
-
263
-
264
-
265
-
266
-
267
-
268
-
269
-
270
-
271
-
272
-
273
-
274
-
275
-
276
-
277
-
278
-
279
-
280
-
281
-
282
-
283
-
284
-
285
-
286
-
287
-
288
-
289
-
290
-
291
-
292
-
293
-
294
-
295
-
296
-
297
-
298
 |
 |
