1994 Chevrolet Cavalier Owner's Manual - Page 99
1994 Chevrolet Cavalier Manual
Page 99 highlights
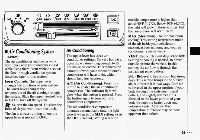
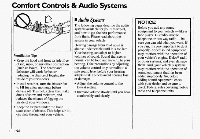
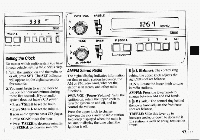
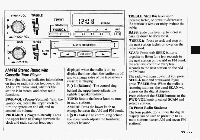
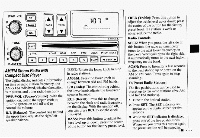
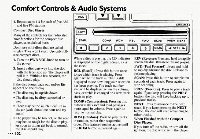
Comfort Controls Audio Systems & BASS: Slide this lever up to increase bass, or down to decrease it. SEEK A: Press to seek and stop on the next station higher or lower on the radio band. SCAN: Press both SEEK buttons together to listen for a few seconds to the next station on the AM or FM band; the scan willcontinue every few seconds to the next station on the AM or FM band. The radio will scan upward if you press SEEKA first and downward if you press V SEEK first. Whenthe radio is scanning stations, the word SCAN will appear on the digital display. Press eitherof the SEEK buttons or the PWR-VOL knob to cancel SCAN and select a station. To Preset Radio Stations: The four pushbuttons under the digital display can be used preset up to 14 to radio stations (seven AM and seven FM stations). 1. Tune in the desired station. 2. Press SET. The word SET will appear on the digital screen for five seconds. 3 While SET is displayed, press of . one the four pushbuttons. Whenever you press this button again, the preset station will betuned in. 4. Repeat steps 1-3 for eachof the four AM and four FM stations. Up to three additional stations on each band may be presetby "pairing" pushbuttons: 1. Tune in the desired station. 2. Press SET, and within five seconds press any two adjacent pushbuttons at the same time. Whenever you press these buttons again, the preset station will betuned in.
-
 1
1 -
2
-
3
-
4
-
5
-
6
-
7
-
8
-
9
-
10
-
11
-
12
-
13
-
14
-
15
-
16
-
17
-
18
-
19
-
20
-
21
-
22
-
23
-
24
-
25
-
26
-
27
-
28
-
29
-
30
-
31
-
32
-
33
-
34
-
35
-
36
-
37
-
38
-
39
-
40
-
41
-
42
-
43
-
44
-
45
-
46
-
47
-
48
-
49
-
50
-
51
-
52
-
53
-
54
-
55
-
56
-
57
-
58
-
59
-
60
-
61
-
62
-
63
-
64
-
65
-
66
-
67
-
68
-
69
-
70
-
71
-
72
-
73
-
74
-
75
-
76
-
77
-
78
-
79
-
80
-
81
-
82
-
83
-
84
-
85
-
86
-
87
-
88
-
89
-
90
-
91
-
92
-
93
-
 94
94 -
 95
95 -
 96
96 -
 97
97 -
 98
98 -
 99
99 -
 100
100 -
 101
101 -
 102
102 -
 103
103 -
 104
104 -
105
-
106
-
107
-
108
-
109
-
110
-
111
-
112
-
113
-
114
-
115
-
116
-
117
-
118
-
119
-
120
-
121
-
122
-
123
-
124
-
125
-
126
-
127
-
128
-
129
-
130
-
131
-
132
-
133
-
134
-
135
-
136
-
137
-
138
-
139
-
140
-
141
-
142
-
143
-
144
-
145
-
146
-
147
-
148
-
149
-
150
-
151
-
152
-
153
-
154
-
155
-
156
-
157
-
158
-
159
-
160
-
161
-
162
-
163
-
164
-
165
-
166
-
167
-
168
-
169
-
170
-
171
-
172
-
173
-
174
-
175
-
176
-
177
-
178
-
179
-
180
-
181
-
182
-
183
-
184
-
185
-
186
-
187
-
188
-
189
-
190
-
191
-
192
-
193
-
194
-
195
-
196
-
197
-
198
-
199
-
200
-
201
-
202
-
203
-
204
-
205
-
206
-
207
-
208
-
209
-
210
-
211
-
212
-
213
-
214
-
215
-
216
-
217
-
218
-
219
-
220
-
221
-
222
-
223
-
224
-
225
-
226
-
227
-
228
-
229
-
230
-
231
-
232
-
233
-
234
-
235
-
236
-
237
-
238
-
239
-
240
-
241
-
242
-
243
 |
 |