2003 Chevrolet Impala Owner's Manual - Page 178
2003 Chevrolet Impala Manual
Page 178 highlights
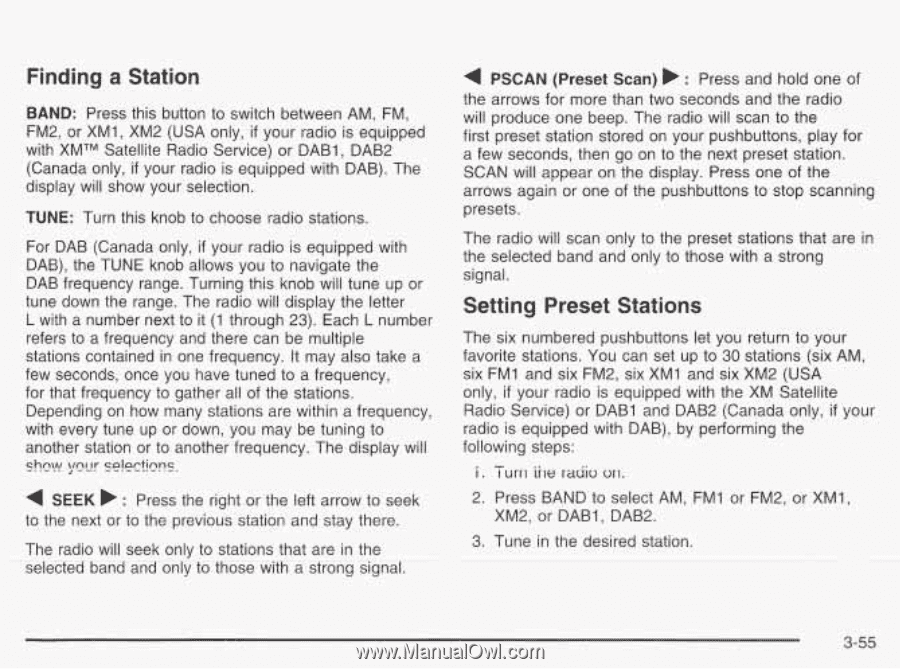
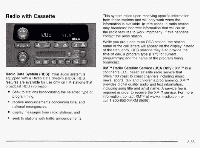
Finding a Station BAND: Press this button to switch between AM, FM, FM2, or XM1, XM2 (USA only, if your radio is equipped with XMTM Satellite Radio Service) or DAB1, DAB2 (Canada only, if your radio is equipped with DAB). The display will show your selection. TUNE: Turn this knob to choose radio stations. For DAB (Canada only, if your radio is equipped with DAB), the TUNE knob allows you to navigate the DAB frequency range. Turning this knob will tune up or tune down the range. The radio will display the letter L with a number next to it (1 through 23). Each L number refers to a frequency and there can be multiple stations contained in one frequency. It may also take a few seconds, once you have tuned to a frequency, for that frequency to gather all of the stations. Depending on how many stations are within a frequency, with every tune up or down, you may be tuning to another station or to another frequency. The display will S "! h\! p c ! r Se!ecti"ns. SEEK b : Press the right or the left arrow to seek to the next or to the previous station and stay there. The radio will seek only to stations that are in the SGTeZ€EdbaM?i7id FnFjt~TLoT~t?Ta~SiEni3Qiial. PSCAN (Preset Scan) b : Press and hold one of the arrows for more than two seconds and the radio will produce one beep. The radio will scan to the first preset station stored on your pushbuttons, play for a few seconds, then go on to the next preset station. SCAN will appear on the display. Press one of the arrows again or one of the pushbuttons to stop scanning presets. The radio will scan only to the preset stations that are in the selected band and only to those with a strong signal. 4 Setting Preset Stations The six numbered pushbuttons let you return to your favorite stations. You can set up to 30 stations (six AM, six FM1 and six FM2, six XM1 and six XM2 (USA only, if your radio is equipped with the XM Satellite Radio Service) or DAB1 and DAB2 (Canada only, if your radio is equipped with DAB), by performing the following steps: 2. Press BAND to select AM, FMI or FM2, or XMI, XM2, or DAB1, DAB2. 3. Tune in the desired station. 4 3-55
-
 1
1 -
2
-
3
-
4
-
5
-
6
-
7
-
8
-
9
-
10
-
11
-
12
-
13
-
14
-
15
-
16
-
17
-
18
-
19
-
20
-
21
-
22
-
23
-
24
-
25
-
26
-
27
-
28
-
29
-
30
-
31
-
32
-
33
-
34
-
35
-
36
-
37
-
38
-
39
-
40
-
41
-
42
-
43
-
44
-
45
-
46
-
47
-
48
-
49
-
50
-
51
-
52
-
53
-
54
-
55
-
56
-
57
-
58
-
59
-
60
-
61
-
62
-
63
-
64
-
65
-
66
-
67
-
68
-
69
-
70
-
71
-
72
-
73
-
74
-
75
-
76
-
77
-
78
-
79
-
80
-
81
-
82
-
83
-
84
-
85
-
86
-
87
-
88
-
89
-
90
-
91
-
92
-
93
-
94
-
95
-
96
-
97
-
98
-
99
-
100
-
101
-
102
-
103
-
104
-
105
-
106
-
107
-
108
-
109
-
110
-
111
-
112
-
113
-
114
-
115
-
116
-
117
-
118
-
119
-
120
-
121
-
122
-
123
-
124
-
125
-
126
-
127
-
128
-
129
-
130
-
131
-
132
-
133
-
134
-
135
-
136
-
137
-
138
-
139
-
140
-
141
-
142
-
143
-
144
-
145
-
146
-
147
-
148
-
149
-
150
-
151
-
152
-
153
-
154
-
155
-
156
-
157
-
158
-
159
-
160
-
161
-
162
-
163
-
164
-
165
-
166
-
167
-
168
-
169
-
170
-
171
-
172
-
 173
173 -
 174
174 -
 175
175 -
 176
176 -
 177
177 -
 178
178 -
 179
179 -
 180
180 -
 181
181 -
 182
182 -
 183
183 -
184
-
185
-
186
-
187
-
188
-
189
-
190
-
191
-
192
-
193
-
194
-
195
-
196
-
197
-
198
-
199
-
200
-
201
-
202
-
203
-
204
-
205
-
206
-
207
-
208
-
209
-
210
-
211
-
212
-
213
-
214
-
215
-
216
-
217
-
218
-
219
-
220
-
221
-
222
-
223
-
224
-
225
-
226
-
227
-
228
-
229
-
230
-
231
-
232
-
233
-
234
-
235
-
236
-
237
-
238
-
239
-
240
-
241
-
242
-
243
-
244
-
245
-
246
-
247
-
248
-
249
-
250
-
251
-
252
-
253
-
254
-
255
-
256
-
257
-
258
-
259
-
260
-
261
-
262
-
263
-
264
-
265
-
266
-
267
-
268
-
269
-
270
-
271
-
272
-
273
-
274
-
275
-
276
-
277
-
278
-
279
-
280
-
281
-
282
-
283
-
284
-
285
-
286
-
287
-
288
-
289
-
290
-
291
-
292
-
293
-
294
-
295
-
296
-
297
-
298
-
299
-
300
-
301
-
302
-
303
-
304
-
305
-
306
-
307
-
308
-
309
-
310
-
311
-
312
-
313
-
314
-
315
-
316
-
317
-
318
-
319
-
320
-
321
-
322
-
323
-
324
-
325
-
326
-
327
-
328
-
329
-
330
-
331
-
332
-
333
-
334
-
335
-
336
-
337
-
338
-
339
-
340
-
341
-
342
-
343
-
344
-
345
-
346
-
347
-
348
-
349
-
350
-
351
-
352
-
353
-
354
-
355
-
356
-
357
-
358
-
359
-
360
-
361
-
362
-
363
-
364
-
365
-
366
-
367
-
368
-
369
-
370
-
371
-
372
-
373
-
374
-
375
-
376
-
377
-
378
-
379
-
380
-
381
-
382
-
383
-
384
-
385
-
386
-
387
-
388
-
389
-
390
-
391
-
392
-
393
-
394
-
395
-
396
-
397
-
398
-
399
-
400
-
401
-
402
-
403
-
404
-
405
-
406
-
407
-
408
-
409
-
410
 |
 |