2008 Suzuki Forenza Owner's Manual - Page 93
2008 Suzuki Forenza Manual
Page 93 highlights
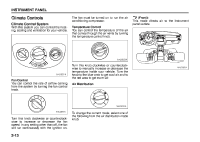
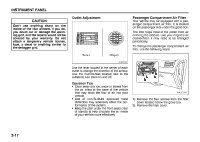
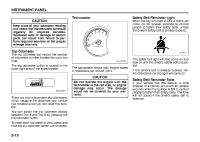
INSTRUMENT PANEL Outlet Adjustment CAUTION Don't use anything sharp on the inside of the rear window. If you do, you could cut or damage the warming grid, and the repairs would not be covered by your warranty. Do not attach a temporary vehicle license, tape, a decal or anything similar to the defogger grid. (Sedan) (Wagon) N4U3033B Passenger Compartment Air Filter Your vehicle may be equipped with a passenger compartment air filter. It is located on the passenger side under the glove box. The filter traps most of the pollen from air entering the module. Like your engine's air cleaner/filter, it may need to be changed periodically. To change the passenger compartment air filter, use the following steps: Use the lever located in the center of each outlet to change the direction of the airflow. Use the thumbwheel located next to the outlets to turn them on and off. Operation Tips • Clear away any ice, snow or leaves from the air inlets at the base of the vehicle that may block the flow of air into your vehicle. • Use of non-SUZUKI approved hood deflectors may adversely affect the performance of the system. • Keep the path under the front seats clear of objects to help circulate the air inside of your vehicle more effectively. 1) Remove the four screws from the filter cover located below the glove box. 2) Remove the filter cover. 3-17
-
 1
1 -
2
-
3
-
4
-
5
-
6
-
7
-
8
-
9
-
10
-
11
-
12
-
13
-
14
-
15
-
16
-
17
-
18
-
19
-
20
-
21
-
22
-
23
-
24
-
25
-
26
-
27
-
28
-
29
-
30
-
31
-
32
-
33
-
34
-
35
-
36
-
37
-
38
-
39
-
40
-
41
-
42
-
43
-
44
-
45
-
46
-
47
-
48
-
49
-
50
-
51
-
52
-
53
-
54
-
55
-
56
-
57
-
58
-
59
-
60
-
61
-
62
-
63
-
64
-
65
-
66
-
67
-
68
-
69
-
70
-
71
-
72
-
73
-
74
-
75
-
76
-
77
-
78
-
79
-
80
-
81
-
82
-
83
-
84
-
85
-
86
-
87
-
 88
88 -
 89
89 -
 90
90 -
 91
91 -
 92
92 -
 93
93 -
 94
94 -
 95
95 -
 96
96 -
 97
97 -
 98
98 -
99
-
100
-
101
-
102
-
103
-
104
-
105
-
106
-
107
-
108
-
109
-
110
-
111
-
112
-
113
-
114
-
115
-
116
-
117
-
118
-
119
-
120
-
121
-
122
-
123
-
124
-
125
-
126
-
127
-
128
-
129
-
130
-
131
-
132
-
133
-
134
-
135
-
136
-
137
-
138
-
139
-
140
-
141
-
142
-
143
-
144
-
145
-
146
-
147
-
148
-
149
-
150
-
151
-
152
-
153
-
154
-
155
-
156
-
157
-
158
-
159
-
160
-
161
-
162
-
163
-
164
-
165
-
166
-
167
-
168
-
169
-
170
-
171
-
172
-
173
-
174
-
175
-
176
-
177
-
178
-
179
-
180
-
181
-
182
-
183
-
184
-
185
-
186
-
187
-
188
-
189
-
190
-
191
-
192
-
193
-
194
-
195
-
196
-
197
-
198
-
199
-
200
-
201
-
202
-
203
-
204
-
205
-
206
-
207
-
208
-
209
-
210
-
211
-
212
-
213
-
214
-
215
-
216
-
217
-
218
-
219
-
220
-
221
-
222
-
223
-
224
-
225
-
226
 |
 |