ASRock 4CoreDual-SATA2 RAID Installation Guide - Page 4
BIOS Configuration Utility, Enter BIOS Configuration Utility, Create Disk Array
 |
View all ASRock 4CoreDual-SATA2 manuals
Add to My Manuals
Save this manual to your list of manuals |
Page 4 highlights
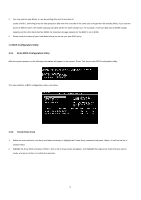
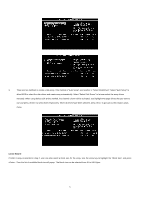
1. You may use two new drives, or use an existing drive and a new drive to create a RAID 1 (mirroring) array for data protection (the new drive must be of the same size or larger than the existing drive). If you use two drives of different sizes, the smaller capacity hard disk will be the base storage size. For example, if one hard disk has an 80GB storage capacity and the other hard disk has 60GB, the maximum storage capacity for the RAID 1 set is 60GB. 2. Please verify the status of your hard disks before you set up your new RAID array. 1.3 BIOS Configuration Utility 1.3.1 Enter BIOS Configuration Utility After the system powers on, the following information will appear on the screen. Press 'Tab' key to enter BIOS configuration utility. The main interface of BIOS configuration utility is as below: 1.3.2 Create Disk Array 1. Within the main interface, use the up and down arrow key to highlight the Create Array command and press to call out the list of creation steps. 2. Highlight the Array Mode and press , then a list of array modes will appear. Just highlight the target array mode that you want to create, and press to confirm the selection. 4
-
 1
1 -
 2
2 -
 3
3 -
 4
4 -
 5
5 -
 6
6 -
 7
7 -
 8
8 -
 9
9 -
 10
10 -
11
-
12
-
13
-
14
-
15
-
16
-
17
-
18
-
19
-
20
-
21
-
22
 |
 |
