ASRock Z77 OC Formula Quick Installation Guide
ASRock Z77 OC Formula Manual
 |
View all ASRock Z77 OC Formula manuals
Add to My Manuals
Save this manual to your list of manuals |
ASRock Z77 OC Formula manual content summary:
- ASRock Z77 OC Formula | Quick Installation Guide - Page 1
of ASRock Inc. Products and corporate names appearing in this guide may motherboard contains Perchlorate, a toxic substance controlled in Perchlorate Best ASRock Website: http://www.asrock.com Published July 2012 Copyright©2012 ASRock INC. All rights reserved. 1 ASRock Z77 OC Formula Motherboard - ASRock Z77 OC Formula | Quick Installation Guide - Page 2
27 26 1 ATX 12V Power Connector (ATX12V2) 26 Intel Z77 Chipset 2 ATX 12V Power Connector (ATX12V1) 27 Power Switch (PWRBTN) 3 1155-Pin CPU Socket 28 Reset Switch (RSTBTN) 4 CPU Fan Connector (CPU_FAN1) 29 64Mb SPI Flash Memory (Backup BIOS) 5 CPU Fan Connector (CPU_FAN2) 30 64Mb SPI Flash - ASRock Z77 OC Formula | Quick Installation Guide - Page 3
10 USB 2.0 Ports (USB23) * 3 LAN RJ-45 Port *** 11 USB 2.0 Ports (USB01) 4 Central / Bass (Orange) 12 USB 3.0 Ports (USB3_45) 5 Rear Speaker (Black) 13 HDMI 4) Side Speaker (No. 7) 2 V -- -- -- 4 V V -- -- 6 V V V -- 8 V V V V English 3 ASRock Z77 OC Formula Motherboard - ASRock Z77 OC Formula | Quick Installation Guide - Page 4
use front panel audio. *** It is recommended to install the USB Keyboard/Mouse cable to USB 2.0 ports (USB01 or USB23) instead of USB 3.0 ports. English 4 ASRock Z77 OC Formula Motherboard - ASRock Z77 OC Formula | Quick Installation Guide - Page 5
ASRock Reminds You... To get better performance in Windows® 7 / 7 64-bit / VistaTM / VistaTM 64bit, it is recommended to set the BIOS option in Storage Configuration to AHCI mode. For the BIOS setup, please refer to the "User Manual" in our support CD for details. 5 ASRock Z77 OC Formula Motherboard - ASRock Z77 OC Formula | Quick Installation Guide - Page 6
memory: 32GB (see CAUTION 4) - Supports Intel® Extreme Memory Profile (XMP)1.3/1.2 - 2 x PCI Express 3.0 x16 slots (PCIE2/PCIE4: single at x16 (PCIE2) / x8 (PCIE4) or dual at x8/x8 mode) (see CAUTION 5) * PCIE 3.0 is only supported with Intel® Ivy Bridge CPU. With ASRock Z77 OC Formula Motherboard - ASRock Z77 OC Formula | Quick Installation Guide - Page 7
.3az - Supports PXE I/O Panel - 1 x PS/2 Keyboard/Mouse Port - 1 x HDMI Port - 1 x Optical SPDIF Out Port - 4 x Ready-to-Use USB 2.0 Ports - 6 x Ready-to-Use USB 3.0 Ports - 1 x RJ-45 LAN Port with LED (ACT/LINK LED and SPEED LED) - 1 x Clear CMOS Switch with LED 7 ASRock Z77 OC Formula Motherboard - ASRock Z77 OC Formula | Quick Installation Guide - Page 8
- 4 pin 12V power connector - SLI/XFire power connector - Front panel audio connector - 3 x USB 2.0 headers (support 6 USB 2.0 ports) - 1 x USB 3.0 header (supports 2 USB 3.0 ports) - 1 x Dr. Debug with LED - 1 x Power Switch with LED - 1 x Reset Switch with LED ASRock Z77 OC Formula Motherboard - ASRock Z77 OC Formula | Quick Installation Guide - Page 9
(see CAUTION 23) * Lucid Virtu Universal MVP can be supported only with processors which are GPU integrated. - Hybrid Booster: - ASRock U-COP (see CAUTION 24) - Boot Failure Guard (B.F.G.) - Combo Cooler Option (C.C.O.) (see CAUTION 25) - Good Night LED English 9 ASRock Z77 OC Formula Motherboard - ASRock Z77 OC Formula | Quick Installation Guide - Page 10
the memory that Windows® cannot use. 5. Only PCIE2 and PCIE4 slots support Gen 3 speed. To run the PCI Express in Gen 3 speed, please install an Ivy Bridge CPU. If you install a Sandy Bridge CPU, the PCI Express will run only at PCI Express Gen 2 speed. 10 ASRock Z77 OC Formula Motherboard English - ASRock Z77 OC Formula | Quick Installation Guide - Page 11
drive, floppy disk or hard drive, then you can update your BIOS only in a few clicks without preparing an additional floppy diskette or other complicated flash utility. Please be noted that the USB flash drive or hard drive must use FAT32/16/12 file system. 11 ASRock Z77 OC Formula Motherboard English - ASRock Z77 OC Formula | Quick Installation Guide - Page 12
HD videos and download simultaneously. Real-Time Analysis of Your Data: With the status window, you can easily recognize which data streams you are transferring currently. 16. ASRock XFast RAM is a new function that is included into Formula Drive. It fully utilizes the memory space that cannot - ASRock Z77 OC Formula | Quick Installation Guide - Page 13
types, Socket LGA 775, LGA 1155 and LGA 1156. Please be noticed that not all the 775 and 1156 CPU Fan can be used. 26. ASRock XFast RAM is not supported by Microsoft® Windows® XP / XP 64-bit. Intel® Smart Connect Technology and Intel® USB 3.0 ports are not supported by Microsoft® Windows® VistaTM - ASRock Z77 OC Formula | Quick Installation Guide - Page 14
damage the motherboard. Before you install or remove any component, ensure that the power is switched off or the power cord is detached from the power supply. Failure to do so may cause severe damage to the motherboard, peripherals, and/or components. 14 ASRock Z77 OC Formula Motherboard English - ASRock Z77 OC Formula | Quick Installation Guide - Page 15
flip up the load plate. English black line Step 2. Insert the 1155-Pin CPU: Step 2-1. Hold the CPU by the edge which is marked with a black line. Step 2-2. Orient the CPU with the IHS (Integrated Heat Sink) up. Locate Pin1 and the two orientation key notches. 15 ASRock Z77 OC Formula Motherboard - ASRock Z77 OC Formula | Quick Installation Guide - Page 16
off by itself. Please save and replace the cover if the processor is removed. The cover must be placed if you wish to return the motherboard for after service. English 16 ASRock Z77 OC Formula Motherboard - ASRock Z77 OC Formula | Quick Installation Guide - Page 17
. Please be noticed that this motherboard supports Combo Cooler Option (C.C.O.), which provides flexible options to adopt three different CPU cooler types, Socket LGA 775, LGA 1155 and LGA 1156. The white throughholes are for Socket LGA 1155/1156 CPU fan. 17 ASRock Z77 OC Formula Motherboard - ASRock Z77 OC Formula | Quick Installation Guide - Page 18
It is not recommended to install them on this motherboard. 6. For optimal compatibility and stability while overclocking memory frequency, it is recommended to install one memory module on DDR3_B2 slot or two memory modules on DDR3_A2 and DDR3_ B2 slots. 18 ASRock Z77 OC Formula Motherboard English - ASRock Z77 OC Formula | Quick Installation Guide - Page 19
permanent damage to the motherboard and the DIMM if you force the DIMM into the slot at incorrect orientation. Step 3. Firmly insert the DIMM into the slot until the retaining clips at both ends fully snap back in place and the DIMM is properly seated. 19 ASRock Z77 OC Formula Motherboard English - ASRock Z77 OC Formula | Quick Installation Guide - Page 20
to the motherboard's chassis fan connector (CHA_FAN1, CHA_FAN2, CHA_FAN3 or CHA_FAN4) when using multiple graphics cards for better thermal environment. 5. Only PCIE2 and PCIE4 slots support Gen 3 speed. To run the x16 slots. Please refer to page 45 for details. 20 ASRock Z77 OC Formula Motherboard - ASRock Z77 OC Formula | Quick Installation Guide - Page 21
the expansion card and make necessary hardware settings for the card before you start the installation. Step 2. Remove the system unit cover (if your motherboard is already installed in a chassis). chassis with screws. Step 6. Replace the system cover. 21 ASRock Z77 OC Formula Motherboard English - ASRock Z77 OC Formula | Quick Installation Guide - Page 22
shall be the same.) Insert one graphics card into PCIE2 slot and the other graphics card to PCIE4 slot. Make sure that the cards are properly seated on the slots. Step2. If required, connect the auxiliary power source to the PCI Express graphics cards. 22 ASRock Z77 OC Formula Motherboard English - ASRock Z77 OC Formula | Quick Installation Guide - Page 23
on each graphics card. Make sure the ASRock SLI_Bridge_2S Card is firmly in place. ASRock SLI_Bridge_2S Card Step4. Connect a VGA cable or a DVI cable to the monitor connector or the DVI connector of the graphics card that is inserted to PCIE2 slot. English 23 ASRock Z77 OC Formula Motherboard - ASRock Z77 OC Formula | Quick Installation Guide - Page 24
, select Set SLI and PhysX configuration. In Set PhysX GPU acceleration item, please select Enabled. In Select an SLI configuration item, please select Enable SLI. And click Apply. C. Reboot your system. D. You can freely enjoy the benefit of SLITM feature. 24 ASRock Z77 OC Formula Motherboard English - ASRock Z77 OC Formula | Quick Installation Guide - Page 25
Windows taskbar. B. From the pop-up menu, select All Programs, and then click NVIDIA Corporation. C. Select NVIDIA Control Panel tab. D. Select Control Panel tab. E. From the pop-up menu, select Set SLI and PhysX configuration. In Set intent to infringe. 25 ASRock Z77 OC Formula Motherboard English - ASRock Z77 OC Formula | Quick Installation Guide - Page 26
the future, please refer to AMD graphics card manuals for detailed installation guide. Step 1. Insert one Radeon graphics card into PCIE2 slot and the other Radeon graphics card to PCIE4 slot. Make sure that the cards are properly seated on the slots. English 26 ASRock Z77 OC Formula Motherboard - ASRock Z77 OC Formula | Quick Installation Guide - Page 27
cards. (CrossFire Bridge is provided with the graphics card you purchase, not bundled with this motherboard. Please refer to your graphics card vendor for details.) CrossFire Bridge or Step 3. Connect D-Sub monitor cable to the DVI to D-Sub adapter.) English 27 ASRock Z77 OC Formula Motherboard - ASRock Z77 OC Formula | Quick Installation Guide - Page 28
graphics cards will not work together properly. (Even the GPU chips version shall be the same.) Insert one graphics card into PCIE2 slot, another graphics card to PCIE4 slot, and the other graphics card to Sub monitor cable to the DVI to D-Sub adapter.) English 28 ASRock Z77 OC Formula Motherboard - ASRock Z77 OC Formula | Quick Installation Guide - Page 29
"2 GPUs" and click "Apply" (if you install two Radeon graphics cards). Select "3 GPUs" and click "OK" (if you install three Radeon graphics cards). English 29 ASRock Z77 OC Formula Motherboard - ASRock Z77 OC Formula | Quick Installation Guide - Page 30
restarting your computer, please confirm whether the option "Enable CrossFireTM" in "ATI Catalyst Control Center" is selected or not; if not, please select it again, and then you CrossFireXTM technology, please check AMD website for updates and details. 30 ASRock Z77 OC Formula Motherboard English - ASRock Z77 OC Formula | Quick Installation Guide - Page 31
to be your primary monitor, and then select "Primary". When you use multiple monitors with your card, one monitor will always be Primary, and all additional monitors will be designated as Secondary. C. Select the display icon identified by the number 2. 31 ASRock Z77 OC Formula Motherboard English - ASRock Z77 OC Formula | Quick Installation Guide - Page 32
the numbers three to seven. For Windows® 7 / 7 64-bit / VistaTM / VistaTM 64-bit OS: Right click the desktop, choose "Personalize", and select the "Display Settings" tab so that you can adjust determines how you move items from one monitor to another. 32 ASRock Z77 OC Formula Motherboard English - ASRock Z77 OC Formula | Quick Installation Guide - Page 33
HDTV set-top-boxes, as well as few entertainment PCs requires a secure connection to a compliant display. Due to the increase in manufacturers employing HDCP in their equipment, it is highly recommended that the HDTV or LCD monitor you purchase is compatible. 33 ASRock Z77 OC Formula Motherboard - ASRock Z77 OC Formula | Quick Installation Guide - Page 34
find this option, please shut down your system and install Multi-Angle CIR Receiver to the other front USB port then try again. Step5. Enter Windows. Execute ASRock support CD and install CIR Driver. (It is listed at the bottom of driver list.) English 34 ASRock Z77 OC Formula Motherboard - ASRock Z77 OC Formula | Quick Installation Guide - Page 35
CIR Receiver does not support Hot-Plug function. Please install it before you boot the system. * ASRock Smart Remote is only supported by some of ASRock motherboards. Please refer to ASRock website for the motherboard support list: http://www.asrock.com 35 ASRock Z77 OC Formula Motherboard English - ASRock Z77 OC Formula | Quick Installation Guide - Page 36
No. 46) Setting Default Clear CMOS ASRock Instant Flash" or "ASRock Internet Flash" in BIOS setup utility to copy the BIOS file to the main BIOS to ensure normal system operation. For the sake of system safety, users cannot update the backup BIOS manually. 36 ASRock Z77 OC Formula Motherboard - ASRock Z77 OC Formula | Quick Installation Guide - Page 37
interface allows up to 3.0 Gb/s data transfer rate. These six Serial ATA3 (SATA3) connectors support SATA data cables for internal storage devices. The current SATA3 interface allows up to 6.0 Gb/s cable to the power connector of the power supply. English 37 ASRock Z77 OC Formula Motherboard - ASRock Z77 OC Formula | Quick Installation Guide - Page 38
I/O panel, there is one USB 3.0 header on this motherboard. This USB 3.0 header can support two USB 3.0 ports. supports an optional wireless transmitting and receiving infrared module. This header can be used to connect the remote controller receiver. English 38 ASRock Z77 OC Formula Motherboard - ASRock Z77 OC Formula | Quick Installation Guide - Page 39
control of audio devices. 1. High Definition Audio supports Jack Sensing, but the panel wire on the chassis must support HDA to function correctly. Please follow the instruction in our manual and chassis manual system is operating. The LED keeps blinking when the 39 ASRock Z77 OC Formula Motherboard - ASRock Z77 OC Formula | Quick Installation Guide - Page 40
Chassis, Power and MOS Fan Connectors (4-pin CHA_FAN1) CHA_FAN_SPEED +12V GND FAN_SPEED_CONTROL (see p.2, No. 37) Please connect the fan cables to the fan connectors and match the GND +12V CHA_FAN_SPEED PWR_FAN_SPEED +12V GND GND +12V MOS_FAN_SPEED ASRock Z77 OC Formula Motherboard English - ASRock Z77 OC Formula | Quick Installation Guide - Page 41
motherboard provides 4-Pin CPU fan (Quiet Fan) support, the 3-Pin CPU fan still can work successfully even without the fan speed control function. If you plan to connect the 3-Pin CPU fan to the CPU fan connector on this motherboard Installation 4 1 41 ASRock Z77 OC Formula Motherboard English - ASRock Z77 OC Formula | Quick Installation Guide - Page 42
motherboard. This COM1 header supports a serial port module. HDMI_SPDIF Header (2-pin HDMI_SPDIF1) (see p.2, No. 42) 1 GND SPDIFOUT HDMI_SPDIF header, providing SPDIF audio output to HDMI VGA card, allows the system to connect HDMI : CPU PLL voltage 42 ASRock Z77 OC Formula Motherboard English - ASRock Z77 OC Formula | Quick Installation Guide - Page 43
3.0 Step 6 The Front USB 3.0 Panel is ready to use. header (USB3_6_7) on the motherboard. English The Installation Guide of Rear USB 3.0 Bracket Step 1 Unscrew the two screws from the Front USB 3.0 Step 2 Step 4 Put the rear USB 3.0 bracket into the chassis. 43 ASRock Z77 OC Formula Motherboard - ASRock Z77 OC Formula | Quick Installation Guide - Page 44
Rapid OC Buttons (MINUS1: see p.2 No. 10) ( memory capability, thermal solution, etc. Overclocking may affect your system stability, or even cause damage to the components and devices. We are not responsible for possible damage caused by overclocking. English 44 ASRock Z77 OC Formula Motherboard - ASRock Z77 OC Formula | Quick Installation Guide - Page 45
cards is out of order, you can use PCIe ON/OFF Switch to find out the faulty one just with a single click without removing the cards. 1. Make sure that you power off the system do not want to use your PCIE card, please remove it from the motherboard. English 45 ASRock Z77 OC Formula Motherboard - ASRock Z77 OC Formula | Quick Installation Guide - Page 46
-memory initialization. Cache initialization CPU post-memory initialization. Application Processor(s) (AP) initialization CPU post-memory initialization. Boot Strap Processor (BSP) selection CPU post-memory initialization. System Management Mode (SMM) initialization ASRock Z77 OC Formula Motherboard - ASRock Z77 OC Formula | Quick Installation Guide - Page 47
is not available Recovery capsule is not found Invalid recovery capsule Reserved for future AMI error codes DXE Core is started NVRAM initialization English 47 ASRock Z77 OC Formula Motherboard - ASRock Z77 OC Formula | Quick Installation Guide - Page 48
0xA2 0xA3 0xA4 0xA5 48 Installation of the South Bridge Runtime Services CPU DXE initialization is started CPU DXE initialization (CPU module is started Driver connecting is started PCI Bus initialization is started PCI Bus Hot Plug Controller Initialization PCI ASRock Z77 OC Formula Motherboard - ASRock Z77 OC Formula | Quick Installation Guide - Page 49
Ready To Boot event Legacy Boot event Exit Boot Services event Runtime Set Virtual Address MAP Begin Runtime Set Virtual Address MAP End Legacy Option ROM Initialization System returned error) Flash update is failed Reset protocol is not available English 49 ASRock Z77 OC Formula Motherboard - ASRock Z77 OC Formula | Quick Installation Guide - Page 50
/ VistaTM 64-bit on your SATA / SATA2 / SATA3 HDDs with RAID functions, please refer to the document at the following path in the Support CD for detailed procedures: ..\ RAID Installation Guide RAID mode is not supported under Windows® XP / XP 64-bit. 50 ASRock Z77 OC Formula Motherboard English - ASRock Z77 OC Formula | Quick Installation Guide - Page 51
ports. Set the option "Marvell SATA3 M0 M1 Operation Mode" to [IDE] for SATA3_M0 and SATA3_M1 ports. Set the option "Marvell SATA3 M2 M3 Operation Mode" to [IDE] for SATA3_M2 and SATA3_M3 ports. STEP 2: Install Windows® XP / XP 64-bit OS on your system. 51 ASRock Z77 OC Formula Motherboard English - ASRock Z77 OC Formula | Quick Installation Guide - Page 52
SATA3 M0 M1 Operation Mode" to [AHCI] for SATA3_M0 and SATA3_M1 ports. Set the option "Marvell SATA3 M2 M3 Operation Mode" to [AHCI] for SATA3_M2 and SATA3_M3 ports. STEP 2: Install Windows® 7 / 7 64-bit / VistaTM / VistaTM 64-bit OS on your system. 52 ASRock Z77 OC Formula Motherboard English - ASRock Z77 OC Formula | Quick Installation Guide - Page 53
your computer. If the Main Menu does not appear automatically, locate and double-click on the file "ASSETUP.EXE" from the BIN folder in the Support CD to display the menus. 53 ASRock Z77 OC Formula Motherboard English - ASRock Z77 OC Formula | Quick Installation Guide - Page 54
besuchen Sie bitte unsere Webseite: www.asrock.com/support/index.asp 1.1 Kartoninhalt ASRock Z77 OC Formula Motherboard (CEB-Formfaktor: 30.5 cm x 26.7 cm; 12.0 Zoll x 10.5 Zoll) ASRock Z77 OC Formula Schnellinstallationsanleitung ASRock Z77 OC Formula Support-CD Sechs Serial ATA (SATA) -Datenkabel - ASRock Z77 OC Formula | Quick Installation Guide - Page 55
Speicher - Max. Kapazität des Systemspeichers: 32GB (siehe VORSICHT 4) - Unterstützt Intel® Extreme Memory Profile (XMP)1.3/1.2 - 2 x PCI Express 3.0 x16-Steckplätze (PCIE2/PCIE4: Einzeln bei x16 (PCIE2) / x8 (PCIE4) oder dual im x8/x8-Modus) 55 ASRock Z77 OC Formula Motherboard Deutsch - ASRock Z77 OC Formula | Quick Installation Guide - Page 56
SLITM * Integrierte Intel® HD-Grafi 10/100/1000 Mb/s - Broadcom BCM57781 - Unterstützt Wake-On-LAN - Unterstützt energieeffizientes Ethernet 802.3az - Unterstützt PXE I/O Panel - 1 x PS/2-Tastaturanschluss/Mausanschluss - 1 x HDMI port - 1 x optischer SPDIF-Ausgang ASRock Z77 OC Formula Motherboard - ASRock Z77 OC Formula | Quick Installation Guide - Page 57
üsse (6,0 Gb/s) durch Intel® Z77; unterstützt RAID- (RAID 0, RAID 1, RAID 5, RAID 10, Intel Rapid Storage und Intel Smart Response-Technologie), NCQ-, - 8-pin anschluss für 12V-ATX-Netzteil - 4-pin anschluss für 12V-ATX-Netzteil - SLI/XFIRE-Netz-Header 57 ASRock Z77 OC Formula Motherboard Deutsch - ASRock Z77 OC Formula | Quick Installation Guide - Page 58
Internet Flash (siehe VORSICHT 19) - ASRock UEFI System Browser - ASRock-Entfeuchterfunktion (siehe VORSICHT 20) - ASRock Interactive UEFI - NickShih-OC-Profil (siehe VORSICHT 21) - Feinabstimmung-Spannungsregler (siehe VORSICHT 22) - Timing Configurator Deutsch 58 ASRock Z77 OC Formula Motherboard - ASRock Z77 OC Formula | Quick Installation Guide - Page 59
+3.3V, Vcore Betriebssysteme - Unterstützt Microsoft® Windows® 7 / 7 64-Bit / VistaTM / asrock.com WARNUNG Beachten Sie bitte, dass Overclocking, einschließlich der Einstellung im BIOS, Anwenden der Untied Overclocking Overclocking verursacht wurden. 59 ASRock Z77 OC Formula Motherboard Deutsch - ASRock Z77 OC Formula | Quick Installation Guide - Page 60
falls die vier oben genannten Punkte normal funktionieren. 10. Formula Drive ist ein Alles-in-einem-Werkzeug zur Feineinstellung verschiedener Systemfunktionen an einer benutzerfreundlichen Schnittstelle; diese beinhaltet Hardware-Überwachung, Fan-tastic 60 ASRock Z77 OC Formula Motherboard Deutsch - ASRock Z77 OC Formula | Quick Installation Guide - Page 61
besuchte Internetseiten, Ihren Browserverlauf, Facebook-Freunde und Nachrichten in Echtzeit miteinander kombiniert: In einer speziellen Ansicht, die das Internet noch angenehmer und aufregender macht. ASRock-Motherboards werden exklusiv mit der Smart- 61 ASRock Z77 OC Formula Motherboard Deutsch - ASRock Z77 OC Formula | Quick Installation Guide - Page 62
Zutun von Windows. Bitte beachten Sie, dass diese Funktion nur mit DHCP-konfigurierten Computern möglich ist. 20. Benutzer können Motherboard-Schäden aufgrund von Feuchtigkeit verhindern, indem Sie die „Entfeuchterfunktion" aktivieren. Bei Aktivierung 62 ASRock Z77 OC Formula Motherboard Deutsch - ASRock Z77 OC Formula | Quick Installation Guide - Page 63
Socket LGA 775, LGA 1155 und LGA 1156. Beachten Sie bitte, dass nicht alle 775 und 1156 CPU-Lüfter verwendet werden können. 26. ASRock XFast RAM wird von Microsoft® Windows® XP / XP 64 Bit nicht unterstützt. Intel® Smart Connect-Technologie und Intel . 63 ASRock Z77 OC Formula Motherboard Deutsch - ASRock Z77 OC Formula | Quick Installation Guide - Page 64
nach der BIOS-Aktualisierung löschen. Wenn Sie das CMOS nach Abschluss der BIOS-Aktualisierung GUID und MAC-Adresse nur gelöscht werden, wenn die CMOS-Batterie entfernt wird. Der CMOS löschen-Schalter hat dieselbe Funktion wie der CMOS löschen-Jumper. Deutsch 64 ASRock Z77 OC Formula Motherboard - ASRock Z77 OC Formula | Quick Installation Guide - Page 65
Sie die BIOS-Datei mit „ASRock Instant Flash" oder „ASRock Internet Flash" im BIOS-Setup in das Haupt-BIOS, damit das System wieder normal gestartet werden kann. Aus Sicherheitsgründen kann das Sicherungs-BIOS nicht manuell überschrieben werden. Deutsch 65 ASRock Z77 OC Formula Motherboard - ASRock Z77 OC Formula | Quick Installation Guide - Page 66
Header und Anschlüsse. Wenn Sie Jumperkappen auf Header und Anschlüsse setzen, wird das Motherboard unreparierbar beschädigt! Seriell-ATA2-Anschlüsse (SATA2_2_3: siehe S.2 - No. 19) ( des SATAStromversorgungskabels mit dem Stromanschluss des Netzteils. 66 ASRock Z77 OC Formula Motherboard - ASRock Z77 OC Formula | Quick Installation Guide - Page 67
zu den vier üblichen USB 2.0-Ports an den I/O-Anschlüssen befinden sich drei USB 2.0- Anschlussleisten am Motherboard. Pro USB 2.0Anschlussleiste werden zwei USB 2.0-Ports unterstützt. (9-pol. USB8_9) (siehe S.2 - No. und Kontrolle über Audio-Geräte. 67 ASRock Z77 OC Formula Motherboard Deutsch - ASRock Z77 OC Formula | Quick Installation Guide - Page 68
So aktivieren Sie das Mikrofon an der Vorderseite. Bei den Betriebssystemen Windows® XP / XP 64 Bit: Wählen Sie „Mixer". Wählen „FrontMic" (Vorderes Mikrofon)Registerkarte. Passen Sie die „Recording Volume" (Aufnahmelautstärke) an. System Panel-Header (9-pin PANEL1) ASRock Z77 OC Formula Motherboard - ASRock Z77 OC Formula | Quick Installation Guide - Page 69
S.2 - No. 49) CHA_FAN_SPEED +12V GND GND +12V CHA_FAN_SPEED (3-pin PWR_FAN1) (siehe S.2 - No. 16) PWR_FAN_SPEED +12V GND (3-pin MOS_FAN1) (siehe S.2 - No. 50) GND +12V MOS_FAN_SPEED 69 ASRock Z77 OC Formula Motherboard - ASRock Z77 OC Formula | Quick Installation Guide - Page 70
den schwarzen Draht dem Erdungsstift an. Obwohl dieses Motherboard einen vierpoligen CPU-Lüfteranschluss (Quiet Fan) bietet, können auch CPU-Lüfter mit dreipoligem 1 und Pin 5 ein. 8 5 Installation der 4-Pin ATX 12V Energieversorgung 4 1 70 ASRock Z77 OC Formula Motherboard Deutsch - ASRock Z77 OC Formula | Quick Installation Guide - Page 71
HDMI_SPDIF-Anschluss der HDMI-VGA-Karte mit diesem Anschluss. GND VCCM VCCSA VTT2 VTT1 VCORE GND Benutzer können die Spannung von OnboardKomponenten messen, inklusive VCCM, VCCSA, VTT2, VTT1, VCORE, DMI_COMP, XCLK_RCOMP, DMI, PCH2, PCH und 1.8V_PLL 71 ASRock Z77 OC Formula Motherboard Deutsch - ASRock Z77 OC Formula | Quick Installation Guide - Page 72
Montieren Sie die USB 3.0-Frontblende mit sechs Gehäuseschrauben am Festplatteneinschub. Schritt 5 Schließen Sie das Kabel der USB 3.0-Frontblende am USB 3.0-Header (USB3_6_7) am Motherboard an. Schritt 6 Die USB 3.0-Frontblende ist nun einsatzbereit. Deutsch 72 ASRock Z77 OC Formula Motherboard - ASRock Z77 OC Formula | Quick Installation Guide - Page 73
3 Fixieren Sie das USB 3.0-Blech mit Schrauben an der Rückwand. Schritt 4 Setzen Sie das USB 3.0-Blech an der Rückwand des Gehäuses ein. Deutsch 73 ASRock Z77 OC Formula Motherboard - ASRock Z77 OC Formula | Quick Installation Guide - Page 74
Systems, wie z. B. Speicher-Fähigkeit, thermische Lösung, usw. Overclocking beeinflus sen Ihr System Stabilität oder sogar zu Schäden an den Komponenten und Geräte. Wir sind nicht Verantwortung für mögliche Schäden durch Übertaktung verursacht worden. Deutsch 74 ASRock Z77 OC Formula Motherboard - ASRock Z77 OC Formula | Quick Installation Guide - Page 75
Kartenhersteller. 3. Der PCIe-Ein-/Ausschalter dient ausschließlich zur Fehlersuche. Falls Sie eine PCIE-Karte nicht nutzen möchten, trennen Sie diese bitte vollständig vom Motherboard. Deutsch 75 ASRock Z77 OC Formula Motherboard - ASRock Z77 OC Formula | Quick Installation Guide - Page 76
der Support-CD, um die Menüs aufzurufen. Das Setup-Programm soll es Ihnen so leicht wie möglich machen. Es ist menügesteuert, d.h. Sie können in den verschiedenen Untermenüs Ihre Auswahl treffen und die Programme werden dann automatisch installiert. 76 ASRock Z77 OC Formula Motherboard Deutsch - ASRock Z77 OC Formula | Quick Installation Guide - Page 77
sous Windows® 7 / 7 64 bits / VistaTM / VistaTM 64 bits, il est recommandé de paramétrer l'option BIOS dans Configuration de stockage en mode AHCI. Pour plus de détails sur l'installation BIOS, référez-vous au "Mode d'emploi" sur votre CD de support. 77 ASRock Z77 OC Formula Motherboard Fran - ASRock Z77 OC Formula | Quick Installation Guide - Page 78
les technologies Intel® Rapid Start et Smart Connect - Compatible avec la Technologie de Mémoire à Canal Double (voir ATTENTION 3) - 4 x slots DIMM DDR3 - Supporter DDR3 3000+(OC)/2800(OC)/2666(OC)/2400(OC) /2133(OC)/1866(OC)/1600/1333/1066 non-ECC, sans ASRock Z77 OC Formula Motherboard Français - ASRock Z77 OC Formula | Quick Installation Guide - Page 79
SLITM * Intel® HD HDMI - 7,1 CH HD Audio avec protection de contenu (Realtek ALC898 Audio Codec) - Prise en charge de l'audio Premium Blu-ray - Prend en charge THX TruStudioTM - PCIE x1 Gigabit LAN 10/100/1000 Mb/s - Broadcom BCM57781 - Support du Wake-On-LAN 79 ASRock Z77 OC Formula Motherboard - ASRock Z77 OC Formula | Quick Installation Guide - Page 80
Intel® Z77, prend en charge USB 1.0/2.0/3.0 jusqu'à 5 Gb/s - 4 x connecteurs SATA2, prennent en charge un taux de transfert de données pouvant aller jusqu'à 3.0Go/s, supporte RAID (RAID 0, RAID 1, RAID 5, RAID 10, Intel Rapid Storage et Intel de mesure de la tension ASRock Z77 OC Formula Motherboard - ASRock Z77 OC Formula | Quick Installation Guide - Page 81
11) - Chargeur ASRock APP (voir ATTENTION 12) - ASRock SmartView (voir ATTENTION 13) - ASRock XFast USB (voir ATTENTION 14) - ASRock XFast LAN (voir ATTENTION 15) - ASRock XFast RAM (voir ATTENTION 16) - ASRock Crashless BIOS (voir ATTENTION 17) 81 ASRock Z77 OC Formula Motherboard Français - ASRock Z77 OC Formula | Quick Installation Guide - Page 82
Moniteur thermique à points multiples - Monitoring de la tension: +12V, +5V, +3.3V, Vcore OS - Microsoft® Windows® 7 / 7 64-bit / VistaTM / VistaTM 64-bit / XP / XP 64-bit (voir ATTENTION 26) vous plaît visitez notre site web: http://www.asrock.com Français 82 ASRock Z77 OC Formula Motherboard - ASRock Z77 OC Formula | Quick Installation Guide - Page 83
entrée microphone, cette carte mère supporte les deux modes stéréo et mono. Pour la sortie audio, cette carte mère supporte les modes 2-canaux, 4-canaux, 6-canaux et 8-canaux. Veuillez vous référer au tableau en page 3 pour effectuer la bonne connexion. 83 ASRock Z77 OC Formula Motherboard Français - ASRock Z77 OC Formula | Quick Installation Guide - Page 84
(S1), Suspension à la RAM (S3), hibernation (S4) ou hors tension (S5). Lorsque le pilote du chargeur APP est installé, vous découvrez un mode de mise en charge tout à fait inédit. Site web ASRock : http://www.asrock.com/Feature/AppCharger/index.asp 84 ASRock Z77 OC Formula Motherboard Français - ASRock Z77 OC Formula | Quick Installation Guide - Page 85
d'exploitation est Windows® 7 / 7 64 bits / VistaTM / VistaTM 64 bits, et que vous utilisez le navigateur IE8. Site Internet ASRock : http://www.asrock.com/Feature/ SmartView/index.asp 14. ASRock XFast USB d'un accès aux réglages de l'heure du système. 85 ASRock Z77 OC Formula Motherboard Français - ASRock Z77 OC Formula | Quick Installation Guide - Page 86
sde CPU, les sockets LGA 775, LGA 1155 et LGA 1156. Veuillez noter que tous les ventilateurs de CPU 775 et 1156 ne peuvent pas être utilisés. 26. ASRock XFast RAM n'est pas pris en charge par Microsoft® Windows® XP / XP 64-bit. Les technologie Intel® Smart Connect et ports Intel® USB 3.0 n'est pas - ASRock Z77 OC Formula | Quick Installation Guide - Page 87
le BIOS. Si vous avez besoin d'effacer le CMOS après avoir mis à jour le BIOS, vous GUID et l'adresse MAC seront effacés seulement si la batterie du CMOS est enlevée. Le commutateur Effacer CMOS présente la même fonction que le cavalier Effacer CMOS. Français 87 ASRock Z77 OC Formula Motherboard - ASRock Z77 OC Formula | Quick Installation Guide - Page 88
dans l'utilitaire d'installation du BIOS pour copier le fichier BIOS sur le BIOS principal afin d'assurer un fonctionnement normal du système. Pour la sécurité du système, les utilisateurs ne peuvent pas mettre à jour manuellement le BIOS de sauvegarde. Français 88 ASRock Z77 OC Formula Motherboard - ASRock Z77 OC Formula | Quick Installation Guide - Page 89
à l'unité d'alimentation électrique d'alimentation sur chaque unité. Connectez ensuite l'extrémité blanche du cordon d'alimentation SATA sur le connecteur d'alimentation de l'unité d'alimentation électrique. 89 ASRock Z77 OC Formula Motherboard - ASRock Z77 OC Formula | Quick Installation Guide - Page 90
infrarouge (IR1 br. 5) (voir p.2 No. 38) IRTX +5VSB DUMMY 1 GND IRRX Cet en-tête supporte un module infrarouge optionnel de transfert et de réception sans fil. Barrette pour module à infrarouges grand public ( contrôle commodes de périphériques audio. 90 ASRock Z77 OC Formula Motherboard Français - ASRock Z77 OC Formula | Quick Installation Guide - Page 91
pour fonctionner correctement. Veuillez suivre les instructions dans notre manuel et le manuel de avant. Pour les systèmes d'exploitation Windows® XP / XP 64 bits : Sé de contrôle Realtek. Ajustez "Recording Volume" (Volume d'enregistrement). En-tête du panneau syst ASRock Z77 OC Formula Motherboard - ASRock Z77 OC Formula | Quick Installation Guide - Page 92
p.2 No. 49) (PWR_FAN1 br. 3) (voir p.2 No. 16) (MOS_FAN1 br. 3) (voir p.2 No. 50) 92 CHA_FAN_SPEED +12V GND GND +12V CHA_FAN_SPEED PWR_FAN_SPEED +12V GND GND +12V MOS_FAN_SPEED ASRock Z77 OC Formula Motherboard - ASRock Z77 OC Formula | Quick Installation Guide - Page 93
brancher le fil noir sur la broche de terre. Bien que cette carte mère offre un support de (Ventilateur silencieux ventilateur de CPU à 4 broches , le ventilateur de CPU à 3 1 et la broche 5. 4-Installation d'alimentation à 4 broches ATX 12V 4 1 93 ASRock Z77 OC Formula Motherboard Français - ASRock Z77 OC Formula | Quick Installation Guide - Page 94
. 1) Connecteur d'alimentation SLI/XFIRE (SLI/XFIRE_POWER1 br. 4) (voir p.2 No. 39) SLI/XFIRE_POWER1 Il n'est pas SPDIF vers la carte VGA HDMI, et permettant au système de se connecter au un téléviseur numérique HDMI /un projecteur / un périph . Français 94 ASRock Z77 OC Formula Motherboard - ASRock Z77 OC Formula | Quick Installation Guide - Page 95
ur du Chipset PCH : tension du cœur du second chipset 1.8V_PLL : tension de CPU PLL Le Guide d'installation du panneau USB 3.0 frontal Etape 1 Préparez le panneau USB 3.0 frontal fourni, quatre vis USB 3.0 frontal peut maintenant être utilisé. Français 95 ASRock Z77 OC Formula Motherboard - ASRock Z77 OC Formula | Quick Installation Guide - Page 96
3.0 Étape 1 Dévissez les deux vis du panneau avant USB 3.0. Étape 2 Assemblez le câble USB 3.0 et le support arrière USB 3.0. Étape 3 Vissez les deux vis dans le support arrière USB 3.0. Étape 4 Placez le support arrière USB 3.0 dans le châssis. Français 96 ASRock Z77 OC Formula Motherboard - ASRock Z77 OC Formula | Quick Installation Guide - Page 97
que capacité de la mémoire, solution thermique, etc Overclocking peuvent af fecter votre système la stabilité, ou même causer des dommages aux composants et périphériques. Nous ne sommes pas responsable d'éventuels dommages causés par l'overclocking. Français 97 ASRock Z77 OC Formula Motherboard - ASRock Z77 OC Formula | Quick Installation Guide - Page 98
, vous pouvez utiliser l'interrupteur de mise en marche/arrêt PCIe afin de détecter celle qui est hors service et d'un simple clic retirer les cartes. 1. Assurez-vous de mettre le système hors tension avant votre carte PCIE, retirez-la de la carte mère. Français 98 ASRock Z77 OC Formula Motherboard - ASRock Z77 OC Formula | Quick Installation Guide - Page 99
le BIOS, veuillez consulter le Guide de l'utilisateur (fichier PDF) dans le CD technique. 3. Informations sur le CD de support Cette carte mère supporte divers systèmes d'exploitation Microsoft® Windows®: 7 et doublecliquez dessus pour afficher les menus. 99 ASRock Z77 OC Formula Motherboard Français - ASRock Z77 OC Formula | Quick Installation Guide - Page 100
/ VistaTM 64-bit, si consiglia di impostare l'opzione BIOS in Storage Configuration (Configurazione di archiviazione) sulla modalità AHCI. Per l'impostazione BIOS, fare riferimento a "User Manual" (Manuale dell'utente) nel CD di supporto per dettagli. ASRock Z77 OC Formula Motherboard Italiano - ASRock Z77 OC Formula | Quick Installation Guide - Page 101
della memoria di sistema: 32GB (vedi ATTENZIONE 4) - Supporto di Intel® XMP (Extreme Memory Profile)1.3/1.2 - 2 x Alloggio PCI Express 3.0 x16 (PCIE2/PCIE4: singolo in modalità x16 (PCIE2) / x8 (PCIE4) o doppio in modalità x8/x8) (vedi ATTENZIONE 5) 101 ASRock Z77 OC Formula Motherboard Italiano - ASRock Z77 OC Formula | Quick Installation Guide - Page 102
Ethernet 802.3az - Supporta PXE I/O Panel - 1 x porta PS/2 per tastiera/mouse - 1 x Porta HDMI - 1 x Porta ottica SPDIF Out - 4 x porte USB 2.0 già integrate - 6 x porte USB 3.0 già integrate - 1 x porte LAN RJ-45 con LED (LED azione/collegamento e LED velocità) ASRock Z77 OC Formula Motherboard - ASRock Z77 OC Formula | Quick Installation Guide - Page 103
2 x Connettori SATA3 6,0Gb/s Z77 Intel®, supporto RAID (RAID 0, RAID 1, RAID 5, RAID 10, Intel Rapid Storage e tecnologia Intel Smart Response) e delle funzioni segmenti) - 1 x interruttore di alimentazione con LED - 1 x interruttore di reset con LED 103 ASRock Z77 OC Formula Motherboard Italiano - ASRock Z77 OC Formula | Quick Installation Guide - Page 104
23) * Lucid Virtu Universal MVP può essere supportato solo con processori dotati di GPU integrata. - Booster ibrido: - ASRock U-COP (vedi ATTENZIONE 24) - Boot Failure Guard (B.F.G.) - Opzione C.C.O. (Combo Cooler Option) (vedi ATTENZIONE 25) - LED notturno ASRock Z77 OC Formula Motherboard - ASRock Z77 OC Formula | Quick Installation Guide - Page 105
essere inferiori a 4GB per l'accantonamento riservato all'uso del sistema sotto Windows® 7 / VistaTM / XP. Per Windows® OS con CPU 64-bit, non c'è tale limitazione. Si può usare ASRock XFast RAM per fare uso della memoria che Windows® non può utilizzare. ASRock Z77 OC Formula Motherboard 105 - ASRock Z77 OC Formula | Quick Installation Guide - Page 106
floppy) o disco rigido; poi si può aggiornare il BIOS con pochi clic, senza preparare altri dischetti (dischi floppy) o altre complicate utilità Flash. Si prega di notare che l'unità Flash USB o il disco rigido devono usare il File System FAT32/16/12. 106 ASRock Z77 OC Formula Motherboard Italiano - ASRock Z77 OC Formula | Quick Installation Guide - Page 107
Crashless BIOS terminerà automaticamente la procedura di aggiornamento del BIOS quando è ripristinata la corrente. Notare che i file del BIOS devono essere collocati nella directory principale del disco USB. Questa funzione è supportata solo dalle porte USB2.0. 107 ASRock Z77 OC Formula Motherboard - ASRock Z77 OC Formula | Quick Installation Guide - Page 108
Socket LGA 775, LGA 1155 e LGA 1156. Notare che non possono essere usate tutte le ventole CPU 775 e 1156. 26. ASRock XFast RAM non è supportato da Microsoft® Windows® XP / XP 64-bit. Tecnologia Intel® Smart Connect e porte Intel inferiore a 1,00 W quando è spento. ASRock Z77 OC Formula Motherboard - ASRock Z77 OC Formula | Quick Installation Guide - Page 109
EuP. In base ai suggerimenti Intel l'alimentatore predisposto EuP deve soddisfare GUID e indirizzo MAC saranno cancellati solo se è rimossa la batteria della CMOS. L'interruttore Clear CMOS (Cancella CMOS) ha la stessa funzione del jumper Clear CMOS. Italiano 109 ASRock Z77 OC Formula Motherboard - ASRock Z77 OC Formula | Quick Installation Guide - Page 110
Flash" nella utility di setup del BIOS per copiare il file del BIOS nel BIOS principale e assicurare il normale funzionamento del sistema. Per garantire la sicurezza del sistema, gli utilizzatori non possono aggiornare manualmente il BIOS di backup. Italiano 110 ASRock Z77 OC Formula Motherboard - ASRock Z77 OC Formula | Quick Installation Guide - Page 111
di alimentazione SATA al connettore di alimentazione del drive. Poi connettete l'estremità bianca del cavo di alimentazio ne SATA al connettore power dell'alimentatore. 111 ASRock Z77 OC Formula Motherboard - ASRock Z77 OC Formula | Quick Installation Guide - Page 112
) Questo collettore supporta moduli ad infrarossi optional per la trasmissione e la ricezione senza fili. Questo connettore può essere utilizzato per collegare ricevitore remoto. Italiano 112 ASRock Z77 OC Formula Motherboard - ASRock Z77 OC Formula | Quick Installation Guide - Page 113
alle istruzioni del nostro manuale e del manuale del telaio per installare il Windows® 7 / 7 64-bit / VistaTM / VistaTM 64-bit: Andare alla scheda "FrontMic" (Microfono frontale) del pannello di controllo Realtek. Regolare la voce "Recording Volume" (Volume ASRock Z77 OC Formula Motherboard 113 - ASRock Z77 OC Formula | Quick Installation Guide - Page 114
di terra. (3-pin CHA_FAN2) (vedi p.2 Nr. 33) (3-pin CHA_FAN3) (vedi p.2 Nr. 17) (3-pin CHA_FAN4) (vedi p.2 Nr. 49) CHA_FAN_SPEED +12V GND GND +12V CHA_FAN_SPEED Italiano 114 ASRock Z77 OC Formula Motherboard - ASRock Z77 OC Formula | Quick Installation Guide - Page 115
Pin 13. Installazione dell'alimentatore ATX a 20 pin 1 13 Connettore ATX 12 V (8-pin ATX12V1) (vedi p.2 Nr. 2) 8 5 4 1 Collegare un alimentatore ATX 12 V a questo connettore. Italiano 115 ASRock Z77 OC Formula Motherboard - ASRock Z77 OC Formula | Quick Installation Guide - Page 116
alimentazione SLI/XFIRE (4-pin SLI/XFIRE_POWER1) (vedi p.2 Nr. 39) SLI/XFIRE_POWER1 HDMI VGA, consente al sistema di collegare dispositivi per TV digitale HDMI/proiettori/ LCD . Collegare il connettore HDMI_SPDIF della scheda VGA HDMI a questo header. Italiano 116 ASRock Z77 OC Formula Motherboard - ASRock Z77 OC Formula | Quick Installation Guide - Page 117
COMP XCLK_RCOMP: tensione COMP gen clock interno DMI: tensione DMI PCH2: tensione core chipset PCH: tensione core secondo chipset 1.8V_PLL: tensione PLL CPU Italiano 117 ASRock Z77 OC Formula Motherboard - ASRock Z77 OC Formula | Quick Installation Guide - Page 118
il cavo USB 3.0 e il supporto USB 3.0 posteriore. Punto 3 Avvitare le due viti nel supporto USB 3.0 Punto 4 Inserire il supporto USB 3.0 posteriore. posteriore nel telaio. 118 ASRock Z77 OC Formula Motherboard - ASRock Z77 OC Formula | Quick Installation Guide - Page 119
sistema, come ad esempio capacità di memoria, soluzione termica, Overclocking ecc possono influenzare il sistema la stabilità, o addirittura causare danni ai componenti e dispositivi. Non siamo responsabile per eventuali danni causati da overclocking. Italiano 119 ASRock Z77 OC Formula Motherboard - ASRock Z77 OC Formula | Quick Installation Guide - Page 120
della stessa. 3. L'interruttore ON/OFF PCIe serve esclusivamente per il debug. Se non si desidera usare la scheda PCIE, rimuoverla dalla scheda madre. Italiano 120 ASRock Z77 OC Formula Motherboard - ASRock Z77 OC Formula | Quick Installation Guide - Page 121
BIOS, fare riferimento al Manuale dell'Utente (PDF file) contenuto nel cd di supporto. 3. Software di supporto e informazioni su CD Questa scheda madre supporta vari sistemi operativi Microsoft® Windows®: e cliccare due volte per visualizzare i menù. 121 ASRock Z77 OC Formula Motherboard Italiano - ASRock Z77 OC Formula | Quick Installation Guide - Page 122
64 bits / VistaTM / VistaTM 64 bits, es recomendable establecer la opción del BIOS de la configuración de almacenamiento en el modo AHCI. Para obtener detalles sobre la configuración del BIOS, consulte el "Manual del usuario" que se encuentra en nuestro CD de soporte. ASRock Z77 OC Formula Motherboard - ASRock Z77 OC Formula | Quick Installation Guide - Page 123
slots - Apoya DDR3 3000+(OC)/2800(OC)/2666(OC)/2400(OC)/ 2133(OC)/1866(OC)/1600/1333/1066 non-ECC, memoria de un-buffered - Máxima capacidad de la memoria del sistema: 32GB (vea ATENCIÓN 4) - Compatible con Intel® Extreme Memory Profile (XMP)1.3/1.2 123 ASRock Z77 OC Formula Motherboard Español - ASRock Z77 OC Formula | Quick Installation Guide - Page 124
LAN 10/100/1000 Mb/s Español - Broadcom BCM57781 - Soporta Wake-On-LAN - Compatible con Ethernet 802.3az de bajo consumo energético - Compatible con PXE Entrada/Salida de I/O Panel Panel Trasero - 1 x puerto de teclado/ratón PS/2 - 1 x puerto HDMI 124 ASRock Z77 OC Formula Motherboard - ASRock Z77 OC Formula | Quick Installation Guide - Page 125
SATA3 de 6,0 Gb/s con chip Intel® Z77 con funciones RAID (RAID 0, RAID 1, RAID 5, RAID 10, Intel Rapid Storage y tecnología Intel Smart Response), NCQ, AHCI y de Conector de ventilador de alimentacion (3-pin) - 1 x Conector de ventilador de MOS (3-pin) 125 ASRock Z77 OC Formula Motherboard Español - ASRock Z77 OC Formula | Quick Installation Guide - Page 126
XFast RAM (vea ATENCIÓN 16) - ASRock Crashless BIOS (vea ATENCIÓN 17) - ASRock OMG (Online Management Guard) (vea ATENCIÓN 18) - ASRock Internet Flash (vea ATENCIÓN 19) - ASRock Sistema Navegador UEFI - Función Deshumidificador ASRock (vea ATENCIÓN 20) - ASRock Interactive UEFI ASRock Z77 OC Formula - ASRock Z77 OC Formula | Quick Installation Guide - Page 127
Control de ajuste de la velocidad del ventilador de la CPU/ chasis/MOS - Monitor térmico multipunto - Monitor de Voltaje: +12V, +5V, +3.3V, Vcore OS - En conformidad con Microsoft® Windows del reloj, incluido el ajuste del BIOS, aplicando la tecnología de aumento ASRock Z77 OC Formula Motherboard - ASRock Z77 OC Formula | Quick Installation Guide - Page 128
página 69 del Manual del Usuario en el Intel® para la información más última. 7. Las funciones xvYCC y Deep Color solamente se admiten con el sistema operativo Windows Fan-tastic Tuning, función de aumento de la velocidad del reloj, DNA OC y IES. La función 128 ASRock Z77 OC Formula Motherboard - ASRock Z77 OC Formula | Quick Installation Guide - Page 129
La función de Fan-tastic Tuning, Windows®. Gracias a esta utilidad, sólo necesitará pulsar durante la fase POST o pulsar para acceder al menú de configuración del BIOS y a la utilidad ASRock ASRock están exclusivamente equipadas con la utilidad 129 ASRock Z77 OC Formula Motherboard Español - ASRock Z77 OC Formula | Quick Installation Guide - Page 130
Windows® 7 / 7 64 bits / VistaTM / VistaTM 64 bits y que la versión de su explorador es IE8. Sitio Web de ASRock: http://www.asrock.com/Feature/SmartView/index.asp 14. ASRock proceso de actualización del BIOS, ASRock Crashless BIOS finalizará de manera autom ASRock Z77 OC Formula Motherboard Español - ASRock Z77 OC Formula | Quick Installation Guide - Page 131
zócalos LGA 775, LGA 1155 y LGA 1156. Recuerde que no es posible el uso de todos los ventiladores para CPU 775 y 1156. 26. ASRock XFast RAM no se admite en Microsoft® Windows® XP / XP 64 bits. Las tecnologías Intel® Smart Connect y puertos Intel® USB 3.0 no se admite en Microsoft® Windows® VistaTM - ASRock Z77 OC Formula | Quick Installation Guide - Page 132
46) Setting Valor predeterminado BIOS para copiar el archivo de BIOS a la BIOS principal y asegurar así el funcionamiento normal del sistema. Para garantizar la seguridad del sistema, los usuarios no pueden actualizar la BIOS de copia de seguridad manualmente. 132 ASRock Z77 OC Formula Motherboard - ASRock Z77 OC Formula | Quick Installation Guide - Page 133
alimentazione energía de la unidad. A continuación, conecte el extremo blanco del cable de alimentación SATA a la conexión de alimentación de la fuente de alimentación. 133 ASRock Z77 OC Formula Motherboard - ASRock Z77 OC Formula | Quick Installation Guide - Page 134
) Este cabezal soporta un módulo infrarrojos de transmisión y recepción wireless opcional. Esta base de conexiones se puede utilizar para conectar receptor remoto. Español 134 ASRock Z77 OC Formula Motherboard - ASRock Z77 OC Formula | Quick Installation Guide - Page 135
siga las instrucciones en nuestro manual y en el manual de chasis para instalar Windows® 7 / 7 64-bit / VistaTM / VistaTM 64-bit: Acceda a la ficha "FrontMic" (Micrófono frontal) del panel de control Realtek. Ajuste la posición del control deslizante "Recording Volume ASRock Z77 OC Formula Motherboard - ASRock Z77 OC Formula | Quick Installation Guide - Page 136
CHA_FAN2) (vea p.2, N. 33) Por favor, conecte los cables del ventilador a los conectores de ventilador, haciendo coincidir el cable negro con la patilla de masa. 136 ASRock Z77 OC Formula Motherboard Español - ASRock Z77 OC Formula | Quick Installation Guide - Page 137
ventilador de procesador de 3 contactos seguirá funcionando correctamente incluso sin la función de control de velocidad de ventilador. Si pretende enchufar el ventilador de procesador de 3 contactos ón de una Fuente de Alimentación ATX de 20 Pins 1 13 Español 137 ASRock Z77 OC Formula Motherboard - ASRock Z77 OC Formula | Quick Installation Guide - Page 138
/XFIRE (4-pin SLI/XFIRE_POWER1) (vea p.2, N. 39) SLI/XFIRE_POWER1 No es HDMI, permite al sistema conectarse a dispositivos de TV Digital HDMI / proyectores / Dispositivos LCD. Conecte el conector HDMI_SPDIF de la tarjeta VGA HDMI a esta cabecera. Español 138 ASRock Z77 OC Formula Motherboard - ASRock Z77 OC Formula | Quick Installation Guide - Page 139
DMI PCH2: voltaje del núcleo del conjunto de chips PCH: voltaje del núcleo del 2do conjunto de chips 1.8V_PLL: voltaje CPU PLL Español 139 ASRock Z77 OC Formula Motherboard - ASRock Z77 OC Formula | Quick Installation Guide - Page 140
soporte USB 3.0 posterior Paso 1 Desatornille los dos tornillos del panel USB 3.0 frontal. Paso 2 Coloque el cable USB 3.0 el soporte USB 3.0 posterior juntos. Español 140 ASRock Z77 OC Formula Motherboard - ASRock Z77 OC Formula | Quick Installation Guide - Page 141
CMOS (CLRCBTN) (vea p.3, N. 14) clr CMOS Botones OC veloces + / - (MINUS1: vea p.2, N. 10) (PLUS1: vea p.2, N. 11) - + El conmutador de OC veloces + / permiten a los usuarios ajustar de forma rápida y sencilla la frecuencia OC en la unidad OC veloces. 141 ASRock Z77 OC Formula Motherboard - ASRock Z77 OC Formula | Quick Installation Guide - Page 142
causar daños a los componentes y dispositivos. Nosotros no somos responsable de posibles daños causados por overclocking. Interruptor PCIe ON/OFF (SWITCH1) (vea p.2, N. 9) ON 123 1: PCIE2 2: PCIE4 3: su tarjeta PCIe, retírela de la placa base. Español 142 ASRock Z77 OC Formula Motherboard - ASRock Z77 OC Formula | Quick Installation Guide - Page 143
figurar la BIOS, por favor refiérase al Manual del Usuario (archivo PDF) contenido en el CD. 3. Información de Software Support CD Esta placa-base soporta diversos tipos de sistema operativo Windows®: 7 / archivo "ASSETUP.EXE" para iniciar la instalación. 143 ASRock Z77 OC Formula Motherboard Español - ASRock Z77 OC Formula | Quick Installation Guide - Page 144
6 x Serial ATA (SATA 2 x Serial ATA (SATA 1 x I/O 1 x USB 3.0 4 x 6 x 1 x USB 3.0 1 x карта ASRock SLI_Bridge_2S 10 x OC GC-Extreme GELID 144 ASRock Windows® 7 / 7 64-bit / VistaTM / VistaTM 64-bit BIOS Storage Configuration AHCI BIOS ASRock Z77 OC Formula Motherboard - ASRock Z77 OC Formula | Quick Installation Guide - Page 145
(OC)/2666(OC)/2400(OC)/ 2133(OC)/1866(OC)/1600/1333/1066 не- ECC 32 4 Intel® Extreme Memory Profile (XMP)1.3/1.2 - 2 x слота PCI Express 3.0 x16 (PCIE2/PCIE4 x16 (PCIE2) / x8 (PCIE4 x8/x8 5) * PCIE 3.0 Intel® Ivy Bridge. В Intel® Sandy Bridge PCIE 2.0. 145 ASRock Z77 OC Formula Motherboard - ASRock Z77 OC Formula | Quick Installation Guide - Page 146
4 x порта USB 2.0 - 6 x порта USB 3.0 - 1 x RJ-45 LAN ACT/LINK SPEED) - 1 x Clear CMOS 8) SATA3 - 2 x порта SATA3 6,0 Intel® Z77 RAID (RAID 0, RAID 1, RAID 5, RAID 10, Intel Rapid Storage Intel Smart Response), NCQ, AHCI 146 ASRock Z77 OC Formula Motherboard - ASRock Z77 OC Formula | Quick Installation Guide - Page 147
2 USB 3.0) - 1 x Dr. Debug (7 1 x Power Switch 1 x Reset Switch 1 x Clear CMOS Rapid OC OC - 1 x PCIe - 1 x Post Status Checker (PSC 9) - 2 x 64Mb AMI UEFI Legal BIOS rpaфичеckoro интеpфeйca 1 x BIOS и 1 x BIOS Plug and Play" - ACPI 1.1 ASRock Z77 OC Formula Motherboard 147 - ASRock Z77 OC Formula | Quick Installation Guide - Page 148
MVP Hybrid Booster: - ASRock U-COP 24 Boot Failure Guard (B.F.G) - Combo Cooler Option (C.C.O 25 LED Power/MOS Power/MOS MOS MOS 12V, +5V, +3.3V, Vcore Microsoft® Windows® 7 / 7 64-bit / VistaTM 64 VistaTM / XP / XP 64-bit 26) - FCC, CE, WHQL ASRock Z77 OC Formula Motherboard - ASRock Z77 OC Formula | Quick Installation Guide - Page 149
Windows® 7 / VistaTM / XP Windows® OS с 64-bit ASRock XFast RAM Windows®. 5. Tолько PCIE2 и PCIE4 Gen 3 PCI Express Gen 3 Ivy Bridge Sandy Bridge PCI Express PCI Express Gen 2. 6 Intel 7 xvYCC и Deep Color Windows® 7 64бит / 7 Deep Color EDID (12 ASRock Z77 OC Formula Motherboard - ASRock Z77 OC Formula | Quick Installation Guide - Page 150
VGA 10 Formula Drive Hardware Monitor Fan-tastic Tuning, Overclocking OC DNA and IES Hardware Monitor Fan-tastic Tuning Overclocking OC DNA IES Formula Drive ASRock: http://www.asrock.com 11. ASRock Instant Flash BIOS Flash ROM BIOS MS-DOS или Windows F6 POST BIOS F2 ASRock - ASRock Z77 OC Formula | Quick Installation Guide - Page 151
ASRock XFast USB USB 15. ASRock XFast LAN Youtube 16. ASRock XFast RAM Formula Drive 32 Windows®. ASRock XFast RAM Adobe Photoshop 5 ASRock XFast RAM SSD 17. ASRock Crashless BIOS BIOS BIOS ASRock Crashless BIOS BIOS BIOS USB USB2.0. 18 OMG 151 ASRock Z77 OC Formula Motherboard - ASRock Z77 OC Formula | Quick Installation Guide - Page 152
MVP 24 25. Combo Cooler Option (C.C.O Socket LGA775, LGA1155 или LGA1156 LGA775 или LGA1156 26. ОС Microsoft® Windows® XP / XP 64 ASRock XFast RAM. ОС Microsoft® Windows® VistaTM / VistaTM 64 XP / XP 64 Intel® Smart Connect Technology и Intel USB 3.0. ASRock Z77 OC Formula Motherboard - ASRock Z77 OC Formula | Quick Installation Guide - Page 153
EuP 1 EuP Intel EuP 50 5V 100 EuP. 1.3 short open 3 1 и 2 CMOS (CLRCMOS1, 3 2, п. 46) CMOS CLRCMOS1 CMOS 15 5 2 и 3 CLRCMOS1 CMOS BIOS CMOS BIOS CMOS 1394 GUID и MAC CMOS. Clear CMOS Clear CMOS. 153 ASRock Z77 OC Formula Motherboard - ASRock Z77 OC Formula | Quick Installation Guide - Page 154
BIOS (BIOS_SEL1 2, п. 32) BIOS) BIOS BIOS BIOS BIOS BIOS BIOS pin2 и pin3 BIOS pin1 и pin2 BIOS "ASRock Instant Flash" или "ASRock Internet Flash BIOS BIOS BIOS. 154 ASRock Z77 OC Formula Motherboard - ASRock Z77 OC Formula | Quick Installation Guide - Page 155
2, п. 22) Serial ATA3 SATA3 SATA 6,0 SATA3_M2 SATA3_M0 SATA3_0 SATA3_M3 SATA3_M1 SATA3_1 Serial ATA (SATA SATA / SATA2 / SATA3 SATA2 / SATA3 Serial ATA (SATA SATA SATA 155 ASRock Z77 OC Formula Motherboard - ASRock Z77 OC Formula | Quick Installation Guide - Page 156
3.0 USB 3.0 USB 3.0. 5 IR1 2, п. 38) IRTX +5VSB DUMMY 1 GND IRRX 4 CIR1 2, п. 36) 9 HD_AUDIO1) (см. cтр. 2, п. 41) GND PRESENCE# MIC_RET OUT_RET 1 OUT2_L J_SENSE OUT2_R MIC2_R MIC2_L 156 ASRock Z77 OC Formula Motherboard - ASRock Z77 OC Formula | Quick Installation Guide - Page 157
OUT2_L. C Ground (GND Ground (GND). D MIC_RET и OUT_RET HD AC'97 E Windows® XP / XP 64 Mixer Recorder FrontMic Windows® 7 / 7 64-бита, VistaTM / VistaTM 64 FrontMic Realtek Recording Volume 9 PANEL1 2, п. 25) PWRBTN RESET PLED 157 ASRock Z77 OC Formula Motherboard - ASRock Z77 OC Formula | Quick Installation Guide - Page 158
+ PLED+ Power LED S1/S3 S4 или S5 Chassis, Power и MOS Fan (4 CHA_FAN1) CHA_FAN_SPEED 2, п. 37) +12V GND FAN_SPEED_CONTROL (3 CHA_FAN2 2, ) CHA_FAN_SPEED +12V GND GND +12V CHA_FAN_SPEED PWR_FAN_SPEED +12V GND GND +12V MOS_FAN_SPEED 158 ASRock Z77 OC Formula Motherboard - ASRock Z77 OC Formula | Quick Installation Guide - Page 159
12 24 20 ATX 20 ATX 1 13. 20 ATX 1 13 12V-ATX (8 ATX12V1 2, п. 2) 8 5 ATX 12V. 4 1 ATX с 8 12V ATX с 4-Pin 12V ATX с 4-Pin 1 5. 8 5 ATX С 4-Pin 12V 4 ASRock Z77 OC Formula Motherboard 1 159 - ASRock Z77 OC Formula | Quick Installation Guide - Page 160
-карту HDMI HDMI HDMI_SPDIF на VGAкарте HDMI. VCCM, VCCSA, VTT2, VTT1, VCORE, DMI_COMP, XCLK_RCOMP, DMI, PCH2, PCH и 1.8V_PLL. 160 VCCM DRAM VCCSA VTT2 VTT VTT1: 2 VTT VCORE DMI_COMP DMI COMP XCLK_RCOMP COMP DMI DM I PCH2 PCH 2 1.8V_PLL PLL ASRock Z77 OC Formula Motherboard - ASRock Z77 OC Formula | Quick Installation Guide - Page 161
USB 3.0 Шаг 1 USB 3.0 Шаг 2 2,5 USB 3.0 Шаг 3 USB 3.0 2,5 Шаг 4 USB 3.0 Шаг 5 USB 3.0 USB 3.0 (USB3_6_7 Шаг 6 USB 3.0 USB 3.0 Шаг 1 USB 3.0. Шаг 2 USB 3.0 USB 3.0. 161 ASRock Z77 OC Formula Motherboard - ASRock Z77 OC Formula | Quick Installation Guide - Page 162
Reset Switch Clear CMOS Switch (CLRCBTN 3, п. 14) clr CMOS Clear CMOS Switch CMOS. OC (MINUS1 2, п. 10) (PLUS1 2, п. 11) - + OC. PCIe ON (SWITCH1) 2, п. 9) 123 1: PCIE2 2: PCIE4 3: PCIE5 PCIe PCIE x16 162 ASRock Z77 OC Formula Motherboard - ASRock Z77 OC Formula | Quick Installation Guide - Page 163
BIOS Setup F2> или + + - ASRock Z77 OC Formula | Quick Installation Guide - Page 164
özel bilgiler için lütfen web sitemizi ziyaret edin. www.asrock.com/support/index.asp 1.1 Paket İçindekiler ASRock Z77 OC Formula Anakart (CEB Form Faktörü: 12,0-inç x 10,5-inç, 30,5 cm x 26,7 cm) ASRock Z77 OC Formula Hızlı Takma Kılavuzu ASRock Z77 OC Formula Destek CD'si 6 x Seri ATA (SATA) Veri - ASRock Z77 OC Formula | Quick Installation Guide - Page 165
)'de tekli veya x8/x8 modda çiftli) (bkz. DİKKAT 5) * PCIE 3.0, sadece Intel® Ivy Köprü İşlemcisiyle desteklenir. Intel® Sandy Köprü İşlemciyle, sadece PCIE 2.0'ı destekler. - 1 x PCI Express 2.0 x16 yuva (PCIE5: x4 modu) - 2 x PCI Express 2.0 x1 yuva 165 ASRock Z77 OC Formula Motherboard Türkçe - ASRock Z77 OC Formula | Quick Installation Guide - Page 166
Anahtarı - HD Ses Jakı: Arka Hoparlör/Orta/Bas/Hat Girişi/Ön Hoparlör/ Mikrofon (bkz. DİKKAT 8) - 2 x SATA3 6,0Gb/sn Intel® Z77 konektör, donanım RAID (RAID 0, RAID 1, RAID 5, RAID 10, Intel Rapid Storage ve Intel Smart Response Teknolojisini), NCQ, AHCI ve "Sistem ASRock Z77 OC Formula Motherboard - ASRock Z77 OC Formula | Quick Installation Guide - Page 167
ı OC Düğmsi: OC frekansını ayarlamak için +/- düğmeleri - 1 x PCIe AÇMA/KAPAMA Anahtarı - 1 x Post Durum Denetleyicisi (PSC) (bkz. DİKKAT 9) - 2 x 64 Mb GUI destekli AMI UEFI Geçerli BIOS (1 x Ana BIOS ve 1 x BIOS Kurtarma Yedekleme) - "Tak Çalıştır"ı destekler 167 ASRock Z77 OC Formula Motherboard - ASRock Z77 OC Formula | Quick Installation Guide - Page 168
ile Otomatik Ayar'ına izin verir) - CPU/Kasa/MOS Fan Çoklu-Hız Kontrolü - Çoklu nokta Termal Monitörü - Voltaj İzleme: +12V, +5V, +3,3V, CPU Vcore - Microsoft® Windows® 7 / 7 64-bit / VistaTM / VistaTM 64-bit / XP / XP 64-bit uyumlu (bkz. DİKKAT 26) - FCC, CE, WHQL ASRock Z77 OC Formula Motherboard - ASRock Z77 OC Formula | Quick Installation Guide - Page 169
sitemizi ziyaret edin: http://www.asrock.com UYARI Lütfen, ayarı BIOS'da ayarlama, Untied Overclocking Teknolojisi'ni uygulama veya üçünc iзin Intel® web sitesini kontrol edin. 7. xvYCC ve Deep Color yalnэzca Windows® sayfa 3'teki tabloyu kontrol edin. ASRock Z77 OC Formula Motherboard 169 Türkçe - ASRock Z77 OC Formula | Quick Installation Guide - Page 170
gerçek zamanlı haber beslemelerinizi, daha kişisel bir İnternet deneyimi için geliştirilmiş bir görünümde birleştiren IE için akıllı başlangıç sayfasıdır. ASRock anakartları, hareket halindeki arkadaşlarınızla irtibat halinde ASRock Z77 OC Formula Motherboard - ASRock Z77 OC Formula | Quick Installation Guide - Page 171
ılar ve Windows İşletim Sistemi OC Profili bir BIOS seçeneği olup global OC şampiyonu olan Nick'in bu anakartı nasıl hız aşımına uğrattığını gösterir. Komplike hız aşırtımı sürecini basitleştiren Nick'in OC ayarını kullanmak için güvenilir ve etkin bir yolu kullanır. ASRock Z77 OC Formula Motherboard - ASRock Z77 OC Formula | Quick Installation Guide - Page 172
. Intel'in önerisine göre, EuP hazır güç kaynağının 100 mA akım tüketiminde 5v beklemede güç etkinliği %50'den yüksektir standardını karşılaması gerekir. EuP hazır güç kaynağı seçimi için, daha fazla ayrıntı için güç kaynağı üreticisine başvurmanızı öneririz. 172 ASRock Z77 OC Formula Motherboard - ASRock Z77 OC Formula | Quick Installation Guide - Page 173
veya "ASRock Internet Flash" öğesini BIOS kurulum programında kullanarak BIOS dosyasını ana BIOS'a kopyalayarak sistemin normal çalıştığından emin olun. Sistem güvenliğinin sağlandığından emin olmak için, kullanıcılar yedek BIOS'u manuel olarak güncelleyemezler. 173 ASRock Z77 OC Formula Motherboard - ASRock Z77 OC Formula | Quick Installation Guide - Page 174
ğlama Lütfen SATA güç kablosunun siyah ucunu her sürücüde bulunan güç konektörüne bağlayın. Sonra, SATA güç kablosunun beyaz ucunu güç kaynağının güç konektörüne bağlayın. Türkçe 174 ASRock Z77 OC Formula Motherboard - ASRock Z77 OC Formula | Quick Installation Guide - Page 175
1 OUT2_L J_SENSE OUT2_R MIC2_R MIC2_L Bu, panel ses kablosu için uygun bağlantı sağlayan ve ses cihazlarını kontrol etmeyi sağlayan bir arayüzdür. ASRock Z77 OC Formula Motherboard 175 Türkçe - ASRock Z77 OC Formula | Quick Installation Guide - Page 176
64-bit İS için: "Karıştırıcı"yı seçin. "Kaydedici"yi seçin. Sonra "Ön Mikrofon"u tıklatın. Windows® 7 / 7 64-bit / VistaTM / VistaTM 64-bit İS için: Realtek Kontrol panelinde "Ön Mikrofon" modülünde temel olarak güç anahtarı, sıfırlama anahtarı, güç LED'i, ASRock Z77 OC Formula Motherboard Türkçe - ASRock Z77 OC Formula | Quick Installation Guide - Page 177
PWR_FAN_SPEED +12V GND GND +12V MOS_FAN_SPEED CPU Fan Konektörü 4-pinli CPU_FAN1) (bkz. s.2 No. 4) 4 3 2 1 GND +12V CPU_FAN_SPEED FAN_SPEED_CONTROL Lütfen fan kablolarını CPU fanına bu konektöre bağlayın ve siyah kabloyu toprak pinine bağlayın. Türkçe 177 ASRock Z77 OC Formula Motherboard - ASRock Z77 OC Formula | Quick Installation Guide - Page 178
şekilde çalışabilir. 3-Pinli CPU fanı bu konektördeki CPU fan konektörüne bağlamayı planlıyorsanız, lütfen Pin 1-3'e bağlayın. Pin 1-3 Bağlı 3-Pinli Fanı Takma (3-pinli CPU_FAN2) (bkz. ATX12V2) (bkz. s.2 No. 1) 4-Pinli ATX 12V Güç Kaynağını Takma 4 1 Türkçe 178 ASRock Z77 OC Formula Motherboard - ASRock Z77 OC Formula | Quick Installation Guide - Page 179
XCLK_RCOMP: Dahili saat jen COMP gerilimi DMI: DMI gerilimi PCH2: Yonga seti çekirdek gerilimi PCH: 2. yonga seti çekirdek gerilimi 1.8V_PLL: CPU PLL gerilimi Türkçe 179 ASRock Z77 OC Formula Motherboard - ASRock Z77 OC Formula | Quick Installation Guide - Page 180
ı sökün. Adım 2 USB 3.0 kablosunu ve arka USB 3.0 braketini bir araya getirin. Adım 3 İki vidayı arka USB 3.0 braketine vidalayın. Adım 4 Arka USB 3.0 braketini kasaya yerleştirin. 180 ASRock Z77 OC Formula Motherboard Türkçe - ASRock Z77 OC Formula | Quick Installation Guide - Page 181
davranış gibi, sistem yapılandırmasına bağlıdır bellek kapasitesi, termal çözümü, vb Overclock sisteminizi etkileyebilir stabilite, veya hatta bileşenleri ve cihazlar zarar verebilir. Biz değildir overclock getirebileceği olası zararlardan sorumlu. Türkçe 181 ASRock Z77 OC Formula Motherboard - ASRock Z77 OC Formula | Quick Installation Guide - Page 182
, lütfen kart satıcısı ile temasa geçiniz. 3. PCIe PCIE kartınız yanabilir sadece hata giderme içindir. Eğer PCIE kartınızı kullanmak istemiyorsanız, lütfen anakarttan çıkarın. Türkçe 182 ASRock Z77 OC Formula Motherboard - ASRock Z77 OC Formula | Quick Installation Guide - Page 183
ından seçim yapmanıza izin veren menü tabanlı bir programdır. BIOS Ayarları hakkında ayrıntılı bilgi için, lütfen Destek CD' vurun. 3. Yazılım Destek CD'si bilgileri Bu anakart çeşitli Microsoft® Windows® işletim sistemleri destekler: 7 / 7 64-bit / VistaTM / ASRock Z77 OC Formula Motherboard Türkçe - ASRock Z77 OC Formula | Quick Installation Guide - Page 184
Formula 지원 CD 시리얼 ATA (SATA 6 ATA (SATA) HDD 2 I/O 차폐 1 개 USB 3.0 1 개 HDD 나사 4 6 개 후면 USB 3.0 브래킷 1개 ASRock SLI 2S 카드 1 개 OC 스탠드 10 개 GELID GC-Extreme ASRock Windows® 7 / 7 64-비트 / VistaTM / VistaTM 64 Storage Configuration BIOS 옵션을 AHCI BIOS CD 184 ASRock Z77 OC Formula Motherboard - ASRock Z77 OC Formula | Quick Installation Guide - Page 185
/PCIE4: x16 (PCIE2) / x8 (PCIE4 x8/x8 5 참조 ) * PCIE 3.0 은 Intel® Ivy Bridge CPU Intel® Sandy Bridge CPU 는 PCIE 2.0 1 개의 PCI Express 2.0 x16 슬롯 (PCIE5: x4 모드 ) - 2 개의 PCI Express 2.0 x1 슬롯 - AMD Quad CrossFireXTM, 3 웨이 CrossFireXTM 및 CrossFireXTM 지원 185 ASRock Z77 OC Formula Motherboard 한국어 - ASRock Z77 OC Formula | Quick Installation Guide - Page 186
4 USB 2.0 포트 - 6 USB 3.0 포트 - 1 개 LED(ACT/LINK LED 및 SPEED LED RJ-45 LAN 포트 - 1 개 LED 가 달린 CMOS 8 참조 ) - Intel® Z77 SATA3 6.0Gb/s 커넥터 2 RAID (RAID 0, RAID 1, RAID 5, RAID 10, Intel Rapid Storage 및 Intel Smart Response 기술 ), NCQ, AHCI 및 "Hot Plug 한 국 어 186 ASRock Z77 OC Formula Motherboard - ASRock Z77 OC Formula | Quick Installation Guide - Page 187
2.0 헤더 3 개 (6 USB 2.0 2개 ) - USB 3.0 헤더 2 개 (4 USB 3.0 2개 ) - Dr. Debug (7 LED) 1 개 - LED 1 개 - LED 1 개 - LED 가 달린 CMOS 1 개 - Rapid OC 버튼 : OC PCIe ON/OFF 스위치 1 개 - POST PSC) 1 9 참조 ) - 64Mb GUI AMI UEFI 적합형 BIOS 2 개 ( 메인 BIOS 1 BIOS 1 개 ) 187 ASRock Z77 OC Formula Motherboard 한 국 어 - ASRock Z77 OC Formula | Quick Installation Guide - Page 188
Timing Configurator - Lucid Virtu Universal MVP ( 주의 23 참조 ) * Lucid Virtu Universal MVP 는 GPU - ASRock U-COP ( 주의 24 참조 ) - B.F.G..(Boot Failure Guard C.C.O.) ( 주의 25 LED - CPU MOS CPU MOS CPU/ 섀시 /MOS CPU CPU/ 섀시 /MOS 12V,+5V,+3.3V,Vcore 한 국 어 188 ASRock Z77 OC Formula Motherboard - ASRock Z77 OC Formula | Quick Installation Guide - Page 189
PCI Express 를 3G Ivy Bridge CPU Sandy Bridge CPU PCI Express 는 PCI Express 2G 6 Intel 7. xvYCC Windows® 7 64-bit / 7 EDID 에서 12bpc HBR 은 Windows® 7 64-bit / 7 / VistaTM 64-bit / VistaTM 8 2 채널 , 4 채널 , 6 채널 및 8 3 9. POST PSC CPU VGA 189 ASRock Z77 OC Formula Motherboard 한 국 어 - ASRock Z77 OC Formula | Quick Installation Guide - Page 190
10. Formula Drive Fan-tastic Tuning OC DNA, IES Fan-tastic Tuning CPU OC DNA 에서는 OC OS OS IES (Intelligent Energy Saver CPU Formula Drive ASRock http://www.asrock.com 11. ASRock Instant Flash ROM BIOS BIOS MS-DOS 나 Windows BIOS POST 중 에 BIOS F6 F2 ASRock Instant Flash USB BIOS - ASRock Z77 OC Formula | Quick Installation Guide - Page 191
의 OC OC Nick Nick 의 OC 22. UEFI Setup Utility V 23. VIRTU Universal MVP GPU GPU Virtu Universal Virtual VsyncTM HyperFormance VIRTU Universal MVP 는 CPU, GPU 24 CPU PC CPU 25 C.C.O.) 은 3 CPU LGA 775, LGA 1155 와 LGA 1156 775 와 1156 CPU 191 ASRock Z77 OC Formula Motherboard - ASRock Z77 OC Formula | Quick Installation Guide - Page 192
26. ASRock XFast RAM 은 Microsoft® Windows® XP / XP 64 Intel® Smart Connect 기술 과 Intel® USB 3.0 포트은 Microsoft® Windows® VistaTM / VistaTM 64- 비트 / XP / XP 64 27. EuP 는 Energy Using Product EuP AC 1.00W EuP EuP EuP Intel EuP 5V 100 mA 50 EuP 192 ASRock Z77 OC Formula Motherboard 한 국 - ASRock Z77 OC Formula | Quick Installation Guide - Page 193
CMOS CMOS 1394 GUID, MAC Clear CMOS Switch는 Clear CMOS BIOS (BIOS_SEL1) (2 32 BIOS) 백업 BIOS 참고 : BIOS 즉 메인 BIOS 와 백업 BIOS BIOS BIOS 2 번 핀과 3 BIOS 1 번 핀과 2 BIOS ASRock Instant Flash" 또는 "ASRock Internet Flash BIOS BIOS BIOS 한국어 193 ASRock Z77 OC Formula Motherboard - ASRock Z77 OC Formula | Quick Installation Guide - Page 194
SATA SATA SATA3 6.0 Gb/s SATA3_M2 SATA3_M0 SATA3_0 SATA3_M3 SATA3_M1 SATA3_1 한 국 어 시리얼 ATA(SATA 시리얼 ATA(SATA) SATA HDD SATA SATA / SATA2 / SATA3 SATA2 / SATA3 SATA SATA 194 ASRock Z77 OC Formula Motherboard - ASRock Z77 OC Formula | Quick Installation Guide - Page 195
I/O 6 USB 3.0 1 개의 USB 3.0 USB 3.0 헤더는 2 개 의 USB 3.0 (5 핀 IR1) (2 38 (4 핀 CIR1) (2 36 IRTX +5VSB DUMMY 1 GND IRRX (9 핀 HD_AUDIO1) (2 41 GND PRESENCE# MIC_RET OUT_RET 1 OUT2_L J_SENSE OUT2_R MIC2_R MIC2_L 195 ASRock Z77 OC Formula Motherboard 한국어 - ASRock Z77 OC Formula | Quick Installation Guide - Page 196
64 비트 OS "Mixer Recorder Front Mic Windows® 7 / 7 64 비트 / VistaTM / VistaTM 64 비트 OS 의 경 우: Realtek FrontMic "Recording Volume (9 핀 PANEL1) (2 25 한 국 어 196 PWRBTN RESET PLED LED LED S1/S3 LED S4 S5 LED HDLED LED LED LED ASRock Z77 OC Formula Motherboard - ASRock Z77 OC Formula | Quick Installation Guide - Page 197
) (2 49 (3 핀 PWR_FAN1) (2 16 (3 핀 MOS_FAN1) (2 50 CHA_FAN_SPEED +12V GND GND +12V CHA_FAN_SPEED PWR_FAN_SPEED +12V GND GND +12V MOS_FAN_SPEED CPU (4 핀 CPU_FAN1) (2 4 4 3 2 1 GND +12V CPU_FAN_SPEED FAN_SPEED_CONTROL CPU 한 국 어 197 ASRock Z77 OC Formula Motherboard - ASRock Z77 OC Formula | Quick Installation Guide - Page 198
24 종래의 20 핀 ATX 20 핀 ATX Pin 1 과 Pin 13 20 핀 ATX 1 13 ATX 12V (8 핀 ATX12V1) (2 2 8 5 4 1 ATX 12V 8- 핀 ATX 12V 4- 핀 ATX 12V 하여 4- 핀 ATX 1 과 핀 5 8 5 (4 핀 ATX12V2) (2 1 4- 핀 ATX 12V 4 1 한 국 어 198 ASRock Z77 OC Formula Motherboard - ASRock Z77 OC Formula | Quick Installation Guide - Page 199
SLI/XFIRE (4 핀 SLI/XFIRE_POWER1) (2 39 SLI/XFIRE_POWER1 2 (9 핀 COM1) (2 40 HDMI_SPDIF 헤더 (2 핀 HDMI_SPDIF1) (2 42 1 GND SPDIFOUT HDMI VGA 카드에 SPDIF HDMI_SPDIF HDMI 디지털 TV LCD HDMI DMI: DMI 전압 PCH2 PCH: 2 1.8V_PLL: CPU PLL 전압 199 ASRock Z77 OC Formula Motherboard 한국어 - ASRock Z77 OC Formula | Quick Installation Guide - Page 200
전면 USB 3.0 1 USB 3.0 2 HDD 2.5" HDD/SSD USB 3.0 3 USB 3.0 2.5 4 USB 3.0 5 USB 3.0 USB 3.0 헤더(USB3_6_7 6 USB 3.0 한 국 어 후면 USB 3.0 1 USB 3.0 2 단계 USB 3.0 USB 3.0 3 USB 3.0 4 USB 3.0 200 ASRock Z77 OC Formula Motherboard - ASRock Z77 OC Formula | Quick Installation Guide - Page 201
OC 버튼 (MINUS1: 2 10 PLUS1: 2 11 - + / - Rapid OC + Rapid OC 에서 OC 한국어 PCIe ON/OFF 스위치 (SWITCH1) (2 9 ON 123 1: PCIE2 2: PCIE4 3: PCIE5 PCIe ON/OFF PCIE x16 PCIE x16 PCIe ON/OFF 1 2. PCIe ON/OFF PCIE 3. PCIe ON/OFF PCIE ASRock Z77 OC Formula Motherboard - ASRock Z77 OC Formula | Quick Installation Guide - Page 202
2 POST F2> 또는 ++ - ASRock Z77 OC Formula | Quick Installation Guide - Page 203
ASRock Z77 OC Formula CD 6 x ATA (SATA 2 x l ATA (SATA) HDD 1 x I/O 1 x USB 3.0 4 x HDD ねじ 6 x 1 x 背面USB 3.0 1 x ASRock SLI_Bridge_2S カード 10 x OC GELID GC-Extreme ASRock Windows® 7 / 7 64-bit / VistaTM / VistaTM 64-bit BIOS AHCI B I O S C D 203 ASRock Z77 OC Formula Motherboard - ASRock Z77 OC Formula | Quick Installation Guide - Page 204
DDR3 3 DDR3 DIMM x 4 - DDR3 3000+(OC)/2800(OC)/2666(OC)/2400(OC)/ 2133(OC)/1866(OC)/1600/1333/1066 non-ECC, un-buffered 32GB ( 注意 4 Intel® Extreme Memory Profile (XMP)1.3/1.2 2 x PCI Express 3.0 x16 PCIE2/PCIE4 x16 (PCIE2) / x8 (PCIE4 x8/x8 5 を参照 ) ASRock Z77 OC Formula Motherboard - ASRock Z77 OC Formula | Quick Installation Guide - Page 205
Realtek ALC898 Codec) - Premium Blu-ray THX TruStudioTM PCIE x1 Gigabit LAN 10/100/1000 Mb/s - Broadcom BCM57781 - Wake-On-LAN Energy Efficient Ethernet 802.3az PXE I/O Panel - PS/2 x 1 - HDMI ポート x 1 - 光学 SPDIF x 1 - Ready-to-Use USB 2.0 ポート x 4 205 ASRock Z77 OC Formula Motherboard 日本語 - ASRock Z77 OC Formula | Quick Installation Guide - Page 206
参照 ) - Intel® Z77 SATA3 6.0Gb x 2 RAID (RAID 0, RAID 1, RAID 5, RAID 10, Intel Rapid Storage および Intel Smart Response NCQ, ピン x 3 x 1 (3 ピン ) - MOS x 1 (3 ピン ) - 24 ピン ATX 8 ピン 12V 4 ピン 12V SLI/XFIRE USB 2.0 USB 2.0 用 6 x 3 - USB 3.0 USB 3.0 用 2 x 1 ASRock Z77 OC Formula Motherboard - ASRock Z77 OC Formula | Quick Installation Guide - Page 207
( 注意 19 ASRock UEFI ASRock 20 ASRock Interactive UEFI Nick Shih ) の OC 21 V 22 Timing Configurator - Lucid Virtu Universal MVP ( 注意 23 Lucid Virtu Universal MVP GPU が内 - ASRock U-COP ( 注意 24 Boot Failure Guard:B.F.G C.C.O.) ( 注意 25 を参照 ) 207 ASRock Z77 OC Formula Motherboard 日本語 - ASRock Z77 OC Formula | Quick Installation Guide - Page 208
RDS(on CPU Vcore CD 69 Dual Channel Memory Technology 18 Windows® 7 / VistaTM / XP 4GB 64 ビット CPU の Windows® OS ASRock XFast RAM Windows PCIE2 と PCIE4 Gen 3 Gen3 速度 で PCI Express Ivy Bridge CPU Sandy Bridge CPU PCI Express は PCI Express Gen 2 ASRock Z77 OC Formula Motherboard 日本語 - ASRock Z77 OC Formula | Quick Installation Guide - Page 209
MS-DOS Windows BIOS では、POST の間に - ASRock Z77 OC Formula | Quick Installation Guide - Page 210
ASRock XFast RAM Adobe Photoshop 5 ASRock XFast RAM SSD または HDD へのア 17. ASRock Crashless BIOS BIOS BIOS 合、ASRock Crashless BIOS BIOS BIOS USB USB 2.0 18. OMG きます。OMG 19. Internet Flash UEFI ASRock Z77 OC Formula Motherboard - ASRock Z77 OC Formula | Quick Installation Guide - Page 211
® Windows® XP / XP 64 Intel® Smart Connect Intel® USB 3.0 Microsoft® Windows® VistaTM / VistaTM 64 ビット / XP / XP 64 27. Energy Using Product EuP EuP に従っ AC 1.00W EuP EuP EuP 対応電 Intel EuP 5v 100 mA 50 EuP 日本語 211 ASRock Z77 OC Formula Motherboard - ASRock Z77 OC Formula | Quick Installation Guide - Page 212
BIOS CMOS BIOS CMOS CMOS 1394 GUID と MAC CMOS クリアCMOS CMOS BIOS BIOS_SEL1 2 32 参照) BIOS) BIOS BIOS BIOS の 2 つの BIOS B I O S BIOS 2 とピン 3 B I O S 1 とピン 2 BIOS ASRock Instant Flash ASRock Internet Flash BIOS BIOS BIOS 日本語 212 ASRock Z77 OC Formula Motherboard - ASRock Z77 OC Formula | Quick Installation Guide - Page 213
SATA3_1 SATA3_M2 SATA3_M0 SATA3_0 ATA(SATA SATA SATA / SATA2 / SATA3 SATA2 / SATA3 ATA(SATA SATA HDD USB 2.0 ヘッダ (9 ピン USB4_5) ページ 2 31 を参照 SATA I/O 4 つの USB 2.0 3 つの USB 2.0 USB 2.0 2 つの USB 2.0 213 ASRock Z77 OC Formula Motherboard 日本語 - ASRock Z77 OC Formula | Quick Installation Guide - Page 214
1 つの USB 3.0 USB 3.0 2 つの USB 3.0 5 ピン IR1) ページ 2 38 を参照 IRTX +5VSB DUMMY 1 GND IRRX 4 ピン CIR1 36 を参照 9 ピン HD_AUDIO1) ページ 2 41 を参照 GND PRESENCE# MIC_RET OUT_RET 1 OUT2_L J_SENSE OUT2_R MIC2_R MIC2_L 1. HDA 214 ASRock Z77 OC Formula Motherboard 日本語 - ASRock Z77 OC Formula | Quick Installation Guide - Page 215
Recorder FrontMic Windows® 7 / 7 64-bit / VistaTM / VistaTM 64-bit OS の場合 : Realtek FrontMic Recording Volume 9 ピン PANEL1) ページ 2 25 を参照 PWRBTN RESET PLED LED LED LED S1/S3 S4 S5 LED HDLED LED LED LED 215 ASRock Z77 OC Formula Motherboard 日本語 - ASRock Z77 OC Formula | Quick Installation Guide - Page 216
2 49 を参照 (3 ピン PWR_FAN1) ページ 2 16 を参照 (3 ピン MOS_FAN1) ページ 2 50 を参照 CHA_FAN_SPEED +12V GND GND +12V CHA_FAN_SPEED PWR_FAN_SPEED +12V GND GND +12V MOS_FAN_SPEED CPU 4 ピン CPU_FAN1) ページ 2 4 を参照 4 3 2 1 GND +12V CPU_FAN_SPEED FAN_SPEED_CONTROL CPU 日本語 216 ASRock Z77 OC Formula Motherboard - ASRock Z77 OC Formula | Quick Installation Guide - Page 217
ATX 12V 8 ピン ATX12V1) ページ 2 2 を参照 8 5 4 1 ATX 電 12V 8-pin ATX 12V 4-pin ATX 12V 4-pin ATX Pin 1 と Pin 5 8 5 (4 ピン ATX12V2) ページ 2 1 を参照 4-Pin ATX 12V 4 1 SLI/XFIRE 4 ピン SLI/XFIRE_POWER1) ページ 2 39 を参照 SLI/XFIRE_POWER1 2 217 ASRock Z77 OC Formula Motherboard 日本語 - ASRock Z77 OC Formula | Quick Installation Guide - Page 218
2 13 を参照 GND DMI_COMP XCLK_RCOMP DMI PCH2 PCH 1.8V_PLL HDMI_SPDIF SPDIF HDMI VGA HDMI TV LCD HDMI VGA HDMI_SPDIF GND VCCM VCCSA VTT2 VTT1 VCORE GND VCCM、VCCSA、VTT2、 COMP 電圧 XCLK_RCOMP COMP 電圧 DMI: DMI 電圧 PCH2 PCH: 第 2 1.8V_PLL: CPU PLL 電圧 日本語 218 ASRock Z77 OC Formula Motherboard - ASRock Z77 OC Formula | Quick Installation Guide - Page 219
4 本の HDD ねじ、6 手順 2 2.5" HDD/SSD を 4 本の HDD USB 3.0 手順 3 前面USB 3.0 2.5 4 正面 USB 3.0 6 手順 5 前面USB 3.0 USB 3.0ヘッダ(USB3_6_7 手順 6 USB 3.0 日本語 背面USB 3.0 手順 1 前面USB 3.0パネルの2 2 USB 3.0 USB 3.0 手順 3 背面USB 3.0 2 手順 4 背面USB 3.0 219 ASRock Z77 OC Formula Motherboard - ASRock Z77 OC Formula | Quick Installation Guide - Page 220
を参照 clr CMOS OC ボタン MINUS1: ページ 2 10 を参照 PLUS1: ページ 2 11 を参照 - + クリア CMOS CMOS OC OC で OC PCIe SWITCH1) ページ 2 9 を参照 ON 123 1: PCIE2 2: PCIE4 3: PCIE5 PCIe 16 の PCIE PCIE カード 16 PCIe 1 1 2. PCIe PCIE 3. PCIe PCIE 日本語 220 ASRock Z77 OC Formula Motherboard - ASRock Z77 OC Formula | Quick Installation Guide - Page 221
2. BIOS 情報 BIOS POST F2 Del BIOS POST BIOS POST Ctrl〉+〈Alt〉+〈Delete BIOS BIOS CD PDF 3 CD 情報 Microsoft® Windows® 7 / 7 64-bit / VistaTM / VistaTM 64bit / XP / XP 64-bit CD CD CDROM CD AUTORUN AUTORUN CD 内の BIN ASSETUP.EXE 221 ASRock Z77 OC Formula Motherboard 日本語 - ASRock Z77 OC Formula | Quick Installation Guide - Page 222
) 華擎 Z77 OC Formula Z77 OC Formula Serial ATA(SATA Serial ATA(SATA I/O USB 3.0 USB 3.0 SLI_Bridge_2S OC Stand GELID GC-Extreme ASRock 為了在 Windows® 7 / 7 64-bit / VistaTM / VistaTM 64-bit BIOS中將Storage Configuration AHCI BIOS User Manual 222 ASRock Z77 OC Formula Motherboard 簡體中文 - ASRock Z77 OC Formula | Quick Installation Guide - Page 223
插槽(PCIE2/PCIE4:單個 x16 (PCIE2) / x8 (PCIE4) 或兩個 x8/x8 5 Intel® Ivy Bridge CPU PCIE 3.0。若使用 Intel® Sandy Bridge CPU PCIE 2.0。 - 1 x PCI Express 2.0 x16 插槽 (PCIE5: x4 模式 ) - 2 x PCI Express 2.0 x1 AMD Quad CrossFireXTM,3 路 CrossFireXTM 和 CrossFireXTM 技術 223 ASRock Z77 OC Formula Motherboard 簡體中文 - ASRock Z77 OC Formula | Quick Installation Guide - Page 224
(ACT/LINK LED 和 SPEED LED) - 1 個帶 LED 的 CMOS 8) - 2 x Intel® Z77 的 SATA3 6.0Gb/s RAID (RAID 0, RAID 1, RAID 5, RAID 10, Intel Rapid Storage 和 Intel Smart Response 技術 ), NCQ, AHCI 4 x Marvell SE9172 的 SATA3 6.0Gb/s RAID (RAID 0 和 RAID 1), NCQ, AHCI 簡體中文 224 ASRock Z77 OC Formula Motherboard - ASRock Z77 OC Formula | Quick Installation Guide - Page 225
(7 段調試 LED) - 1 個帶 LED 1 個帶 LED 1 個帶 LED 的 CMOS OC OC 頻率 - 1 個 PCIe ON/OFF 開關 - 1 PSC 9) - 2 x 64Mb AMI UEFI Legal BIOS, 支持 GUI (1 x 主 BIOS 和 1 x BIOS Plug and Play,PnP) - ACPI 1.1 SMBIOS 2.3.1 - CPU Core, IGPU, DRAM, 1.8V PLL, VTT, VCCSA 調節器 225 ASRock Z77 OC Formula Motherboard 簡體中文 - ASRock Z77 OC Formula | Quick Installation Guide - Page 226
C.C.O 25) - CPU - CPU - CPU CPU - CPU 12V, +5V, +3.3V 操作系統 - Microsoft® Windows® 7/7 64 位元 /VistaTM/VistaTM 64 位元 / XP/XP 64 26) 認證 - FCC, CE, WHQL - 支持 ErP/EuP ErP/EuP 27) http://www.asrock.com 簡體中文 226 ASRock Z77 OC Formula Motherboard - ASRock Z77 OC Formula | Quick Installation Guide - Page 227
位元 /VistaTM 支持 HBR。 8 2 聲道、4 聲道、6 8 3 9 PSC CPU、內存、VGA 10、F o r m u l a D r i v e Fan-tastic OC DNA 和 IES。 在 H a r d w a r e M o n i t o r F a n tastic Overclocking CPU OC DNA OC O C O C I E S C P U Formula Drive http://www.asrock.com 227 ASRock Z77 OC Formula Motherboard 簡體中文 - ASRock Z77 OC Formula | Quick Installation Guide - Page 228
XFast LAN Youtube 16、華擎 XFast RAM 是 Formula Drive Windows 32-bit CPU XFast RAM Adobe Photoshop XFast RAM SSD 或 HDD 17、華擎 Crashless BIOS BIOS BIOS Crashless BIOS BIOS BIOS USB USB2.0 端口。 18 O M G OMG 19 UEFI U E F I Windows DHCP 228 ASRock Z77 OC Formula Motherboard 簡體中文 - ASRock Z77 OC Formula | Quick Installation Guide - Page 229
775 和 1156 CPU 26、Microsoft® Windows® XP / XP 64-bit XFast RAM。Microsoft® Windows® VistaTM / VistaTM 64-bit / XP / XP 64-bit Intel Intel® USB 3.0 27、EuP, 全稱 Energy Using Product E u P 1.00W EuP EuP EuP Intel EuP 100m A 5V s b 50 E u P 229 ASRock Z77 OC Formula Motherboard 簡體中文 - ASRock Z77 OC Formula | Quick Installation Guide - Page 230
B I O S C M O S C M O S C M O S 1394 GUID 和 MAC 清除CMOS CMOS BIOS (BIOS_SEL1) ( 見第 2 頁第 32 項 ) BIOS) 備分 BIOS BIOS BIOS 和備份 BIOS B I O S B I O S 2 和針腳 3 B I O S 1 和針腳 2 BIOS Instant Flash"或"華擎 Internet Flash"將 BIOS BIOS BIOS。 簡體中文 230 ASRock Z77 OC Formula Motherboard - ASRock Z77 OC Formula | Quick Installation Guide - Page 231
SATA3_0 Serial ATA (SATA Serial ATA (SATA) 電源線 ( 選配 ) 連接到 SATA USB 2.0 (9 針 USB4_5) ( 見第 2 頁第 31 項 ) SATA SATA/SATA2/SATA3 SATA2/SATA3 接口。 請將 SATA SATA SATA I/O USB 2.0 USB 2.0 USB 2.0 USB 2.0 接 口。 231 ASRock Z77 OC Formula Motherboard 簡體中文 - ASRock Z77 OC Formula | Quick Installation Guide - Page 232
I/O USB 3.0 USB 3.0 USB 3.0 USB 3.0 接 口。 (5 針 IR1) ( 見第 2 頁第 38 項 ) (4 針 CIR1) ( 見第 2 頁第 36 項 ) (9 針 HD_AUDIO1) ( 見第 2 頁第 41 項 ) IRTX +5VSB DUMMY 1 GND IRRX GND PRESENCE# MIC_RET OUT_RET 1 OUT2_L J_SENSE OUT2_R MIC2_R MIC2_L 簡體中文 232 ASRock Z77 OC Formula Motherboard - ASRock Z77 OC Formula | Quick Installation Guide - Page 233
XP 64 Mixer"。選擇"Recorder FrontMic"。 在 Windows® 7 / 7 64 位元 / VistaTM / VistaTM 64 Realtek FrontMic"。調節"Recording Volume"。 (9 針 PANEL1) ( 見第 2 頁第 25 項 ) PWRBTN RESET PLED S1/S3 S4 S5 HD LED (4 針 SPEAKER1) ( 見第 2 頁第 23 項 ) 233 ASRock Z77 OC Formula Motherboard 簡體中文 - ASRock Z77 OC Formula | Quick Installation Guide - Page 234
+12V GND GND +12V MOS_FAN_SPEED CPU (4 針 CPU_FAN1) ( 見第 2 頁第 4 項 ) 4 3 2 1 GND +12V CPU_FAN_SPEED FAN_SPEED_CONTROL 請將 CPU 4-Pin CPU 風扇 (Quiet Fan 3-Pin CPU 3-Pin CPU CPU Pin 1-3。 Pin 1-3 連接 3-Pin (3 針 CPU_FAN2) ( 見第 2 頁第 5 項 ) 簡體中文 234 ASRock Z77 OC Formula Motherboard - ASRock Z77 OC Formula | Quick Installation Guide - Page 235
12V 8-pin ATX 12V 4-pin ATX 12V 4-pin ATX 12V Pin 1 和 Pin 5 插上電 源接頭。 8 5 (4 針 ATX12V2) ( 見第 2 頁第 1 項 ) 4-Pin ATX 12V 4 1 SLI/XFIRE (4 針 SLI/XFIRE_POWER1) ( 見第 2 頁第 39 項 ) (9 針 COM1) ( 見第 2 頁第 40 項 ) SLI/XFIRE_POWER1 這個 COM1 簡體中文 235 ASRock Z77 OC Formula Motherboard - ASRock Z77 OC Formula | Quick Installation Guide - Page 236
HDMI_SPDIF 接頭 (2 針 HDMI_SPDIF1) ( 見第 2 頁第 42 項 ) 1 GND SPDIFOUT HDMI_SPDIF SPDIF HDMI HDMI HDMI 顯卡的 HDMI_SPDIF V-ProbeTM (7 針 VOL_CON1, 7 針 VOL_CON2) ( 見第 2 頁第 13 項 ) GND COMP 電壓 XCLK_RCOMP COMP 電壓 DMI:DMI 電壓 PCH2 PCH:第 2 1.8V_PLL:CPU PLL 電壓 簡體中文 236 ASRock Z77 OC Formula Motherboard - ASRock Z77 OC Formula | Quick Installation Guide - Page 237
步驟 1 USB 3.0 HDD 步驟 2 用四個 HDD 螺絲將 2.5"HDD/SSD USB 3.0 步驟 3 將前部USB 3.0 2.5 步驟 4 USB 3.0 步驟 5 將前部USB 3.0 USB 3.0接頭 (USB3_6_7)。 步驟 6 USB 3.0 簡體中文 后部USB 3.0 步驟 1 USB 3.0 步驟 2 將USB 3.0 USB 3.0面板。 步驟 3 USB 3.0面板。 步驟 4 將后部USB 3.0 237 ASRock Z77 OC Formula Motherboard - ASRock Z77 OC Formula | Quick Installation Guide - Page 238
: 見第 2 頁第 10 項 ) (PLUS1: 見第 2 頁第 11 項 ) - + PCIe ON/OFF 開關 (SWITCH1) ( 見第 2 頁第 9 項 ) ON 123 1: PCIE2 2: PCIE4 3: PCIE5 PCIe ON/OFF PCIE x16 PCIE x16 PCIe ON/OFF 1 2. 關閉 PCIe ON/OFF PCIE PCIE 卡 PCIE 3. PCIe ON/OFF PCIE 除。 簡體中文 238 ASRock Z77 OC Formula Motherboard - ASRock Z77 OC Formula | Quick Installation Guide - Page 239
2. BIOS 信息 Flash Memory 存儲了 BIOS POST F2> 或 < D e l B I O S P O S T P O S T B I O S Ctrl>++ - ASRock Z77 OC Formula | Quick Installation Guide - Page 240
SJ/T 11364-2006 10 年。 圖一 部件名稱 鉛 (Pb) 鎘 (Cd) 汞 (Hg Cr(VI PBB PBDE) X O O O O O X O O O O O O SJ/T 11363-2006 X SJ/T 11363-2006 2002/95/EC 簡體中文 240 ASRock Z77 OC Formula Motherboard - ASRock Z77 OC Formula | Quick Installation Guide - Page 241
x 10.5 英吋 , 30.5 公分 x 26.7 公分 ) 華擎 Z77 OC Formula Z77 OC Formula Serial ATA(SATA Serial ATA(SATA I/O USB 3.0 USB 3.0 SLI_Bridge_2S 卡 十個 OC Stands GELID GC-Extreme 散熱膏 ASRock提醒您... 若要在Windows® 7 / 7 64位元 / VistaTM / VistaTM 64 BIOS選項設為AHCI BIOS 241 ASRock Z77 OC Formula Motherboard 繁體中文 - ASRock Z77 OC Formula | Quick Installation Guide - Page 242
Profile(XMP)1.3/1.2 - 2 x PCI Express 3.0 x16 插槽 (PCIE2/PCIE4:單個 x16 (PCIE2) / x8 (PCIE4) 或兩個 x8/x8 5) * PCIE 3.0 僅適用 Intel® Ivy Bridge CPU。Intel® Sandy Bridge CPU 僅支援 PCIE 2.0。 - 1 x PCI Express 2.0 x16 插槽 (PCIE5: x4 模式 ) - 2 x PCI Express 2.0 x1 插槽 繁體中文 242 ASRock Z77 OC Formula Motherboard - ASRock Z77 OC Formula | Quick Installation Guide - Page 243
個 HDMI 接口 - 1 個光纖 SPDIF 4 USB 2.0 接口 - 6 USB 3.0 接口 - 1 個 RJ-45 LED 指示燈 (ACT/LINK LED 和 SPEED LED) - 1 個 LED CMOS 8) - 2 x Intel® Z77 的 SATA3 6.0Gb/s RAID (RAID 0, RAID 1, RAID 5, RAID 10, Intel Rapid Storage 和 Intel Smart Response 技術 ), NCQ, AHCI 243 ASRock Z77 OC Formula Motherboard 繁體中文 - ASRock Z77 OC Formula | Quick Installation Guide - Page 244
2.0 接口 ) - 1 x USB 3.0 2 USB 3.0 接口 ) - 1 x Dr. Debug (7 LED) - 1 個 LED 1 個 LED 1 個 LED CMOS 1 個 PCIe ON/OFF 開關 - 1 個 Post Status Checker (PSC 9) - 2 x 64Mb AMI UEFI Legal BIOS ( 支援 GUI) (1 x 主 BIOS 以及 1 x BIOS Plug and Play,PnP) - ACPI 1.1 SMBIOS 2.3.1 ASRock Z77 OC Formula Motherboard - ASRock Z77 OC Formula | Quick Installation Guide - Page 245
25) - 晚安 LED 指示燈 硬體監控 - CPU - CPU - CPU CPU - CPU 12V, +5V, +3.3V 操作系統 - Microsoft® Windows® 7/7 64 位元 /VistaTM/VistaTM 64 位元 / XP/XP 64 26) 認證 - FCC, CE, WHQL - 支援 ErP/EuP ErP/EuP 27) http://www.asrock.com 繁體中文 245 ASRock Z77 OC Formula Motherboard - ASRock Z77 OC Formula | Quick Installation Guide - Page 246
r m u l a D r i v e H a r d w a r e M o n i t o r、F a n - t a s t i c 調整、 Overclocking、OC DNA 及 IES)。Hardware Monitor Fan-tastic Overclocking C P U O C D N A O C O C OC IES (Intelligent Energy Saver),當 CPU Formula Drive ASRock http://www.asrock.com ASRock Z77 OC Formula Motherboard 繁體中文 - ASRock Z77 OC Formula | Quick Installation Guide - Page 247
16、華擎 XFast RAM 是 Formula Drive Windows 32-bit CPU XFast RAM Adobe Photoshop XFast RAM SSD 或 HDD 17、華擎 Crashless BIOS BIOS BIOS Crashless BIOS BIOS BIOS USB USB2.0 插槽。 18 OMG OMG 19、Internet Flash UEFI U E F I W i n d o w s D H C P 247 ASRock Z77 OC Formula Motherboard 繁體中文 - ASRock Z77 OC Formula | Quick Installation Guide - Page 248
775 和 1156 CPU 26、Microsoft® Windows® XP / XP 64-bit XFast RAM。Microsoft® Windows® VistaTM / VistaTM 64-bit / XP / XP 64-bit Intel Intel® USB 3.0 接頭。 27、EuP, 全稱 Energy Using Product EuP 1.00W EuP EuP EuP Intel EuP 100mA 5Vsb 50 EuP 248 ASRock Z77 OC Formula Motherboard 繁體中文 - ASRock Z77 OC Formula | Quick Installation Guide - Page 249
1.3 3 1 和針腳 2 CMOS (CLRCMOS1, 3 2 頁第 46 項 ) 設定 默認設置 清除 CMOS 註: C L R C M O S1 C M O S 15 CLRCMOS1 的 pin2 及 pin3 短路 5 BIOS CMOS BIOS CMOS CMOS C M O S 1394 GUID 及 MAC Clear CMOS Clear CMOS 繁體中文 249 ASRock Z77 OC Formula Motherboard - ASRock Z77 OC Formula | Quick Installation Guide - Page 250
BIOS (BIOS_SEL1) ( 見第 2 頁第 32 項 ) 預設 備用 BIOS (主 BIOS) BIOS:主 BIOS 與備用 BIOS B I O S B I O S pin2 與 pin3 BIOS pin2 與 pin3 BIOS ASRock Instant Flash」或「ASRock Internet Flash」將 BIOS BIOS BIOS。 繁體中文 250 ASRock Z77 OC Formula Motherboard - ASRock Z77 OC Formula | Quick Installation Guide - Page 251
SATA3_0 Serial ATA (SATA) 數據線 ( 選配 ) Serial ATA (SATA) 電源線 ( 選配 ) 連接到 SATA USB 2.0 (9 針 USB4_5) ( 見第 2 頁第 31 項 ) SATA SATA/SATA2/SATA3 SATA2/SATA3 接口。 請將 SATA SATA SATA I/O USB 2.0 USB 2.0 USB 2.0 USB 2.0 接 口。 251 ASRock Z77 OC Formula Motherboard 繁體中文 - ASRock Z77 OC Formula | Quick Installation Guide - Page 252
I/O USB 3.0 USB 3.0 USB 3.0 USB 3.0 接 口。 (5 針 IR1) ( 見第 2 頁第 38 項 ) (4 針 CIR1) ( 見第 2 頁第 36 項 ) IRTX +5VSB DUMMY 1 GND IRRX (9 針 HD_AUDIO1) ( 見第 2 頁第 41 項 ) GND PRESENCE# MIC_RET OUT_RET 1 OUT2_L J_SENSE OUT2_R MIC2_R MIC2_L 繁體中文 252 ASRock Z77 OC Formula Motherboard - ASRock Z77 OC Formula | Quick Installation Guide - Page 253
XP / XP 64 Mixer Recorder FrontMic"。 在 Windows® 7 / 7 64 位元 / VistaTM / VistaTM 64 Realtek FrontMic Recording Volume"。 (9 針 PANEL1) ( 見第 2 頁第 25 項 ) PWRBTN RESET PLED S1/S3 S4 S5 HD LED (4 針 SPEAKER1) ( 見第 2 頁第 23 項 ) 253 ASRock Z77 OC Formula Motherboard 繁體中文 - ASRock Z77 OC Formula | Quick Installation Guide - Page 254
+12V GND GND +12V MOS_FAN_SPEED CPU (4 針 CPU_FAN1) ( 見第 2 頁第 4 項 ) 4 3 2 1 GND +12V CPU_FAN_SPEED FAN_SPEED_CONTROL 請將 CPU 4-Pin CPU 風扇 (Quiet Fan 3-Pin CPU 3-Pin CPU CPU Pin 1-3。 Pin 1-3 連接 3-Pin (4 針 CPU_FAN2) ( 見第 2 頁第 5 項 ) 繁體中文 254 ASRock Z77 OC Formula Motherboard - ASRock Z77 OC Formula | Quick Installation Guide - Page 255
12V 8-pin ATX 12V 4-pin ATX 12V 4-pin ATX 12V 8 5 順著 Pin 1 和 Pin 5 (4 針 ATX12V2) ( 見第 2 頁第 1 項 ) 4-Pin ATX 12V 4 1 SLI/XFIRE (4 針 SLI/XFIRE_POWER1) ( 見第 2 頁第 39 項 ) SLI/XFIRE_POWER1 序列埠 (9 針 COM1) ( 見第 2 頁第 40 項 ) COM1 繁體中文 255 ASRock Z77 OC Formula Motherboard - ASRock Z77 OC Formula | Quick Installation Guide - Page 256
HDMI_SPDIF 接頭 (2 針 HDMI_SPDIF1) ( 見第 2 頁第 42 項 ) 1 GND SPDIFOUT HDMI_SPDIF SPDIF HDMI HDMI HDMI HDMI_SPDIF V-ProbeTM (7 針 VOL_CON1, 7 針 VOL_CON2) ( 見第 2 頁第 13 項 ) GND COMP 電壓 XCLK_RCOMP COMP 電壓 DMI: DMI 電壓 PCH2 PCH 1.8V_PLL:CPU PLL 電壓 繁體中文 256 ASRock Z77 OC Formula Motherboard - ASRock Z77 OC Formula | Quick Installation Guide - Page 257
前USB 3.0 步驟 1 USB 3.0 步驟 2 2.5 USB 3.0 步驟 3 將前USB 3.0 2.5 4 USB 3.0 中。 步驟 5 將前USB 3.0 USB 3.0座 (USB3_6_7)。 步驟 6 前USB 3.0 後USB 3.0 步驟 1 鬆開前USB 3.0 步驟 2 將USB 3.0纜線和後USB 3.0 步驟 3 USB 3.0托架。 步驟 4 將後USB 3.0 繁體中文 257 ASRock Z77 OC Formula Motherboard - ASRock Z77 OC Formula | Quick Installation Guide - Page 258
3: PCIE5 PCIe ON/OFF PCIE x16 PCIE x16 PCIe ON/OFF PCIE PCIE 卡。 1 2. 關閉 PCIe ON/OFF PCIE PCIE 如需您 PCIE PCIE 3. PCIe ON/OFF PCIE 繁體中文 258 ASRock Z77 OC Formula Motherboard - ASRock Z77 OC Formula | Quick Installation Guide - Page 259
2. BIOS 訊息 Flash Memory BIOS POST F2> 或 + + - ASRock Z77 OC Formula | Quick Installation Guide - Page 260
baik di Windows® 7/ 7 64-bit/ VistaTM/ VistaTM 64-bit, sebaiknya atur pilihan BIOS dalam Storage Configuration (Konfigurasi Penyimpanan) ke mode AHCI. Untuk konfigurasi BIOS, lihat "Panduan Pengguna" dalam CD dukungan kami untuk informasi rinci. 260 ASRock Z77 OC Formula Motherboard Bahasa Indonesia - ASRock Z77 OC Formula | Quick Installation Guide - Page 261
(OC)/1866(OC)/1600/1333/1066 non-ECC yang tidak di-buffer - Kapasitas paling banyak: 32GB - Mendukung Intel® Extreme Memory Profile (XMP)1.3/1.2 - 2 x PCI Express 3.0 x16 slots (PCIE2/PCIE4: tunggal pada mode x16 (PCIE2) / x8 (PCIE4) atau ganda pada mode x8/x8) 261 ASRock Z77 OC Formula Motherboard - ASRock Z77 OC Formula | Quick Installation Guide - Page 262
Energy Efficient Ethernet 802.3az - Mendukung PXE I/O Panel - 1 x Port Keyboard/Mouse PS/2 - 1 x Port HDMI - 1 x Port Keluaran Optical SPDIF - 4 x Port USB 2.0 siap-dipakai - 6 x Port USB 3.0 siap-dipakai - 1 x RJ-45 LAN Port LED (ACT/LINK LED dan SPEED LED) ASRock Z77 OC Formula Motherboard - ASRock Z77 OC Formula | Quick Installation Guide - Page 263
- Penghubung power SLI/XFire - Penghubung audio panel dapan - 3 x USB 2.0 header (menggunakan 6 port USB 2.0) - 1 x USB 3.0 header (menggunakan 2 port USB 3.0) - 1 x Dr. Debug - 1 x kuasa beralih LED - 1 x ulang beralih LED - 1 x Clear CMOS LED 263 ASRock Z77 OC Formula Motherboard Bahasa Indonesia - ASRock Z77 OC Formula | Quick Installation Guide - Page 264
Universal MVP hanya dapat didukung dengan prosesor yang mengintegrasikan GPU. - Hybrid Booster: - ASRock U-COP - Penjaga kegagalan input (B.F.G.) - Combo Cooler Option (C.C.O.) - Good Night LED - Perasa Suhu CPU/casis/power/MOS - Pengukur Kipas CPU/casis/power/MOS ASRock Z77 OC Formula Motherboard - ASRock Z77 OC Formula | Quick Installation Guide - Page 265
Microsoft® Windows® 7 / 7 64-bit / VistaTM / VistaTM 64-bit / XP / XP 64-bit Sertifikasi - FCC, CE, WHQL - ErP/EuP Ready (memerlukan catu daya ErP/EuP ready) * Untuk informasi rinci, silakan kunjungi website kami: http://www.asrock.com Bahasa Indonesia 265 ASRock Z77 OC Formula Motherboard - ASRock Z77 OC Formula | Quick Installation Guide - Page 266
> Boot Option #1. ("xxx" is the device which contains your Windows® installation files. Normally it is an optical drive.) You can also press to launch boot menu at system POST and choose the item "UEFI:xxx" to boot. 4. Start Windows® installation. 266 ASRock Z77 OC Formula Motherboard English - ASRock Z77 OC Formula | Quick Installation Guide - Page 267
. When you see "Where do you want to install Windows?" page, please click "Load Driver". D. Plug the USB flash disk into your USB port; select "Browse" to find the RAID driver. Then choose the directory (xx\AMD64\) you have copied in the first step. 267 ASRock Z77 OC Formula Motherboard English - ASRock Z77 OC Formula | Quick Installation Guide - Page 268
following the Windows® instructions. 5. Follow Windows® Installation Guide to install OS. If you install Windows® 7 64-bit / VistaTM 64-bit in a large hard disk (ex. Disk volume > 2TB), it may take more time to boot into Windows® or install driver/ utilities. If you encounter this problem, you will - ASRock Z77 OC Formula | Quick Installation Guide - Page 269
B. Disable "Volume Shadow Copy" service. a. Type "computer management" in the Start Menu, then press "Enter". b. Go to "Services and Applications>Services"; Then double click "Volume Shadow Copy". 269 ASRock Z77 OC Formula Motherboard English - ASRock Z77 OC Formula | Quick Installation Guide - Page 270
hotfix kb2505454. (This may take a long time; >30 mins.) C. Reboot your system. (It may take about 5 minutes to reboot.) D. Windows® will install this hotfix then reboot by itself. E. Please start to install motherboard drivers and utilities. 6. Finish. 270 ASRock Z77 OC Formula Motherboard English
-
 1
1 -
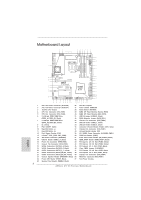 2
2 -
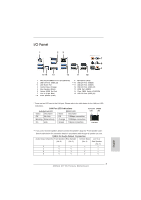 3
3 -
 4
4 -
 5
5 -
 6
6 -
 7
7 -
8
-
9
-
10
-
11
-
12
-
13
-
14
-
15
-
16
-
17
-
18
-
19
-
20
-
21
-
22
-
23
-
24
-
25
-
26
-
27
-
28
-
29
-
30
-
31
-
32
-
33
-
34
-
35
-
36
-
37
-
38
-
39
-
40
-
41
-
42
-
43
-
44
-
45
-
46
-
47
-
48
-
49
-
50
-
51
-
52
-
53
-
54
-
55
-
56
-
57
-
58
-
59
-
60
-
61
-
62
-
63
-
64
-
65
-
66
-
67
-
68
-
69
-
70
-
71
-
72
-
73
-
74
-
75
-
76
-
77
-
78
-
79
-
80
-
81
-
82
-
83
-
84
-
85
-
86
-
87
-
88
-
89
-
90
-
91
-
92
-
93
-
94
-
95
-
96
-
97
-
98
-
99
-
100
-
101
-
102
-
103
-
104
-
105
-
106
-
107
-
108
-
109
-
110
-
111
-
112
-
113
-
114
-
115
-
116
-
117
-
118
-
119
-
120
-
121
-
122
-
123
-
124
-
125
-
126
-
127
-
128
-
129
-
130
-
131
-
132
-
133
-
134
-
135
-
136
-
137
-
138
-
139
-
140
-
141
-
142
-
143
-
144
-
145
-
146
-
147
-
148
-
149
-
150
-
151
-
152
-
153
-
154
-
155
-
156
-
157
-
158
-
159
-
160
-
161
-
162
-
163
-
164
-
165
-
166
-
167
-
168
-
169
-
170
-
171
-
172
-
173
-
174
-
175
-
176
-
177
-
178
-
179
-
180
-
181
-
182
-
183
-
184
-
185
-
186
-
187
-
188
-
189
-
190
-
191
-
192
-
193
-
194
-
195
-
196
-
197
-
198
-
199
-
200
-
201
-
202
-
203
-
204
-
205
-
206
-
207
-
208
-
209
-
210
-
211
-
212
-
213
-
214
-
215
-
216
-
217
-
218
-
219
-
220
-
221
-
222
-
223
-
224
-
225
-
226
-
227
-
228
-
229
-
230
-
231
-
232
-
233
-
234
-
235
-
236
-
237
-
238
-
239
-
240
-
241
-
242
-
243
-
244
-
245
-
246
-
247
-
248
-
249
-
250
-
251
-
252
-
253
-
254
-
255
-
256
-
257
-
258
-
259
-
260
-
261
-
262
-
263
-
264
-
265
-
266
-
267
-
268
-
269
-
270
 |
 |
1
ASRock
Z77 OC Formula
Motherboard
English
Copyright Notice:
No part of this installation guide may be reproduced, transcribed, transmitted, or trans-
lated in any language, in any form or by any means, except duplication of documentation
by the purchaser for backup purpose, without written consent of ASRock Inc.
Products and corporate names appearing in this guide may or may not be registered
trademarks or copyrights of their respective companies, and are used only for identi
fi
ca-
tion or explanation and to the owners’ bene
fi
t, without intent to infringe.
Disclaimer:
Speci
fi
cations and information contained in this guide are furnished for informational use
only and subject to change without notice, and should not be constructed as a commit-
ment by ASRock. ASRock assumes no responsibility for any errors or omissions that may
appear in this guide.
With respect to the contents of this guide, ASRock does not provide warranty of any kind,
either expressed or implied, including but not limited to the implied warranties or condi-
tions of merchantability or
fi
tness for a particular purpose. In no event shall ASRock, its
directors, of
fi
cers, employees, or agents be liable for any indirect, special, incidental, or
consequential damages (including damages for loss of pro
fi
ts, loss of business, loss of
data, interruption of business and the like), even if ASRock has been advised of the pos-
sibility of such damages arising from any defect or error in the guide or product.
This device complies with Part 15 of the FCC Rules. Operation is subject to the following
two conditions:
(1) this device may not cause harmful interference, and
(2) this device must accept any interference received, including interference that
may cause undesired operation.
CALIFORNIA, USA ONLY
The Lithium battery adopted on this motherboard contains Perchlorate, a toxic substance
controlled in Perchlorate Best Management Practices (BMP) regulations passed by the
California Legislature. When you discard the Lithium battery in California, USA, please
follow the related regulations in advance.
“Perchlorate Material-special handling may apply, see
www.dtsc.ca.gov/hazardouswaste/perchlorate”
ASRock Website: http://www.asrock.com
Published July 2012
Copyright
©
2012 ASRock INC. All rights reserved.