Adobe 718659340025 Printing Guide
Adobe 718659340025 - InDesign CS - PC Manual
 |
View all Adobe 718659340025 manuals
Add to My Manuals
Save this manual to your list of manuals |
Adobe 718659340025 manual content summary:
- Adobe 718659340025 | Printing Guide - Page 1
TECHNICAL REFERENCE Adobe® InDesign® CS Printing Guide for Service Providers - Adobe 718659340025 | Printing Guide - Page 2
groups ...6 PDF/X-1a, PDF/X-3, and PDF 1.5 (Acrobat 6 - compatible) support 7 Enhanced Photoshop color support...8 Merging raster-based Photoshop DCS and Preflighting ...14 Packaging files for handoff ...15 Handing off Adobe PDF files ...18 Opening InDesign files 19 About InDesign icons and - Adobe 718659340025 | Printing Guide - Page 3
Exporting Adobe PDF files 99 Common areas...100 General panel ...101 Compression panel ...104 Marks and Bleed panel ...106 shop 115 Applying your print presets to customer f iles 116 Streamlining output with PDF presets 117 About the predef ined PDF expor t presets 117 Set ting up - Adobe 718659340025 | Printing Guide - Page 4
Welcome to the Adobe® InDesign® CS Printing Guide for Print Service Providers. You'll Adobe InDesign 1.5.2 and Adobe InDesign 2, such as support for a wide variety of Adobe PostScript® workflows, advanced built-in trapping, and the Ink Manager. The number of service providers embracing Adobe - Adobe 718659340025 | Printing Guide - Page 5
Support for Adobe PostScript® 3™ in Adobe Adobe also remains committed to giving prepress service Adobe InDesign CS. Another priority is to ensure that Adobe InDesign CS successfully outputs advanced features used in files placed from Adobe Photoshop®, Adobe Illustrator®, and Adobe Acrobat®. Adobe - Adobe 718659340025 | Printing Guide - Page 6
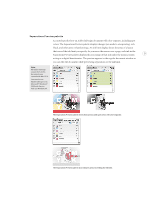
InDesign screen shots in this document were created with Mac OS X. You can also use Adobe InDesign CS in Microsoft® Windows® 2000 with Service Pack 2 or Windows XP. The Separations Preview palette shows how process and spot colors will color-separate. The Separations Preview palette also indicates - Adobe 718659340025 | Printing Guide - Page 7
're familiar with the Channels palette in Adobe Photoshop, you'll quickly understand how the Separations this feature is minimized because it works similarly to the transparency flattener in Adobe Illustrator and Adobe Acrobat 6 Professional. In addition, flattening is previewed directly on the page - Adobe 718659340025 | Printing Guide - Page 8
PDF output. Screen preview of document areas A Margins B Page edge C Bleed D Slug A B C D Adobe InDesign CS can preview the page area, the bleed area, and the slug area. For clarity, the preference for Guides In Back now controls the page border as well, in case you want the guides - Adobe 718659340025 | Printing Guide - Page 9
Back is off by default.) In addition, the Guides and Pasteboard preferences now include a Minimum Vertical Offset -in, in-RIP, or composite workflow. In addition, mixed inks are preserved when you export PDF files, and when print- ing to a composite printer. Mixed ink swatches let you define color - Adobe 718659340025 | Printing Guide - Page 10
CS can export document layers to PDF 1.5 layers. PDF 1.5 is also supported by Adobe Acrobat 6 Professional. However, most PDF prepress workflows are currently based on earlier versions of PDF, so PDF 1.5 workflows won't be common until PDF 1.5 is supported by more RIPs and prepress applications - Adobe 718659340025 | Printing Guide - Page 11
be a challenge to integrate them into some prepress workflows. By automatically merging DCS 2.0 files created from Adobe Photoshop, it's easier to reuse legacy files. Merging is supported when exporting or printing, including color separation and trapping with the built-in trapping engine. These - Adobe 718659340025 | Printing Guide - Page 12
it was saved in another application; and Effective ppi, which can be higher or lower than the Actual resolution if the image is scaled within Adobe InDesign CS. For example, if a designer imports an image that was saved at 300 dpi and scales it 200%, its effective resolution becomes 150 dpi - Adobe 718659340025 | Printing Guide - Page 13
the Simulate Overprint feature in a PDF exported for proofing or when printing to a composite device. Adobe InDesign CS also adds stroke styles you can always use your shop's display preference as the default. A service provider will usually want to use a fast display setting such as Typical - Adobe 718659340025 | Printing Guide - Page 14
is not selected in the Download pop-up menu in the Graphics Adobe InDesign with other service providers. To submit a feature request, go to: http://www.adobe.com/support/feature.html To exchange ideas and solutions with other Adobe InDesign service providers, go to the Adobe InDesign Service - Adobe 718659340025 | Printing Guide - Page 15
space to CMYK (choose Edit > Transparency Blend Space > CMYK). • Place Adobe native formats that support unflattened transparency: Illustrator 9 or later (native .AI format, not EPS), Photoshop 4 or later, or PDF 1.4 (Acrobat 5) or PDF 1.5 (Acrobat 6). Adobe InDesign CS can flatten EPS versions of - Adobe 718659340025 | Printing Guide - Page 16
Duotone mode), but not Photoshop files saved in Multichannel Illustrator file. (Of course, the Illustrator file should normally be linked to the InDesign document.) • For placed PDF it should not be reordered or synchronized by the prepress service provider. • Verify pagination. • If a table of - Adobe 718659340025 | Printing Guide - Page 17
this document: • PDF export presets. If you accept PDF files from customers, create a PDF export preset customized box in Adobe InDesign CS is consistent with Adobe Photoshop, Adobe Illustrator, and other Adobe applications. You them off, to identify any problems that need to be resolved at the customer's - Adobe 718659340025 | Printing Guide - Page 18
Provider command in Adobe PageMaker® or the Collect for Output feature in QuarkXPress™. With the Package command, your customers or customer service representatives can collect the files needed to output an InDesign document, as well as provide contact information and instructions that help - Adobe 718659340025 | Printing Guide - Page 19
for each option you select). The InDesign document and the Printing Instructions report are automatically copied to the folder you specify here. 16 help ensure that the links in their documents don't cause output problems. Use Document Hyphenation Exceptions only: This option embeds the customer's - Adobe 718659340025 | Printing Guide - Page 20
InDesign document. This option is turned off by default, meaning that Adobe InDesign CS only includes content on layers that are visible at the is packaged. View Report: This option automatically displays the Printing Instructions report after the 17 package is created. The report is always - Adobe 718659340025 | Printing Guide - Page 21
is based. Transparency must be flattened for PDF 1.3. • PDF 1.4 adds support for transparency. Some RIPs process PDF 1.4 directly. Transparency in an Adobe InDesign document doesn't need to be flattened when exported to PDF 1.4 or above. • PDF 1.5 adds support for document layers and JPEG 2000 image - Adobe 718659340025 | Printing Guide - Page 22
it will be converted to InDesign CS format. This should not cause output problems unless the text is edited after conversion. If a document has been converted two available choices are User Dictionary and Document. From a service provider's point of view, User Dictionary means the dictionary - Adobe 718659340025 | Printing Guide - Page 23
consent. Even fonts missing from placed EPS and PDF files are identified. If a missing font is fonts inside placed graphics, but knowing about the problem up-front makes it easy to alert the if a font is active in more than one format, Adobe InDesign CS displays each instance of the font in the - Adobe 718659340025 | Printing Guide - Page 24
21 2. In the Fonts in Document list, select a font. Missing fonts are identified by a yellow alert triangle ( ). You can also select fonts in the Fonts in Document list by clicking in the list and using the arrow keys. 3. Do one of the following: • To find the first layout instance of the font - Adobe 718659340025 | Printing Guide - Page 25
links to placed files, InDesign displays an alert and provides several features that make it easy for you to resolve link-related problems in customer files. To resolve the problems right away, click the Fix Links button. You'll be asked to relink to any missing links, and any modified links (files - Adobe 718659340025 | Printing Guide - Page 26
display it. By default, files are sorted by status, with missing or problem links at the top so that they are easy to identify at a glance yellow triangle with an exclamation point ( ). If you need to relink a file manually, click the Relink button ( ) and locate the new file. You can sort - Adobe 718659340025 | Printing Guide - Page 27
in a document. As a service provider you may want to discourage this practice because it makes troubleshooting more difficult, and increases InDesign cases where pasting can be desirable, such as pasting Adobe Illustrator paths into Adobe InDesign for further editing. However, customers do need to - Adobe 718659340025 | Printing Guide - Page 28
missing in the Links palette or Preflight dialog box, it poses no problems for high-resolution printing because the text is completely included in the customer uses a workflow where text is only edited and formatted within Adobe InDesign after it's placed, unlinking text files can be a good idea - Adobe 718659340025 | Printing Guide - Page 29
Handling alerts about missing or mismatched color profiles When you open a file, InDesign may present an alert saying that a file's color profile is miss- ing or doesn't match the current working space. The correct action depends on how your shop handles color management. Decisions are easier if - Adobe 718659340025 | Printing Guide - Page 30
You may notice that the Color Settings dialog box in Adobe InDesign CS is consistent with Adobe Photoshop 6 and later, and other recent Adobe products. 3. Deselect Enable Color Management, and click OK. Handling profile messages in a color-managed workflow 27 If you frequently encounter alerts - Adobe 718659340025 | Printing Guide - Page 31
space without saving it). For a comprehensive overview of color management, see the chapter "Producing Consistent Color" in the Adobe InDesign CS User Guide or online Help. Excluding individual graphics from color management It's possible for a document to exclude specific images from being - Adobe 718659340025 | Printing Guide - Page 32
instances of this graphic, will remain color-managed if color management is turned on in the Edit > Color Settings dialog box. Note that at any time, you can use the Info palette to identify the color profile of a selected image. The Info palette is new for InDesign CS. 29 - Adobe 718659340025 | Printing Guide - Page 33
operations such as preflighting and printing across all documents in a book. This requires using the book palette, which displays a book's Adobe InDesign documents as a list. Book palette A Style source document icon B Pagination column C Palette menu A D Missing document icon E Modified document - Adobe 718659340025 | Printing Guide - Page 34
attention to which documents are selected in the book file. Some commands in the book palette menu, such as the Preflight Book, Export Book to PDF, and Print Book commands, operate on the selected documents only. To preflight, export, or print the entire book, make sure that either no documents are - Adobe 718659340025 | Printing Guide - Page 35
won't resolve color management profile inconsistencies among book documents. To anticipate color management error messages before high-resolution output, export to PDF as a test, because profile conflict alert messages appear when the book is printed or exported. If you encounter a color profile - Adobe 718659340025 | Printing Guide - Page 36
without nonprinting items. Nonprinting items include elements such as rulers, guides, grids, frame edges, text highlighting of missing fonts or Checking for differences if the file was converted from earlier versions of Adobe InDesign In general, opening a document created with an earlier version - Adobe 718659340025 | Printing Guide - Page 37
Adobe InDesign CS to open an Adobe InDesign 2 document containing placed PDF files, the PDF files may output as if printed from Adobe InDesign 2 because the PDF relinking imported files" on page 22. Note: InDesign does not support OLE or Quark XTensions®. Consequently, when you open files that - Adobe 718659340025 | Printing Guide - Page 38
, as well as QuarkXPress guides, are placed on the corresponding InDesign master pages. • PageMaker document guides are placed on the Default InDesign. For information about other conversion issues, check the support documents on the Adobe Web site. To open a PageMaker or QuarkXPress document or - Adobe 718659340025 | Printing Guide - Page 39
EPS files, Incomplete fonts are screen fonts without a corresponding printer font, and Protected fonts can't be embedded in PDF or EPS files due to licensing restrictions. You can select Show Problems Only to view a concise list of the missing fonts; clicking Find Font opens the Find Font dialog box - Adobe 718659340025 | Printing Guide - Page 40
workflows. (Note: InDesign can't detect RGB color data embedded in EPS or PDF files; customers must check for RGB data before saving files in those formats. RGB data can be detected in Photoshop raster EPS files.) Adobe InDesign CS adds two resolution indicators to the Links and Images panel. Actual - Adobe 718659340025 | Printing Guide - Page 41
original path or filename has been altered since the document was last saved, click Relink to locate the missing link. Repair All: The Repair All option provides a convenient way to resolve all missing or modified links. If the original path or filenames have been altered since the document was - Adobe 718659340025 | Printing Guide - Page 42
panel 39 In the Colors and Inks panel you can view the inks specified in the InDesign document, including inks specified in placed EPS and PDF files. The Angle and Lines/Inch values displayed here are based on the optimized screens for the current PostScript printing device selected in the Print - Adobe 718659340025 | Printing Guide - Page 43
Print Settings panel 40 The Print Settings panel summarizes the document's current print settings. This can help your staff to identify differences between customer-supplied laser proofs and those created at your shop. - Adobe 718659340025 | Printing Guide - Page 44
objects and placed images, but with certain conditions. Adobe Illustrator files (native format or PDF, but not EPS) are trapped if they were created by Adobe Illustrator 9 or later. PDF files can indicate whether they have been previously trapped; Adobe InDesign traps them only if they were not - Adobe 718659340025 | Printing Guide - Page 45
not be changed except by someone familiar with the press conditions for the job. Additional information about trap options is available in the Adobe InDesign CS User Guide and online Help. To create or edit a trap preset: 1. Choose Window > Trap Presets. 2. Do one of the following: • To create a new - Adobe 718659340025 | Printing Guide - Page 46
the same as in the Stroke palette. The default is Miter, which maintains compatibility by producing the same trapping results as earlier versions of the Adobe Trapping Engine. The End Style controls the intersection of three traps. The default is Miter, which shapes the end of the trap to keep it - Adobe 718659340025 | Printing Guide - Page 47
the default of 100%. For 44 best results, use a value no lower than 70%. See "Trapping with blacks and rich blacks" in the Adobe InDesign CS User Guide or online Help. Black Density: Indicates the neutral density value at or above which InDesign considers an ink to be black. For example, if - Adobe 718659340025 | Printing Guide - Page 48
Preset menu. (There is a possibility that the palette menu may display [No Trap Style] instead, if the document was created in an older version of Adobe InDesign. [No Trap Style] is the wording previously used for [No Trap Preset] and means the same thing). 3. Click Assign. - Adobe 718659340025 | Printing Guide - Page 49
of plates. If you need to make adjustments, you can do so with immediate feedback by editing while separations preview is in effect. 46 Adobe InDesign previews separations by displaying any combination of the inks defined in the document, such as the cyan plate and the magenta plate. The results - Adobe 718659340025 | Printing Guide - Page 50
Manager" on page 87. • You can't preview the overprinting effects of built-in trapping or Adobe In-RIP Trapping. Separations preview displays only the effects of overprints applied manually through the Attributes palette or by applying transparency. 47 • You may want to disallow display performance - Adobe 718659340025 | Printing Guide - Page 51
To preview areas that are over your ink limit: In the Separations Preview palette, choose Ink Limit from the View pop-up menu, and enter an ink limit value. Areas in red are over your ink limit, and areas with more saturated reds are further over the ink limit. Areas in gray are within the ink - Adobe 718659340025 | Printing Guide - Page 52
palette on page 46. To preview overprinting: Choose View > Overprint Preview. Note: You can also preview overprints when you output to a composite printing device or PDF file. To do this, turn on Simulate Overprint in the Advanced panel of the Print dialog box or the Export - Adobe 718659340025 | Printing Guide - Page 53
editors such as Adobe Photoshop for many service provider to handle. However, this situation continues to improve with time. Transparency is already part of the PDF 1.4 and 1.5 specifications supported by Adobe InDesign (starting from version 2), Acrobat (starting from version 5), and Illustrator - Adobe 718659340025 | Printing Guide - Page 54
the document. Original art with native transparency Flattened art simulates transparency by cutting up objects (objects slightly shifted for illustrative purposes) If a spread doesn't contain transparency, the flattener leaves it alone. Note: The transparency flattener in InDesign CS preserves - Adobe 718659340025 | Printing Guide - Page 55
Print or Export PDF dialog boxes. Although this may sound contradictory, it isn't. Overprinting instructions are for Illustrator 9 or later (native file format only, not EPS). • Photoshop 4 or later (native file format only). • PDF 1.4 or later (generated by applications such as Illustrator - Adobe 718659340025 | Printing Guide - Page 56
Illustrator native transparency is directly supported by InDesign only for files saved in Illustrator 9 or later native (.AI) format or PDF in InDesign can flatten and output the files' transparency typically without problems. Complex transparency A document may require additional attention if it - Adobe 718659340025 | Printing Guide - Page 57
to flattening. However, transparency is not a problem for most Photoshop DCS 2.0 files because Adobe InDesign CS can recombine their plates, integrate them working with transparency. By helping customers recognize potential trouble spots with transparency, jobs with transparency can move more - Adobe 718659340025 | Printing Guide - Page 58
is much easier in Adobe InDesign CS: working with Photoshop DCS 1.0 and 2.0 files. Adobe InDesign CS can merge most Photoshop DCS 1.0 and 2.0 InDesign layout and it can't be merged, use Photoshop to convert the file to PDF or native Photoshop (PSD) format before flattening the InDesign document. ( - Adobe 718659340025 | Printing Guide - Page 59
Adobe InDesign CS are now consistent with Adobe Illustrator CS and Adobe Acrobat 6 Professional. Adobe InDesign CS defaults to Medium Resolution for fast output on the customer's desktop printer. In a print service chance that some jobs may encounter output problems if, for example, memory limits are - Adobe 718659340025 | Printing Guide - Page 60
box, type a name in the Preset text box or accept the default name. 4. Drag the Raster/Vector Balance slider only if necessary. In most service provider workflows, there is little reason to use a value lower than 100. Lowering this value allows more rasterization of objects. You might lower this - Adobe 718659340025 | Printing Guide - Page 61
if the gradients interact with transparency and are saved in a file format that provides native transparency information to InDesign (such as Illustrator 10). Note: Do not change this value to improve feathered edges or drop shadows. InDesign automatically increases the resolution for Feather - Adobe 718659340025 | Printing Guide - Page 62
objects' edges. If stitching occurs in PDF files exported from InDesign, turn off Smooth Images in Adobe Acrobat (in the Smoothing panel in the need to wonder what will work. Previewing transparency flattener presets Adobe InDesign CS lets you highlight the effects of any transparency flattener - Adobe 718659340025 | Printing Guide - Page 63
the flattener settings in the Print dialog box only. If you want to change flattener settings for PDF output, be sure to specify the flattener preset in the Advanced panel in the Export PDF dialog box. Also note that the Apply Settings to Print button changes the flattener settings for the - Adobe 718659340025 | Printing Guide - Page 64
above 1200 dpi. If you are printing on a device below 1200 dpi and this feature high- lights many characters on a page, you can make all text appear consistent by applying a preset where Convert All Text to Outlines is turned on. • Raster-fill Text and Regions highlights text or strokes that may - Adobe 718659340025 | Printing Guide - Page 65
quality flattener presets will process faster and result in smaller output or PDF files. At the document level, you can apply a transparency Transparency) to ignore transparency for the spread. This is useful for troubleshooting. • Custom to open the Custom Spread Flattening dialog box for - Adobe 718659340025 | Printing Guide - Page 66
Print dialog box reference InDesign CS provides a wide range of printing options which may seem overwhelming at first, but the comprehensive range of options lets you precisely customize printing settings for your shop's workflow. Once you've determined the best combinations of settings for 63 - Adobe 718659340025 | Printing Guide - Page 67
• Graphics (page 91). Options for downloading fonts and graphics, and the PostScript language data format. • Color Management (page 94). Options when using a color-managed workflow. • Advanced (page 96). Options such as - Adobe 718659340025 | Printing Guide - Page 68
PPD other than the one properly set up with a particular device. If you or your customers want to create a PostScript file targeted to a PPD for a printer not connected to the computer, choose PostScript File in the Printer menu. For this reason, make sure your output devices are properly set up - Adobe 718659340025 | Printing Guide - Page 69
The proxy has three views. To cycle through the views, click the proxy. The views are as follows: Standard view: Displays the spatial relationship between the current print settings and the current media (paper) size. It answers the question "What is the page position relative to the media?" It - Adobe 718659340025 | Printing Guide - Page 70
level, and font downloading settings. When options support the Preview option in the Mac OS X Print dialog box. The Mac OS X Preview option generates a screen quality PDF that is not suitable for previewing a prepress-quality document. Instead, use any of the high-quality preview options Adobe - Adobe 718659340025 | Printing Guide - Page 71
Cancel button If you click Cancel, changes you made in the Print dialog box won't be saved. The only exception is that if you saved settings in a driver-specific dialog box, changes you made there will be saved. If you want to save changes to the Print dialog box but don't want to print, consider - Adobe 718659340025 | Printing Guide - Page 72
up. Any output path that generates PostScript files can be directed to a drop folder for further processing by another workflow application, such as Adobe Acrobat Distiller. When you create a PostScript file, you'll be asked to specify a folder location; that's when you can specify a drop folder - Adobe 718659340025 | Printing Guide - Page 73
In-RIP 70 Trapping from InDesign, or to use InDesign's built-in trapping. In-RIP separations and Adobe In-RIP trapping are available only if you select a PPD that supports them. • Special printer features supported by the PPD are not available. To use them, use a PostScript output path that uses - Adobe 718659340025 | Printing Guide - Page 74
driver. • Highly DSC compliant. However, not as DSC compliant as the InDesign PostScript file workflows. • Supports all output color modes (composite or separated). 71 • Can use InDesign to set up built-in trapping or Adobe In-RIP Trapping. • Can be printed to a file or directly to a device. To set - Adobe 718659340025 | Printing Guide - Page 75
of the InDesign Print dialog box. Note: In InDesign, you can't use the Preview option in the Mac OS X Print dialog box, because the PDF documents it produces are low-resolution and not suitable for prepress. Instead, use any of InDesign's preview features, such as Preview mode, Overprint Preview - Adobe 718659340025 | Printing Guide - Page 76
driver, which you can open by clicking Setup (Windows) or Printer (Mac OS X) at the bottom of the Print dialog box. Where options are duplicated, Adobe recommends specifying settings in the InDesign Print dialog box so that they can be saved as print presets, and to minimize potential conflicts and - Adobe 718659340025 | Printing Guide - Page 77
sheet of media. This option is usually of more use to designers than to service providers. Note that selecting this option does not automatically scale or reorient a of blank plates. Print Visible Guide and Baseline Grids: Prints margin guides, ruler guides, column guides, baseline grids, bleed area - Adobe 718659340025 | Printing Guide - Page 78
won't print. This option is primarily of use to designers and art directors. Service providers should usually make sure this option is off when creating final output or presets. Note: For optimal performance, turn the Print Visible Guides and Baseline Grids option off. 75 This makes the most - Adobe 718659340025 | Printing Guide - Page 79
• If you targeted a device-dependent PostScript file (Printer: PostScript® file; PPD: ), you can choose from the paper sizes defined in the selected PPD. The Custom paper size option may also be available if it's enabled by the selected PPD. • If you targeted a printer set up through - Adobe 718659340025 | Printing Guide - Page 80
Scale to Fit are on. Thumbnails: Outputs from 2 to 49 pages on a single media page, for the purpose of reviewing a document. In most service provider scenarios, this option should be turned off. The orientation of the thumbnail pages may not match the orientation of the document, because InDesign - Adobe 718659340025 | Printing Guide - Page 81
a single tile. You set the top left corner of the tile by positioning the zero point of the rulers. The Overlap value isn't available for Manual because only one sheet is printed. • Overlap. Specifies how much of each tile edge is repeated along the edge of any adjacent tiles. This option - Adobe 718659340025 | Printing Guide - Page 82
3. Specify a Width and Height if needed. The default Auto setting is useful for continuous media, such as a roll of film or paper. It will use only enough media to print the page and any page marks that are turned on. 79 4. Specify the following options as necessary: • Orientation, to rotate the - Adobe 718659340025 | Printing Guide - Page 83
Marks and Bleed panel This panel specifies items that expand the required print area beyond the page edge, such as crop marks and the bleed area. 80 Note: InDesign does not automatically scale down the page to accommodate printer marks unless Scale to Fit is selected, so be sure the paper size is - Adobe 718659340025 | Printing Guide - Page 84
Registration marks E Page area D (shown in gray for illustrative purposes) F Slug area E F Printer marks 1 07 the top of each page, as a guide in adjusting ink density on a printing press print this information is always downloaded, regardless of the Download Fonts setting. Type: Specifies - Adobe 718659340025 | Printing Guide - Page 85
Bleed and Slug options Use Document Bleed Settings: Applies the bleed values specified in Document Setup instead of specifying them here. Bleed: specifies the amount of bleed on each side of the page. The four options are labeled Top, Bottom, Left, and Right when Spreads is selected or Facing - Adobe 718659340025 | Printing Guide - Page 86
Overprint option are available, but others are not. 83 For information about RIPs that support Adobe In-RIP Trapping, contact the following Adobe OEM partners who have licensed Adobe In-RIP Trapping: Agfa-Gevaert N.V. Fuji Photo Film Co., Ltd. Heidelberger Druckmaschinen Information Presentation - Adobe 718659340025 | Printing Guide - Page 87
Photoshop spaces such as RGB or Lab in placed PDF or placed EPS files, separation of these supports in-RIP separations. You also need a PPD that supports this device and a compatible Adobe of text and should be turned off for most service provider scenarios. It's available only for composite output - Adobe 718659340025 | Printing Guide - Page 88
85 included with InDesign (also known as the on-host trapping option). It does not trap placed EPS files unless they are Photoshop DCS 1.0-2.0/EPS raster images; Adobe In-RIP Trapping doesn't have this limitation. If a document uses stroked TrueType fonts, better results can be obtained using - Adobe 718659340025 | Printing Guide - Page 89
Screening: Specifies the combination of screen ruling (in lines per inch) and resolution (in dots per inch) for output. The settings in this menu depend on whether composite or separations output is specified: • For composite output, a Default setting is available. This simply uses the device's - Adobe 718659340025 | Printing Guide - Page 90
lets you use ink aliasing to quickly change the relationship between a document's spot colors and the ink plates generated during color separation or PDF export, independent of the Swatches palette. This is necessary when the customer's 87 document contains more spot inks than they've arranged to - Adobe 718659340025 | Printing Guide - Page 91
Except for the ink name, each property displayed in the ink list can be changed in the options section below the ink list. Each ink in the list displays the following properties: • Ink status icon. Indicates whether the ink is set to be separated as a spot ( ) or process ( ) color. Also indicates - Adobe 718659340025 | Printing Guide - Page 92
to a process color icon [ ].) Note: When you use Ink Manager in the Export PDF dialog box, the Type, Neutral Density, and Sequence options don't affect the PDF file. All other Ink Manager options are supported. Adjusting neutral density. The default ND values for a spot color are derived from its - Adobe 718659340025 | Printing Guide - Page 93
enough for proper trap creation. Spot inks that are not easily simulated using process inks, however, may need their ND values adjusted so that the trapping engine traps them correctly. By typing new values, you can ensure that an ink that is observed as darker or lighter is perceived that way in - Adobe 718659340025 | Printing Guide - Page 94
Graphics panel The Graphics panel controls output of fonts and linked graphics. 91 Images section Send data: Determines how linked image data is sent. Useful for omitting images for printing proofs or for some production workflows. The Images section contains the following options: • All. Sends - Adobe 718659340025 | Printing Guide - Page 95
fastest possible print speed. In a service provider context, this setting may be useful for troubleshoot- ing jobs by helping to determine whether images are causing a problem. Also useful for 92 proofing copy. Fonts section Note that if duplicate font downloading options are available in the - Adobe 718659340025 | Printing Guide - Page 96
. This option is disabled if None is chosen in the Download dropdown list. Other graphics options Note that if duplicate PostScript options and networks are in use. Note that Mac OS X 10.2 does not support binary printing, so the only data format available for Mac OS X is problems for binary data. - Adobe 718659340025 | Printing Guide - Page 97
. 94 Even when color management is on, as in this example, some color management options may be unavailable if the targeted device doesn't support the options. (In the device-independent output path shown here, the target device is intentionally unknown.) Source space section Options in this section - Adobe 718659340025 | Printing Guide - Page 98
include the CRD and Intent (if specified below) so that the device can color-manage the output. Select this option only if the RIP supports PostScript Color Management. CRD: Sends a Color Rendering Dictionary to the output device with the job. A Color Rendering Dictionary is analogous to an output - Adobe 718659340025 | Printing Guide - Page 99
and transparency flattening so that you can create output compatible with most output devices. 96 OPI section Options in this section enable support for OPI (Open Prepress Interface) workflows. For these options to work properly, high-resolution versions of linked graphics must be available where - Adobe 718659340025 | Printing Guide - Page 100
graphic's file type-EPS (encapsulated PostScript graphics), PDF (Acrobat files), or Bitmap Images. (Photoshop EPS files are considered to be EPS files in the Edit > Transparency Flattener Presets dialog box. Typically, service providers creating final high-resolution output should use the built-in - Adobe 718659340025 | Printing Guide - Page 101
report on the current print settings. The summary can be saved, which is useful for troubleshooting, communicating job settings to colleagues and customers, and archiving the exact settings used to output a job. In Adobe InDesign CS, the targeted PPD file-and the full path to it-are now included - Adobe 718659340025 | Printing Guide - Page 102
driver or a PPD. In addition, when you export to an Adobe PDF file, InDesign uses the internal PDF library (which supports PDF 1.3-1.5) along with the Adobe Graphics Manager to create the file, instead of using Acrobat Distiller. If you use post-processing applications to impose documents, you - Adobe 718659340025 | Printing Guide - Page 103
viewing. 100 Preset menu The PDF export presets included with InDesign match those in Acrobat Distiller as much as possible. PDF export presets, see "Streamlining output with PDF presets" on page 117. Note: Check the InDesign Adobe PDF settings periodically using the Summary panel in the Export PDF - Adobe 718659340025 | Printing Guide - Page 104
on page 73). It also lets you specify which PDF attributes are exported. 101 Pages section The Pages section Acrobat 4: Generates a file using the PDF 1.3 standard. Maintains compatibility with software or hardware that isn't compatible with features in Acrobat 5 (PDF 1.4) or Acrobat 6 (PDF - Adobe 718659340025 | Printing Guide - Page 105
makes for faster access and viewing when downloading the file from the Web or a network. View PDF After Exporting: Opens the Adobe PDF file in Acrobat. For best results, use Acrobat 5 or Acrobat 6 Professional. Transparency can be viewed in Acrobat 5 or Acrobat 6 Professional using this format. The - Adobe 718659340025 | Printing Guide - Page 106
Adobe PDF hyperlinks for InDesign hyperlinks, table of contents entries, and index entries. The hyperlinks are fully supported in Acrobat or Adobe Reader®. Non-Printing Objects: Exports all objects, including those for which Nonprinting is turned on in the Attributes palette. Visible Guides - Adobe 718659340025 | Printing Guide - Page 107
the size of a PDF file. For best results in a service provider workflow, compression should be limited so that it doesn't degrade the output quality of the file. For ease of training, this panel is now very similar to the same Compression panel in Adobe Illustrator CS and Acrobat Distiller 6. 104 - Adobe 718659340025 | Printing Guide - Page 108
JPEG 2000 compression (available when you specify Acrobat 6 compatibility) may not be supported by all RIPs and prepress applications. Monochrome . InDesign uses lossless compression, so the quality of these elements in your PDF file won't be affected. Crop Image Data to Frames: This option may - Adobe 718659340025 | Printing Guide - Page 109
Print dialog box, this panel now includes upgraded controls corresponding to the improved bleed and slug support in Adobe InDesign CS. See "Marks and Bleed panel" on page 80. 106 If you export a page to PDF with marks, bleed area, and slug area, make sure you specify a page size large enough to - Adobe 718659340025 | Printing Guide - Page 110
for OPI replacement, or selecting a transparency flattener preset. 107 Color section The Color settings specify how to represent color information in the exported Adobe PDF file. For example, if a customer used a mix of RGB and CMYK objects, the color settings can control how the RGB objects are - Adobe 718659340025 | Printing Guide - Page 111
device that uses the Adobe PDF file needs to translate colors PDF file so that it displays the effects of overprinting where it was applied using the Attributes palette. This is useful when sending proofs back to customers using Acrobat 4, which doesn't support overprint preview (Acrobat 5 and Acrobat - Adobe 718659340025 | Printing Guide - Page 112
embedding. Embedding prevents font substitution when a reader edits the file and ensures that readers will see the text in its original font. If InDesign cannot embed a font due to the font vendor's settings and someone who opens 109 or prints an Adobe PDF file does not have access to the - Adobe 718659340025 | Printing Guide - Page 113
and menu items related to those features are dimmed. In Adobe InDesign CS, the Security panel is consistent with the same panel in Adobe Illustrator CS and Acrobat 6 Professional. 110 Note: PDF export presets do not support passwords and security settings. If you export a document that includes - Adobe 718659340025 | Printing Guide - Page 114
the file unless the User Password is entered properly. The password is required even if the PDF file is opened in 111 another program that can open PDF files, such as Adobe Illustrator. If you select this option, enter a Document Open Password. Use a Password to Restrict Printing, Editing, and - Adobe 718659340025 | Printing Guide - Page 115
Streamlining output with print presets To output InDesign files with a minimum of time and work, take advantage of the print presets feature. With print presets, job settings are easy to standardize with minimum potential for operator error. 112 Set up workflow-specific print presets on the - Adobe 718659340025 | Printing Guide - Page 116
Setting up print presets You can create a print preset whether or not any documents are open, or from inside the Print dialog box. A print preset saves the state of every option in Print dialog box panels. The available print presets are shared across open documents, but each open document can use a - Adobe 718659340025 | Printing Guide - Page 117
5. Save the printer-specific settings: • On Windows, settings are saved when you click Print in the Print dialog box. • On Mac OS X, click Save Custom Settings. 114 6. If the printer-specific dialog box isn't already closed, click the Save, Print, or OK button (the exact button name varies depends - Adobe 718659340025 | Printing Guide - Page 118
Distributing print presets throughout your shop Once you've defined your shop's print presets, you can easily copy them to other computers that run InDesign in your shop. To save printer settings into a file you can move to other computers: 1. On the computer where you've defined your standard - Adobe 718659340025 | Printing Guide - Page 119
a job, make a habit of creating a print preset of the job settings and archiving the preset with the job. If you later want to repeat or troubleshoot the job, the archived preset will make it possible to output the job exactly as it was run before. - Adobe 718659340025 | Printing Guide - Page 120
the predefined PDF export presets Adobe InDesign CS includes pre-defined PDF export presets. Note that for prepress service providers, information is compressed. Adobe PDF files created using the eBook PDF preset are compatible with Acrobat 5 or 6. • Screen. Creates compact Adobe PDF files that will - Adobe 718659340025 | Printing Guide - Page 121
information in an Adobe PDF file that a 118 commercial printer or service provider will need to print the document correctly. This PDF export preset does PDF/X-1a. • Acrobat 6 Layered. Creates Adobe PDF files that conform to PDF 1.5. Compared to other presets, Acrobat 6 Layered adds support for - Adobe 718659340025 | Printing Guide - Page 122
or select the file and click Open. To save PDF export presets: 1. In the PDF Presets dialog box, select one or more presets in adobe.com Adobe, the Adobe logo, Acrobat, Illustrator, InDesign, Photoshop, PostScript, PostScript 3, and Reader are either registered trademarks or trademarks of Adobe
-
 1
1 -
 2
2 -
 3
3 -
 4
4 -
 5
5 -
 6
6 -
 7
7 -
8
-
9
-
10
-
11
-
12
-
13
-
14
-
15
-
16
-
17
-
18
-
19
-
20
-
21
-
22
-
23
-
24
-
25
-
26
-
27
-
28
-
29
-
30
-
31
-
32
-
33
-
34
-
35
-
36
-
37
-
38
-
39
-
40
-
41
-
42
-
43
-
44
-
45
-
46
-
47
-
48
-
49
-
50
-
51
-
52
-
53
-
54
-
55
-
56
-
57
-
58
-
59
-
60
-
61
-
62
-
63
-
64
-
65
-
66
-
67
-
68
-
69
-
70
-
71
-
72
-
73
-
74
-
75
-
76
-
77
-
78
-
79
-
80
-
81
-
82
-
83
-
84
-
85
-
86
-
87
-
88
-
89
-
90
-
91
-
92
-
93
-
94
-
95
-
96
-
97
-
98
-
99
-
100
-
101
-
102
-
103
-
104
-
105
-
106
-
107
-
108
-
109
-
110
-
111
-
112
-
113
-
114
-
115
-
116
-
117
-
118
-
119
-
120
-
121
-
122
 |
 |

TECHNICAL REFERENCE
Adobe® InDesign® CS
Printing Guide
for Service Providers