Adobe 718659340025 Printing Guide - Page 7
Flattener Preview palette - illustrator
 |
View all Adobe 718659340025 manuals
Add to My Manuals
Save this manual to your list of manuals |
Page 7 highlights
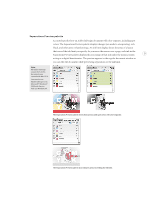
If you're familiar with the Channels palette in Adobe Photoshop, you'll quickly understand how the Separations Preview palette works. All process and spot inks defined in the file are listed in the palette, and you can hide or show inks to preview any combination of them. To accelerate your prepress workflow, you can use the Window > Arrange > New Window command to view the same page or spread in multiple windows-one that previews separa- 4 tions, another view to indicate areas over the ink limit, and a third to view the composite. You can then make adjustments in any view while simultaneously and continuously moni- toring how your changes affect each separation, areas over the ink limit, and the composite document. For more information, see "Previewing separations, transparency, and overprints" on page 46. Flattener Preview palette Evaluate the effects of transparency flattener settings before generating output. The Flattener Preview palette shows how page areas would be affected by flattening, without altering the document. You can try different presets and see the results. When you're satisfied with the results of the flattener preview, you can apply the currently viewed settings to the document's print settings by clicking the Apply Settings to Print button. Training on this feature is minimized because it works similarly to the transparency flattener in Adobe Illustrator and Adobe Acrobat 6 Professional. In addition, flattening is previewed directly on the page (not in a separate window or palette), so you can edit page objects while the flattener preview is in effect. For more information, see "Previewing transparency flattener presets" on page 59. The original object is on the left. The flattener preview on the right indicates the page areas affected by using the selected flattener preset to flatten the transparency in the drop shadows.
-
 1
1 -
 2
2 -
 3
3 -
 4
4 -
 5
5 -
 6
6 -
 7
7 -
 8
8 -
 9
9 -
 10
10 -
 11
11 -
 12
12 -
13
-
14
-
15
-
16
-
17
-
18
-
19
-
20
-
21
-
22
-
23
-
24
-
25
-
26
-
27
-
28
-
29
-
30
-
31
-
32
-
33
-
34
-
35
-
36
-
37
-
38
-
39
-
40
-
41
-
42
-
43
-
44
-
45
-
46
-
47
-
48
-
49
-
50
-
51
-
52
-
53
-
54
-
55
-
56
-
57
-
58
-
59
-
60
-
61
-
62
-
63
-
64
-
65
-
66
-
67
-
68
-
69
-
70
-
71
-
72
-
73
-
74
-
75
-
76
-
77
-
78
-
79
-
80
-
81
-
82
-
83
-
84
-
85
-
86
-
87
-
88
-
89
-
90
-
91
-
92
-
93
-
94
-
95
-
96
-
97
-
98
-
99
-
100
-
101
-
102
-
103
-
104
-
105
-
106
-
107
-
108
-
109
-
110
-
111
-
112
-
113
-
114
-
115
-
116
-
117
-
118
-
119
-
120
-
121
-
122
 |
 |
