Adobe 718659340025 Printing Guide - Page 8
Bleeds, slugs, and pasteboard enhancements - pdf
 |
View all Adobe 718659340025 manuals
Add to My Manuals
Save this manual to your list of manuals |
Page 8 highlights
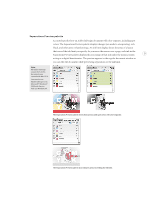
Bleeds, slugs, and pasteboard enhancements Set up bleed and slug areas outside the document area. You can specify a distance outside the page within which page objects can bleed. You can also specify a slug area where information can be added outside the page area and be included in output if desired. Slugs are commonly used in advertising to show information about an ad that is not part of the ad itself. 5 In the Document Setup dialog box, clicking the More Options button reveals the Bleed and Slug options. Bleeds and slugs are completely integrated into all phases of your workflow. Adobe InDesign CS adds Bleed and Slug preview modes, which display a document on screen as it would appear when trimmed to the bleed area or slug area. (Adobe InDesign 2 already includes a Preview mode that displays a document trimmed to the page edge.) As you would expect, bleed and slug areas can optionally be included in print or PDF output. Screen preview of document areas A Margins B Page edge C Bleed D Slug A B C D Adobe InDesign CS can preview the page area, the bleed area, and the slug area. For clarity, the preference for Guides In Back now controls the page border as well, in case you want the guides and the page border to display in front of or behind all other objects on
-
 1
1 -
2
-
 3
3 -
 4
4 -
 5
5 -
 6
6 -
 7
7 -
 8
8 -
 9
9 -
 10
10 -
 11
11 -
 12
12 -
 13
13 -
14
-
15
-
16
-
17
-
18
-
19
-
20
-
21
-
22
-
23
-
24
-
25
-
26
-
27
-
28
-
29
-
30
-
31
-
32
-
33
-
34
-
35
-
36
-
37
-
38
-
39
-
40
-
41
-
42
-
43
-
44
-
45
-
46
-
47
-
48
-
49
-
50
-
51
-
52
-
53
-
54
-
55
-
56
-
57
-
58
-
59
-
60
-
61
-
62
-
63
-
64
-
65
-
66
-
67
-
68
-
69
-
70
-
71
-
72
-
73
-
74
-
75
-
76
-
77
-
78
-
79
-
80
-
81
-
82
-
83
-
84
-
85
-
86
-
87
-
88
-
89
-
90
-
91
-
92
-
93
-
94
-
95
-
96
-
97
-
98
-
99
-
100
-
101
-
102
-
103
-
104
-
105
-
106
-
107
-
108
-
109
-
110
-
111
-
112
-
113
-
114
-
115
-
116
-
117
-
118
-
119
-
120
-
121
-
122
 |
 |
