Asus A7V400-MX SE A7V400-MX SE user's manual for English version - Page 47
Primary/Secondary IDE Master/Slave - manual se
 |
View all Asus A7V400-MX SE manuals
Add to My Manuals
Save this manual to your list of manuals |
Page 47 highlights
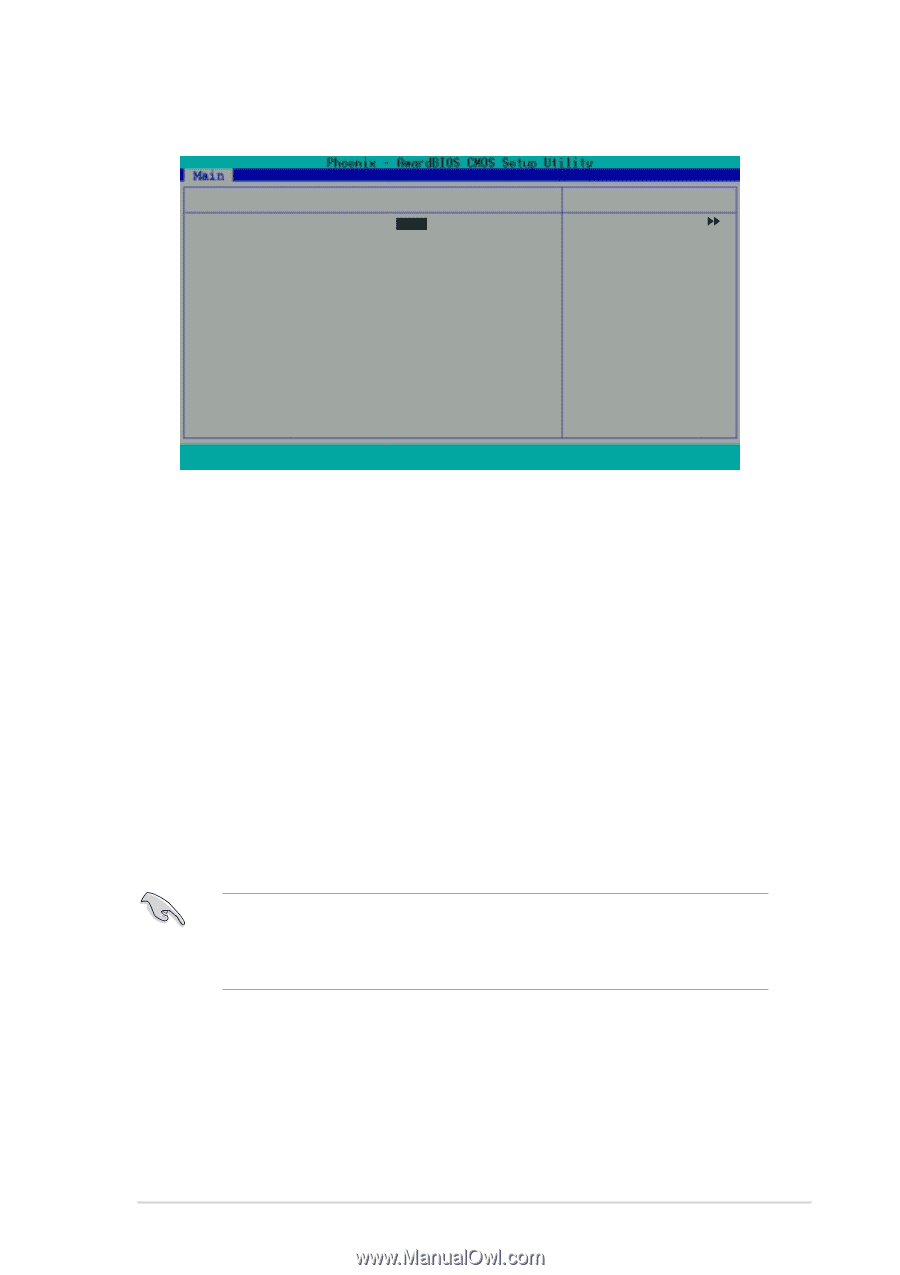
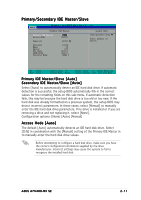
Primary/Secondary IDE Master/Slave Primary IDE Master Primary IDE Master Access Mode [Auto] [Auto] Capacity 40020 MB Cylinder Head Sector PIO Mode UDMA Mode Transfer Mode 19158 16 255 [Auto] [Auto] UDMA 5 Select Menu Item Specific Help Press [Enter] to select. F1 : Help ↑↓ : Select Item -/+ : Change Value F5 : Setup Defaults ESC : Exit →← : Select Menu Enter : Select Submenu F10: Save and Exit Primary IDE Master/Slave [Auto] Secondary IDE Master/Slave [Auto] Select [Auto] to automatically detect an IDE hard disk drive. If automatic detection is successful, the setup BIOS automatically fills in the correct values for the remaining fields on this sub-menu. If automatic detection fails, this may be because the hard disk drive is too old or too new. If the hard disk was already formatted on a previous system, the setup BIOS may detect incorrect parameters. In these cases, select [Manual] to manually enter the IDE hard disk drive parameters. If no drive is installed or if you are removing a drive and not replacing it, select [None]. Configuration options: [None] [Auto] [Manual] Access Mode [Auto] The default [Auto] automatically detects an IDE hard disk drive. Select [CHS] in coordination with the [Manual] setting of the Primary IDE Master in to manually enter the hard disk drive values. Before attempting to configure a hard disk drive, make sure you have the correct configuration information supplied by the drive manufacturer. Incorrect settings may cause the system to fail to recognize the installed hard disk. ASUS A7V400-MX SE 2-11
-
 1
1 -
2
-
3
-
4
-
5
-
6
-
7
-
8
-
9
-
10
-
11
-
12
-
13
-
14
-
15
-
16
-
17
-
18
-
19
-
20
-
21
-
22
-
23
-
24
-
25
-
26
-
27
-
28
-
29
-
30
-
31
-
32
-
33
-
34
-
35
-
36
-
37
-
38
-
39
-
40
-
41
-
 42
42 -
 43
43 -
 44
44 -
 45
45 -
 46
46 -
 47
47 -
 48
48 -
 49
49 -
 50
50 -
 51
51 -
 52
52 -
53
-
54
-
55
-
56
-
57
-
58
-
59
-
60
-
61
-
62
-
63
-
64
-
65
-
66
-
67
-
68
-
69
-
70
-
71
-
72
 |
 |