Asus NCCH-DL Disk Array & Driver Installation Guide English Version
Asus NCCH-DL Manual
 |
View all Asus NCCH-DL manuals
Add to My Manuals
Save this manual to your list of manuals |
Asus NCCH-DL manual content summary:
- Asus NCCH-DL | Disk Array & Driver Installation Guide English Version - Page 1
Server systems and motherboards RAID configuration and driver installation guide For • AP130-E1 5U Rackmount Server • AP1720-E2 5U Rackmount Server • NCCH-DL Motherboard • PSCH-L Motherboard - Asus NCCH-DL | Disk Array & Driver Installation Guide English Version - Page 2
IN IT. Products and corporate names appearing in this manual may or may not be registered trademarks or copyrights of their respective companies, and are used only for identification or explanation and to the owners' benefit, without intent to infringe. 2 RAID configuration and driver installation - Asus NCCH-DL | Disk Array & Driver Installation Guide English Version - Page 3
RAID controller driver .. 50 2.3.1 Windows® 2000 Server 50 2.3.2 Windows® 2003 Server 54 2.3.3 Red Hat® Linux 9.0 59 3. LAN driver installation 60 3.1 Windows® 2000 Server 60 3.2 Windows® 2003 Server 62 3.3 Red Hat® Linux 9.0 64 4. VGA driver installation 65 4.1 Windows® 2000/2003 Server - Asus NCCH-DL | Disk Array & Driver Installation Guide English Version - Page 4
from a hard disk drive included in a created RAID set, copy first the RAID driver from the support CD to a floppy disk before you install an operating system to the selected hard disk drive. Refer to section "2. RAID driver installation" for details. 4 RAID configuration and driver installation - Asus NCCH-DL | Disk Array & Driver Installation Guide English Version - Page 5
bays following the instructions in the system user guide. 2. Connect a SATA signal cable to the signal connector at the back of each drive and to the SATA connector on the motherboard. 3. Connect a SATA power cable to the power connector on each drive. 1.3 Setting the RAID item in BIOS You must set - Asus NCCH-DL | Disk Array & Driver Installation Guide English Version - Page 6
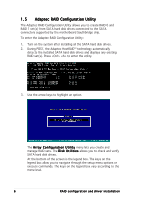
drives connected to the SATA connectors supported by the motherboard Southbridge chip. To enter the Adaptec RAID Configuration Utility: 1. Turn on the system after installing all the SATA hard disk drives the legend box vary according to the menu level. 6 RAID configuration and driver installation - Asus NCCH-DL | Disk Array & Driver Installation Guide English Version - Page 7
select C r e a t e A r r a y, then press . 3. Select the first drive you want to add to the array, then press . The selected drive appears in the S e l e c t e d D r i v e s section. A RAID 0 set requires two identical hard disk drives. RAID configuration and driver installation 7 - Asus NCCH-DL | Disk Array & Driver Installation Guide English Version - Page 8
on the drives. Press to proceed or press to abort creating the RAID 0 set. 6. After disk initialization, the utility displays the A r r a y P r o p e r t i e s menu. Select A r r a y T y p e > R A I D 0 ( S t r i p e ), then press . 8 RAID configuration and driver installation - Asus NCCH-DL | Disk Array & Driver Installation Guide English Version - Page 9
the menu, then press to select. For server systems, we recommend that you use a lower array block size. For multimedia computer systems used mainly for audio and video editing, we recommend a higher array block size for optimum performance. RAID configuration and driver installation 9 - Asus NCCH-DL | Disk Array & Driver Installation Guide English Version - Page 10
menu, then press to select. 10. When you have finished setting the array properties, move the cursor to D o n e, then press to create the RAID 0 set. 10 RAID configuration and driver installation - Asus NCCH-DL | Disk Array & Driver Installation Guide English Version - Page 11
have created the RAID 0 set, the utility main menu appears. Select M a n a g e A r r a y s to display the array, then press to view the array properties. 12. The screen displays the array properties. Press to return to the previous menu. RAID configuration and driver installation 11 - Asus NCCH-DL | Disk Array & Driver Installation Guide English Version - Page 12
1 set (Mirrored) To create a RAID 1 set: 1. Follow instructions 1 to 5 of the section "Creating a RAID 0 set (Stripe)." 2. From the A r r a y P r o p e to the A r r a y L a b e l option, then type a name for the RAID 1 set. Press when finished. 12 RAID configuration and driver installation - Asus NCCH-DL | Disk Array & Driver Installation Guide English Version - Page 13
the cursor to D o n e, then press to create the RAID 1 set. 6. A message appears on screen informing you that a RAID 1 array created with Quick Init requires you to run a Verify W/FIX on the drives for consistency. Press any key to continue. RAID configuration and driver installation 13 - Asus NCCH-DL | Disk Array & Driver Installation Guide English Version - Page 14
7. After you have created the RAID 1 set, the utility main menu appears. Select M a n a g e A r r a y to display the created set. Press to to return to the previous menu. 9. To exit the utility, press , highlight Y e s, then press . 14 RAID configuration and driver installation - Asus NCCH-DL | Disk Array & Driver Installation Guide English Version - Page 15
the main menu, select M a n a g e A r r a y s, then select the RAID set you want to make as bootable. 2. Press + . A message appears on screen informing you that all other arrays (if available) will become non-bootable. Press to continue. RAID configuration and driver installation 15 - Asus NCCH-DL | Disk Array & Driver Installation Guide English Version - Page 16
The RAID 0 array becomes bootable. An asterisk precedes a bootable array for easy identification . 6. Use the up or down arrow to highlight the bootable RAID set (HostRAID#0-#0 6300ESB), then press to select. The system boots from the RAID set. 16 RAID configuration and driver installation - Asus NCCH-DL | Disk Array & Driver Installation Guide English Version - Page 17
select the RAID set you want to delete, then press . The Array Properties dialog box appears. 2. Move the cursor to D e l e t e, then press to delete the selected RAID set; otherwise, move the cursor to C a n c e l to close the dialog box. RAID configuration and driver installation 17 - Asus NCCH-DL | Disk Array & Driver Installation Guide English Version - Page 18
, press to delete the RAID set or press to abort the operation. 4. To verify if the array was deleted, select M a n a g e A r r a y s from the main menu. A N o A r r a y s P r e s e n t message pops up on the screen if no array is detected. 18 RAID configuration and driver installation - Asus NCCH-DL | Disk Array & Driver Installation Guide English Version - Page 19
select the RAID set you want to delete, then press . The Array Properties dialog box appears. 2. Move the cursor to D e l e t e, then press to delete the selected RAID set; otherwise, move the cursor to C a n c e l to close the dialog box. RAID configuration and driver installation 19 - Asus NCCH-DL | Disk Array & Driver Installation Guide English Version - Page 20
the arrow keys to select either M e m b e r # 0 or M e m b e r # 1 to delete a RAID 1 set member. Select [ N o n e ] or [ B o t h ] if you want to delete the entire array. r r a y s P r e s e n t message pops up on the screen if no array is detected. 20 RAID configuration and driver installation - Asus NCCH-DL | Disk Array & Driver Installation Guide English Version - Page 21
set. Check the system and motherboard user guide for additional information. To rebuild a RAID array: 1. Enter the Adaptec RAID Configuration Utility following the instructions in the section "Creating a RAID 0 (Stripe)." 2. Select A r r a y C o n f i g u r a t i o n U t i l i t y from the initial - Asus NCCH-DL | Disk Array & Driver Installation Guide English Version - Page 22
t u s shows the rebuilding progress. To rebuild the RAID set using the RAID management application in the operating system, press while the RAID set is being rebuilt to exit the application. A message pops up for confirmation. Press to exit. 22 RAID configuration and driver installation - Asus NCCH-DL | Disk Array & Driver Installation Guide English Version - Page 23
S150 TX4™ BIOS displays the following: 3. Press to display the FastBuild™ Utility main menu. 4. To make sure that the SATA hard disk drives are properly installed, press to view the drive assignments. When finished, press to return to the main menu. RAID configuration and driver - Asus NCCH-DL | Disk Array & Driver Installation Guide English Version - Page 24
, press to save and create a RAID 0 array. 4. A pop-up window appears. Press (Create and Quick Initialize). 5. A pop-up message appears, warning you that all existing data on the hard disk drives will be deleted. Press to continue. 24 RAID configuration and driver installation - Asus NCCH-DL | Disk Array & Driver Installation Guide English Version - Page 25
, install an operating system (OS). The OS will treat the RAID 0 array as a single drive unit. During the OS installation, the system prompts you to install third-party SCSI or RAID driver. Refer to section "2. RAID driver installation" for details. RAID configuration and driver installation 25 - Asus NCCH-DL | Disk Array & Driver Installation Guide English Version - Page 26
new SATA hard disk drives Refer to these instructions when creating a RAID 1 set using two new SATA hard displays M i r r o r. 4. After making a selection, press . 5. A pop-up window appears. Press (Create only) to create the RAID 1 set. 26 RAID configuration and driver installation - Asus NCCH-DL | Disk Array & Driver Installation Guide English Version - Page 27
, install an operating system (OS). The OS will treat the RAID 0 array as a single drive unit. During the OS installation, the system prompts you to install third-party SCSI or RAID driver. Refer to section "2. RAID driver installation" for details. RAID configuration and driver installation 27 - Asus NCCH-DL | Disk Array & Driver Installation Guide English Version - Page 28
drive and a new drive Refer to these instructions when creating a RAID 1 set using an existing bootable or data pop-up window appears. Press (Create and duplicate) to copy the existing data from the source (existing) drive to the target (new) drive. 28 RAID configuration and driver installation - Asus NCCH-DL | Disk Array & Driver Installation Guide English Version - Page 29
TX4™ BIOS checks and displays the disk array information. 9. Use the FDISK utility to format the array as a single hard drive. 10. After you have formatted the arrayed drives, install an operating system (OS). The OS will treat the RAID 1 array as a single drive unit. RAID configuration and driver - Asus NCCH-DL | Disk Array & Driver Installation Guide English Version - Page 30
Using quick initialization Refer to these instructions when creating a RAID 1 set using one or two existing hard disk drives M i r r o r. 4. After making a selection, press . 5. A pop-up window appears. Press (Create and Quick Initialize). 30 RAID configuration and driver installation - Asus NCCH-DL | Disk Array & Driver Installation Guide English Version - Page 31
TX4™ BIOS checks and displays the disk array information. 7. Use the FDISK utility to format the array as a single hard drive. 8. After you have formatted the arrayed drives, install an operating system (OS). The OS will treat the RAID 1 set as a single drive unit. RAID configuration and driver - Asus NCCH-DL | Disk Array & Driver Installation Guide English Version - Page 32
field, then select S e c u r i t y using the space bar. The M o d e field displays M i r r o r/ S t r i p e. 4. After making a selection, press . 5. A pop-up window appears. Press (Create and Quick Initialize) to create the RAID 0+1 set. 32 RAID configuration and driver installation - Asus NCCH-DL | Disk Array & Driver Installation Guide English Version - Page 33
TX4™ BIOS checks and displays the disk array information. 8. Use the FDISK utility to format the array as a single hard drive. 9. After you have formatted the arrayed drives, install an operating system (OS). The OS will treat the RAID 0+1 set as a single drive unit. RAID configuration and driver - Asus NCCH-DL | Disk Array & Driver Installation Guide English Version - Page 34
type for the selected array number. You can select Performance (RAID 0 Striping) or Security (RAID 1 Mirroring) if you installed two SATA hard disk drives. You can select a RAID 0+1 (Striping/Mirroring) if you have installed four SATA hard disk drives. 34 RAID configuration and driver installation - Asus NCCH-DL | Disk Array & Driver Installation Guide English Version - Page 35
You can manually assign the stripe block size only if you are creating a RAID 0 (Striping) or RAID 0+1(Striping/Mirroring) set. • For server systems, we to the array, then press . The A s s i g n m e n t column of the assigned drives show Y . RAID configuration and driver installation 35 - Asus NCCH-DL | Disk Array & Driver Installation Guide English Version - Page 36
TX4™ BIOS checks and displays the disk array information. 9. Use the FDISK utility to format the array as a single hard drive. 10. After you have formatted the arrayed drives, install an operating system (OS). The OS will treat the RAID set as a single drive unit. 36 RAID configuration and driver - Asus NCCH-DL | Disk Array & Driver Installation Guide English Version - Page 37
1.6.5 Deleting a RAID set The D e l e t e A r r a y menu deletes the disk array assignments and e f i n i t i o n M e n u appears displaying the hard disk drives assigned to the selected array. 4. When prompted, press + to delete the array. RAID configuration and driver installation 37 - Asus NCCH-DL | Disk Array & Driver Installation Guide English Version - Page 38
5. The D e l e t e A r r a y M e n u appears, showing that the array is successfully deleted. Press to exit. 38 RAID configuration and driver installation - Asus NCCH-DL | Disk Array & Driver Installation Guide English Version - Page 39
from errors. During POST, the FastTrak S150 TX4™ BIOS checks and displays the RAID 1 condition. The screen displays the following information if the BIOS detected an error on the array. To rebuild the with an identical (same storage capacity) drive. RAID configuration and driver installation 39 - Asus NCCH-DL | Disk Array & Driver Installation Guide English Version - Page 40
with mirrored information from the existing array drive. A progress bar indicates the duplicating process. 10. When finished, exit the utility, then restart the system. 40 RAID configuration and driver installation - Asus NCCH-DL | Disk Array & Driver Installation Guide English Version - Page 41
part provides instructions on how to install the RAID controller drivers during OS installation. 2.1 Creating a RAID driver disk You may have to use another system to create the RAID driver disk from the system/motherboard support CD or from the Internet. 2 . 1 . 1 Windows® 2000/2003 Server A floppy - Asus NCCH-DL | Disk Array & Driver Installation Guide English Version - Page 42
disk: 1. Insert a blank formatted high-density floppy disk to the floppy disk drive. 2. Explore the support CD, then copy all the files in the following folder to the floppy disk drive: \Drivers\Promise20319\Linux\RedHat 3. Eject the floppy disk. 42 RAID configuration and driver installation - Asus NCCH-DL | Disk Array & Driver Installation Guide English Version - Page 43
® 6300ESB RAID controller driver 2 . 2 . 1 Windows® 2000/2003 Server OS During Windows® 2000/2003 Server OS installation To install the Intel® 6300ESB RAID controller driver when installing Windows® 2000/2003 Server OS: 1. Boot the computer using the Windows® 2000/2003 Server installation CD. The - Asus NCCH-DL | Disk Array & Driver Installation Guide English Version - Page 44
> to select. 6. The Windows® 2000/2003 Setup loads the RAID controller drivers from the RAID driver disk. When prompted, press to continue installation. 7. Setup then proceeds with the OS installation. Follow screen instructions to continue. 44 RAID configuration and driver installation - Asus NCCH-DL | Disk Array & Driver Installation Guide English Version - Page 45
To an existing Windows® 2000/2003 Server OS To install the Intel® 6300ESB RAID controller driver on an existing Windows® 2000/2003 Server OS: 1. Restart the computer, then log in with A d m i n i s t r a t o r privileges. 2. Windows® automatically detects the RAID controller and displays a N e w H a - Asus NCCH-DL | Disk Array & Driver Installation Guide English Version - Page 46
11. Click F i n i s h after the driver installation is done. To verify the Intel® 6300ESB RAID controller driver installation: 1. Right-click the M y C o m p u t e r icon on the Windows® desktop , then select P r o p e r t i e s from the menu. 2. Click the H a r d w a r e tab, then click the D e v i - Asus NCCH-DL | Disk Array & Driver Installation Guide English Version - Page 47
® Linux 9.0 To install the Intel® 6300ESB RAID controller driver when installing Red Hat® Linux 9.0 OS: 1. Boot the system from the Red Hat® Installation CD. 2. At the boot:, type linux dd , then press . 3. Select Y e s using the key when asked if you have the driver disk. Press - Asus NCCH-DL | Disk Array & Driver Installation Guide English Version - Page 48
cursor to O K, then press . 5. When prompted, insert the Intel® 6300ESB Red Hat® Linux 9.0 driver disk to the floppy disk drive, select O K , then press . The drivers for the Intel® 6300ESB RAID controller are installed to the system. 48 RAID configuration and driver installation - Asus NCCH-DL | Disk Array & Driver Installation Guide English Version - Page 49
6. When asked if you will load additional RAID controller drivers, select N o, then press ; otherwise, select Y e s if you need to install additional RAID controller drivers. 7. Follow screen instructions to continue the OS installation. RAID configuration and driver installation 49 - Asus NCCH-DL | Disk Array & Driver Installation Guide English Version - Page 50
2.3 Installing the Promise® PDC20319 RAID controller driver 2.3.1 Windows® 2000 Server During Windows® operating system installation To install the Promise® PDC20319 RAID controller driver during Windows® 2000 Server OS installation: 1. Boot the computer using the Windows® 2000 Server installation - Asus NCCH-DL | Disk Array & Driver Installation Guide English Version - Page 51
to select. 6. The Windows® 2000 Setup loads the RAID controller drivers from the RAID driver disk. When prompted, press to continue installation. 7. Setup then proceeds with the OS installation. Follow screen instructions to continue. RAID configuration and driver installation 51 - Asus NCCH-DL | Disk Array & Driver Installation Guide English Version - Page 52
operating system Follow the same instructions in the section " I n s t a l l i n g t h e I n t e l® 6300ESB RAID controller driver: To an existing Windows® 2 0 0 0 / 2 0 0 3 S e r v e r O S" to install the Promise® PDC20319 RAID controller driver on an existing Windows® 2000 Server OS. To verify the - Asus NCCH-DL | Disk Array & Driver Installation Guide English Version - Page 53
i e s from the menu. 3. Click the D r i v e r tab, then click the D r i v e r D e t a i l s button to display the RAID controller properties. 4. Click the U n i n s t a l l button, then click O K. 5. Follow screen instructions to uninstall the driver. RAID configuration and driver installation 53 - Asus NCCH-DL | Disk Array & Driver Installation Guide English Version - Page 54
2.3.2 Windows® 2003 Server During Windows® operating system installation To install the Promise® PDC20319 RAID controller driver during Windows® 2003 Server OS installation: 1. Boot the computer using the Windows® 2003 Server installation CD. The W i n d o w s® S e t u p starts. 2. Press when - Asus NCCH-DL | Disk Array & Driver Installation Guide English Version - Page 55
press to select. 6. The Windows® Setup loads the RAID controller drivers from the RAID driver disk. When prompted, press to continue installation. 7. Setup then proceeds with the OS installation. Follow screen instructions to continue. RAID configuration and driver installation 55 - Asus NCCH-DL | Disk Array & Driver Installation Guide English Version - Page 56
To an existing Windows® operating system To install the Promise® PDC20319 RAID controller driver on an existing Windows® 2003 Server OS. 1. Restart the computer, then log in with A d m i n i s t r a t o r privileges. 2. Insert the RAID driver disk you created earlier to the floppy disk drive. 3. - Asus NCCH-DL | Disk Array & Driver Installation Guide English Version - Page 57
. Select Win Server 2003 Promise FastTrak S150 TX4 (tm) Controller, then click N e x t. 10. Click F i n i s h after the driver installation is done. To verify the Promise® PDC20319 RAID controller driver installation: 1. Right-click the M y C obeforem p u t e r icon on the Windows® desktop , then - Asus NCCH-DL | Disk Array & Driver Installation Guide English Version - Page 58
r D e t a i l s button to display the RAID controller drivers. 6. Click O K when finished. After installing the RAID controller driver, you must remove the Windows®-assigned SCSI controller driver. To do this: 1. From the C o m p u t e r M a n a g e m e n t window, click the "+" sign before the item - Asus NCCH-DL | Disk Array & Driver Installation Guide English Version - Page 59
. 4. When asked if you will load additional RAID controller drivers, select N o, then press ; otherwise, select Y e s if you need to install additional RAID controller drivers. 5. Follow screen instructions to continue the OS installation. RAID configuration and driver installation 59 - Asus NCCH-DL | Disk Array & Driver Installation Guide English Version - Page 60
provides instructions on how to install the Intel® 82547GI LAN controller drivers. 3 . 1 Windows® 2000 Server To install the Intel® 82547GI LAN controller driver on a Windows® 2000 Server OS: 1. Restart the computer, then log in with A d m i n i s t r a t o r privileges. 2. Insert the motherboard - Asus NCCH-DL | Disk Array & Driver Installation Guide English Version - Page 61
the Intel® 82547GI LAN controller driver installation: 1. Right-click the M y C o m p u t e r icon on the Windows® desktop , then tab, then click the D r i v e r D e t a i l s button to display the RAID controller drivers. 6. Click O K when finished. RAID configuration and driver installation 61 - Asus NCCH-DL | Disk Array & Driver Installation Guide English Version - Page 62
3 . 2 Windows® 2003 Server To install the Intel® 82547GI LAN controller driver on a Windows® 2003 Server OS: 1. Restart the computer, then log in with A d m i n i s t r a t o r privileges. 2. Insert the motherboard/system support CD to the optical drive, or the LAN controller driver disk to the - Asus NCCH-DL | Disk Array & Driver Installation Guide English Version - Page 63
the Intel® 82547GI LAN controller driver installation: 1. Right-click the M y C o m p u t e r icon on the Windows® desktop , then tab, then click the D r i v e r D e t a i l s button to display the RAID controller drivers. 6. Click O K when finished. RAID configuration and driver installation 63 - Asus NCCH-DL | Disk Array & Driver Installation Guide English Version - Page 64
instructions when installing the Intel® 82547GI LAN controller base driver for the in Red Hat® Linux version 5.2.x operating system. The following procedures were tested for 2.4.x kernels through 2.4.20. Building and installing the drivers being tested. 64 RAID configuration and driver installation - Asus NCCH-DL | Disk Array & Driver Installation Guide English Version - Page 65
Adapter (VGA) drivers. 4 . 1 Windows® 2000/2003 Server The Windows® 2000/2003 Server operating system automatically recognizes the ATI® RAGE XL VGA drivers during system installation. There is no need to install an additional driver(s) to support the onboard VGA. Follow these instructions to make - Asus NCCH-DL | Disk Array & Driver Installation Guide English Version - Page 66
66 RAID configuration and driver installation
-
 1
1 -
 2
2 -
 3
3 -
 4
4 -
 5
5 -
 6
6 -
 7
7 -
8
-
9
-
10
-
11
-
12
-
13
-
14
-
15
-
16
-
17
-
18
-
19
-
20
-
21
-
22
-
23
-
24
-
25
-
26
-
27
-
28
-
29
-
30
-
31
-
32
-
33
-
34
-
35
-
36
-
37
-
38
-
39
-
40
-
41
-
42
-
43
-
44
-
45
-
46
-
47
-
48
-
49
-
50
-
51
-
52
-
53
-
54
-
55
-
56
-
57
-
58
-
59
-
60
-
61
-
62
-
63
-
64
-
65
-
66
 |
 |
For
For
For
For
For
•
AP130-E1 5U Rackmount Server
AP130-E1 5U Rackmount Server
AP130-E1 5U Rackmount Server
AP130-E1 5U Rackmount Server
AP130-E1 5U Rackmount Server
•
AP1720-E2 5U Rackmount Server
AP1720-E2 5U Rackmount Server
AP1720-E2 5U Rackmount Server
AP1720-E2 5U Rackmount Server
AP1720-E2 5U Rackmount Server
•
NCCH-DL Motherboard
NCCH-DL Motherboard
NCCH-DL Motherboard
NCCH-DL Motherboard
NCCH-DL Motherboard
•
PSCH-L Motherboard
PSCH-L Motherboard
PSCH-L Motherboard
PSCH-L Motherboard
PSCH-L Motherboard
RAID configuration and
driver installation guide
Server systems and
motherboards